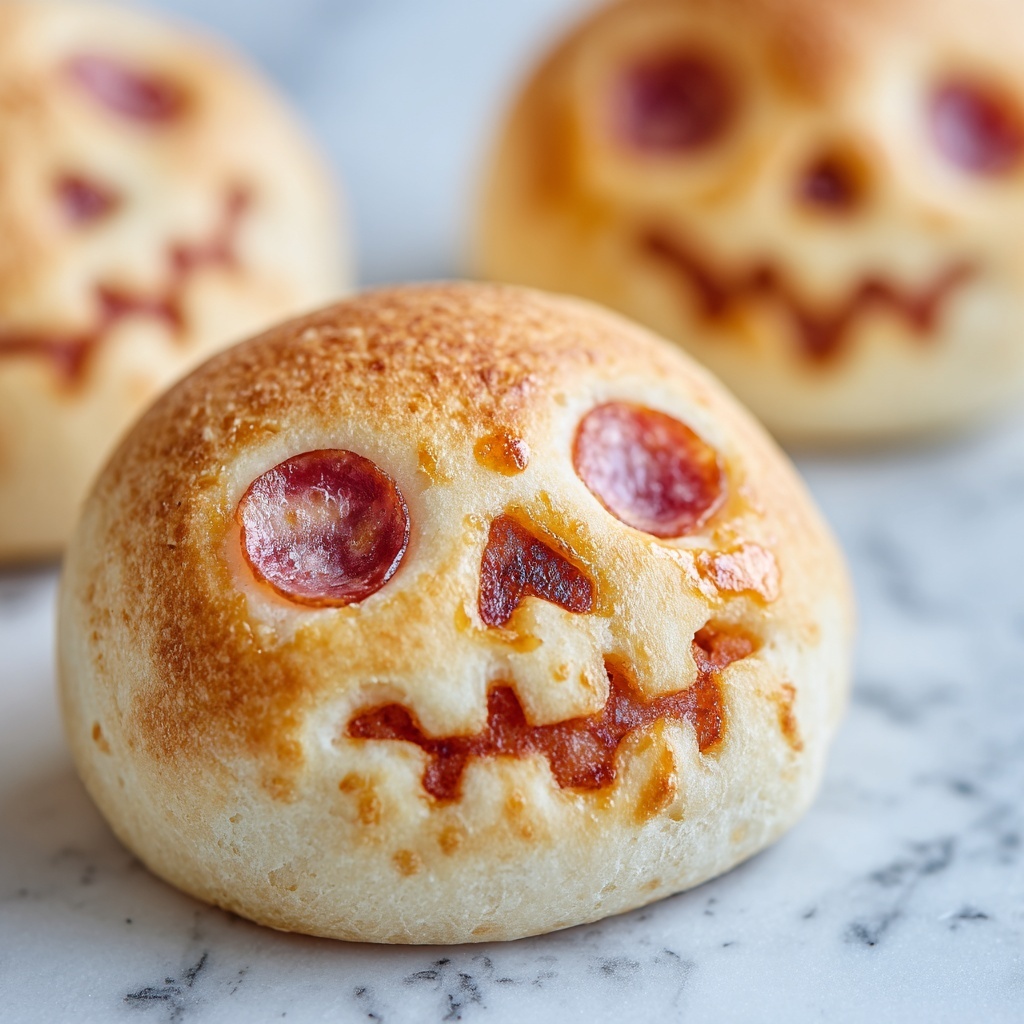
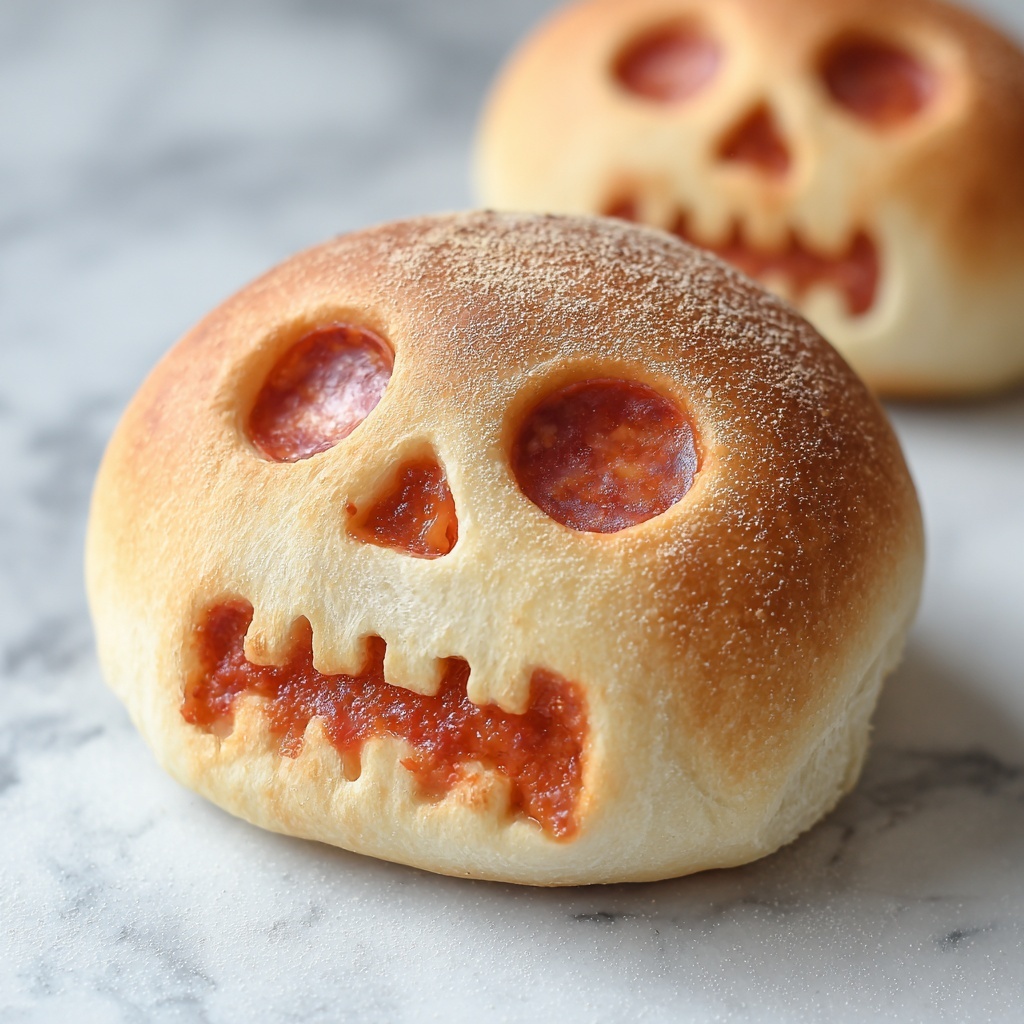
If you’re craving a spooky yet irresistibly delicious treat this fall, the Cheesy Halloween Pizza Skulls Recipe is here to become your new favorite. This fun, festive pizza takes traditional flavors and gives them a playful twist by shaping each serving into a delightful little skull loaded with gooey mozzarella, zesty sauce, and your choice of savory fillings. They’re quick to prepare, perfect for sharing at Halloween parties, and guaranteed to make your guests smile with every cheesy bite. Let’s dive into the magic behind these hauntingly tasty pizza skulls!
Ingredients You’ll Need
Simple, easy-to-find ingredients come together to create the perfect balance of flavor and texture in this Cheesy Halloween Pizza Skulls Recipe. Each element plays a vital role: the soft pizza dough forms a golden, sturdy skull shell, while the cheeses melt into a luscious center that binds all the delicious fillings.
- 13 to 16 ounces pre-made pizza dough: Provides the soft, chewy base that crisps up beautifully and holds all the fillings inside.
- 3/4 to 1 cup pizza sauce: Adds tangy, savory moisture that pairs perfectly with melty cheese.
- 2 cups shredded mozzarella cheese: This cheese melts into gooey, stringy goodness, making these skulls irresistibly cheesy.
- 1/4 cup Parmesan cheese (optional): Sprinkled on top for a salty, slightly sharp contrast that elevates each bite.
- Optional fillings like cooked sausage, mini pepperoni, sliced black olives, chopped ham: These add extra layers of flavor and texture to customize your pizza skulls exactly how you like.
- To serve: marinara sauce: Perfect for dipping and boosting every cheesy mouthful.
- Chopped parsley or basil for garnish: Adds fresh color and a hint of herbal brightness.
How to Make Cheesy Halloween Pizza Skulls Recipe
Step 1: Prep the Baking Pan
Start by giving your mini skull baking pan a good spray with non-stick cooking spray. This step is crucial to ensure your pizza skulls pop out easily after baking, keeping their spooky shapes intact.
Step 2: Prepare the Dough
Lightly dust your work surface with flour to prevent sticking, then roll out or pat your pizza dough to about 1/4 inch thickness. Cut it into six rectangles that fit perfectly inside each skull mold. This precise thickness creates that perfect balance between sturdy crust and tender bite.
Step 3: Assemble the Skulls
Press each dough rectangle gently but firmly into the skull pan cavities. Fill each one with a spoonful of pizza sauce, a generous handful of shredded mozzarella, a sprinkle of Parmesan (if using), and any delicious optional fillings you desire like sausage or olives. For a fun finishing touch, add a little more sauce on top before sealing.
Step 4: Seal the Skulls
Fold the dough over the toppings carefully and pinch the edges tightly to seal in all the cheesy goodness. This ensures that while baking, all those savory flavors stay trapped inside each skull, creating a melty surprise.
Step 5: Chill the Skulls
Pop the tray into the refrigerator as you preheat your oven to 400°F (200°C). The chilling step helps the dough relax and keeps the edges from opening up during baking, so your pizza skulls keep their shape beautifully.
Step 6: Bake the Pizza Skulls
Bake your skulls in the preheated oven for 16 to 20 minutes until the dough is golden brown and cooked through. You’ll know they’re ready when the crust has a crisp, inviting color and cheese bubbles through any seams.
Step 7: Cool and Serve
Let the pizza skulls cool in the pan for about 5 minutes—that’s the perfect moment for all the flavors to settle. Then carefully unmold them and serve with extra marinara sauce for dipping, garnished with fresh parsley or basil to brighten up the plate.
How to Serve Cheesy Halloween Pizza Skulls Recipe

Garnishes
Fresh herbs like chopped parsley or basil not only add a splash of forest green against the golden crust but also provide a subtle aromatic lift that makes each bite even more irresistible. Don’t be shy to sprinkle some Parmesan over the top right before serving for that final cheesy touch.
Side Dishes
These pizza skulls pair wonderfully with simple side dishes like crisp garden salad, roasted vegetables, or even a warm cup of tomato soup. Each side complements the rich, melty center with fresh or earthy flavors, making your Halloween meal balanced and satisfying.
Creative Ways to Present
For an extra spooky but fun presentation, arrange your pizza skulls on a large platter with dollops of marinara sauce shaped like dripping blood. You can also scatter some edible flowers or small candy eyeballs nearby to delight children and adults alike. Turning these into bite-sized appetizers by cutting each skull in half is a fantastic idea for party settings!
Make Ahead and Storage
Storing Leftovers
If you have any pizza skulls left over (though it’s hard to resist), store them in an airtight container in the refrigerator. They will keep deliciously fresh for up to 2 days, maintaining their gooey center and crisp crust.
Freezing
You can freeze unbaked pizza skulls by placing the assembled pan in the freezer for a couple of hours before transferring the skulls to a freezer-safe container or bag. When you’re ready to bake, just thaw them overnight in the refrigerator and proceed as usual. This is perfect for busy days when you want to impress with minimal prep.
Reheating
To reheat leftover pizza skulls, pop them in a preheated oven at 350°F (175°C) for about 10 minutes to refresh the crust and melt the cheese again. Avoid microwaving if possible, as this can make the dough soggy and the cheese lose its luscious texture.
FAQs
Can I use homemade pizza dough for this recipe?
Absolutely! Homemade pizza dough works wonderfully in the Cheesy Halloween Pizza Skulls Recipe. Just be sure your dough is rolled out to the right thickness so it molds well and cooks evenly.
What are some good vegetarian filling options?
Try baby spinach, sautéed mushrooms, roasted red peppers, or black olives for a tasty vegetarian twist. These add plenty of flavor and contrast nicely with the gooey cheeses.
How do I prevent the skulls from leaking the filling during baking?
Make sure to pinch the edges tightly and chill the assembled skulls before baking. This helps seal everything inside and keeps your pizza skulls perfectly intact.
Can I double this recipe for a larger party?
Definitely! Just multiply the ingredients accordingly and use multiple skull pans or bake in batches. These little pizza skulls are party crowd-pleasers, so they disappear fast.
Is it okay to add extra cheese inside?
More cheese equals more fun in this recipe, so go ahead and add extra mozzarella or Parmesan if you want even cheesi-er pizza skulls. Just be sure not to overfill so the dough seals properly.
Final Thoughts
If you want a Halloween recipe that combines festive fun and mouthwatering flavor, you simply must try the Cheesy Halloween Pizza Skulls Recipe. It’s easy to make, endlessly customizable, and a guaranteed hit at any gathering. I promise these pizza skulls will bring a cheeky smile to your celebration and keep everyone coming back for more cheesy bites. So grab your pizza dough and skull pan, and let’s get baking!
Print
Cheesy Halloween Pizza Skulls Recipe
- Prep Time: 10 minutes
- Cook Time: 20 minutes
- Total Time: 30 minutes
- Yield: 6 servings
- Category: Snack
- Method: Baking
- Cuisine: Italian-American
Description
This fun and festive Cheesy Halloween Pizza Skulls recipe features mini pizza pockets shaped like skulls, filled with gooey mozzarella, tangy pizza sauce, and a variety of optional savory fillings. Perfect for Halloween parties or spooky-themed meals, these handheld delights bake up golden and crispy, served with marinara sauce for dipping and garnished with fresh herbs.
Ingredients
Pizza Dough and Sauce
- 13 to 16 ounces pre-made pizza dough (boxed or fresh)
- 3/4 to 1 cup pizza sauce
Cheeses
- 2 cups shredded mozzarella cheese
- 1/4 cup Parmesan cheese (optional)
Optional Fillings
- 8 oz cooked sausage
- 6 oz mini pepperoni
- Sliced black olives
- Chopped ham
- Crumbled crispy bacon
- Mini Italian meatballs
- Cooked corn kernels
- Baby spinach
- Fresh basil
To Serve
- Marinara sauce for dipping
- Chopped parsley or basil for garnish
Other
- Non-stick cooking spray for pan
- Flour for dusting work surface
Instructions
- Prep the Baking Pan: Spray the mini skull baking pan thoroughly with non-stick cooking spray to prevent the dough from sticking during baking.
- Prepare the Dough: Lightly dust your work surface with flour. Roll, pat, or stretch the pizza dough out to about 1/4 inch thickness. Cut the dough into 6 equal rectangles sized to fit the cavities of your skull baking pan.
- Assemble the Skulls: Press each dough rectangle gently into a skull-shaped cavity of the prepared baking pan. Spoon pizza sauce into the center, add shredded mozzarella cheese, sprinkle with Parmesan if using, and add desired optional fillings like sausage, pepperoni, or veggies. Top with a small spoonful of sauce on each filled cavity.
- Seal the Skulls: Fold the dough over the filling to cover it completely, then pinch the edges firmly to seal each pizza skull, ensuring none of the filling leaks out while baking.
- Chill the Skulls: Place the baking pan with assembled pizza skulls into the refrigerator to chill while you preheat the oven. This helps keep their shape during baking.
- Bake the Pizza Skulls: Preheat your oven to 400°F (200°C). Bake the chilled pizza skulls for 16 to 20 minutes, or until the dough is golden brown and fully cooked through, with cheese melted inside.
- Cool and Serve: Allow the pizza skulls to cool in the pan for about 5 minutes to firm up before carefully unmolding. Serve warm with marinara sauce on the side for dipping and garnish with freshly chopped parsley or basil for a vibrant finish.
Notes
- If you do not have a skull-shaped baking pan, you can use another shaped mold or create freeform stuffed pizza pockets.
- Feel free to customize fillings based on your preferences or dietary needs, including vegetarian options like spinach and basil.
- Chilling the assembled pizza skulls before baking helps maintain their shape and prevents dough from spreading.
- Watch the baking time closely as ovens vary; bake until dough is fully cooked and golden brown.
- Store leftovers in an airtight container in the refrigerator and reheat in the oven for best results.

