
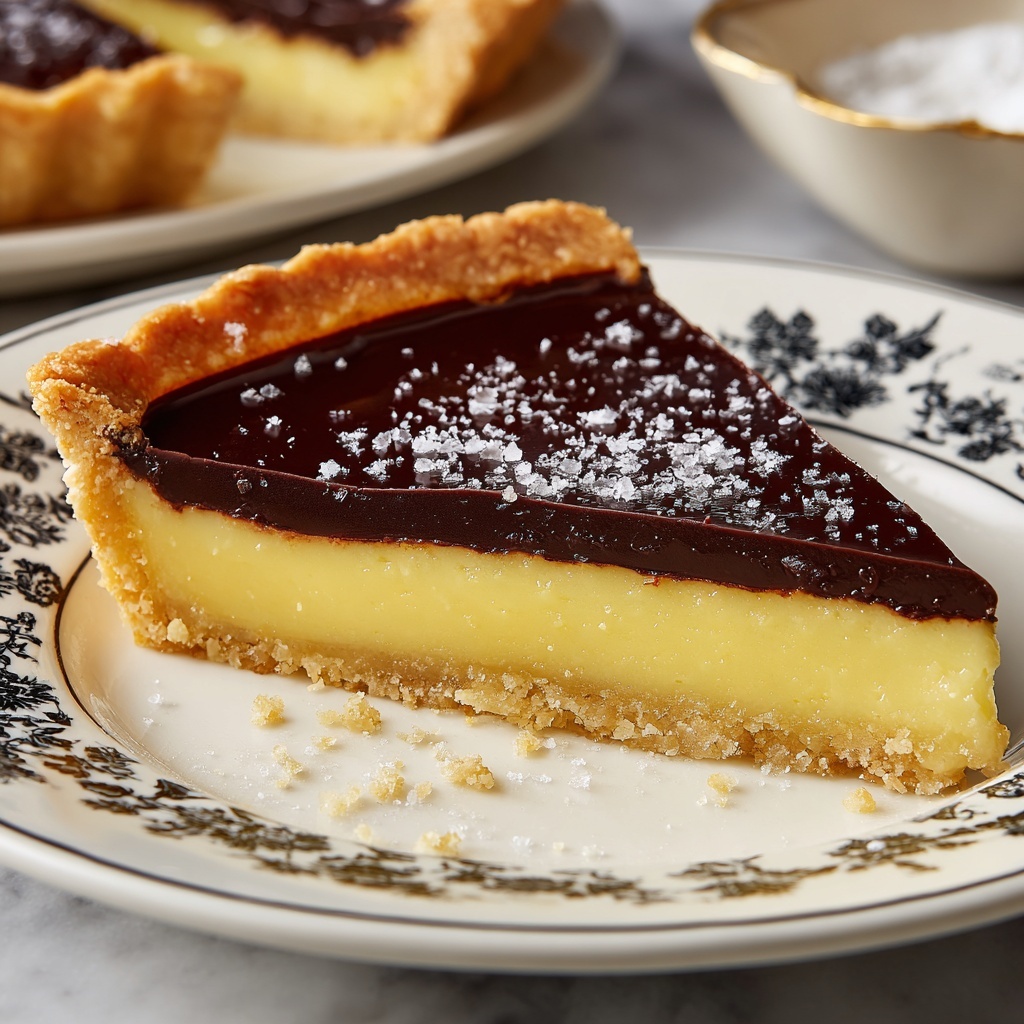
If you’re on the lookout for a timeless dessert that hits all the sweet, creamy, and chocolatey notes you crave, then this Old-Fashioned Chocolate Pie Recipe is the answer. It’s the kind of pie that reminds you of cherished family gatherings, cozy afternoons, and that nostalgic charm only a classic homemade treat can bring. With a luscious yet simple chocolate filling nestled in a crisp pie crust, this pie delivers pure comfort with every bite, making it a dependable favorite you’ll want to bake again and again.
Ingredients You’ll Need
Gathering the right ingredients for this pie is straightforward, yet each component plays a crucial role in building its rich flavor and luscious texture. From the rich cocoa to the creamy milk and buttery finish, every item is essential to achieve that perfect Old-Fashioned Chocolate Pie Recipe magic.
- Prepared 9-inch pie crust: Use a baked pie crust to ensure a crisp base that holds up to the creamy filling without sogginess.
- 1 cup granulated sugar: Adds the perfect sweetness to balance the cocoa’s natural bitterness.
- 1/3 cup unsweetened cocoa powder: Provides a deep, authentic chocolate flavor that shines through.
- 1/4 cup cornstarch: This thickener is key to creating that silky, pudding-like consistency.
- 1/4 teaspoon salt: Enhances all the other flavors, making the chocolate taste even richer.
- 2 3/4 cups whole milk: Gives the filling its creamy body and smooth mouthfeel.
- 4 large egg yolks (lightly beaten): Adds richness and helps set the filling nicely without cracking.
- 2 tablespoons unsalted butter: Introduces a glossy finish and a subtle buttery softness to the chocolate custard.
- 1 1/2 teaspoons vanilla extract: Adds a warm, aromatic note that complements the chocolate beautifully.
- Whipped cream or meringue (optional): A fluffy topping that adds lightness and an extra layer of indulgence.
How to Make Old-Fashioned Chocolate Pie Recipe
Step 1: Prepare the Chocolate Base
Start by whisking together the sugar, cocoa powder, cornstarch, and salt in a medium saucepan. This dry mix ensures the intense chocolate flavor is evenly spread and beautifully smooth. Gradually whisk in the milk, which transforms the powders into a creamy liquid base that will soon become your filling’s foundation.
Step 2: Thicken the Filling
Cook the mixture over medium heat, stirring constantly to prevent lumps. After 7 to 10 minutes, you’ll see it bubble and thicken—this is when the magic begins. The warmth gently activates the cornstarch, turning your mixture into a luscious chocolate custard that begs for a spoon (but patience, it’s for the pie!).
Step 3: Temper the Egg Yolks
To prevent scrambling, slowly whisk a small amount of the hot chocolate mixture into your beaten egg yolks. This tempering step brings the eggs up to temperature gradually. Then whisk the egg mixture back into the saucepan. This careful process results in a silky, smooth filling that sets perfectly in the crust.
Step 4: Finish the Filling
Continue cooking the filling on low heat for 2 to 3 minutes until it becomes thick and glossy, signaling it’s ready to shine in your pie crust. Remove from heat and stir in butter and vanilla extract for added richness and depth. This step transforms your pie filling from straightforward chocolate pudding to classic, indulgent Old-Fashioned Chocolate Pie Recipe perfection.
Step 5: Assemble and Chill
Pour the steaming hot chocolate filling into your baked pie crust. Smooth the top with a spatula and let it cool at room temperature for 30 minutes before refrigerating. A good chill—at least 4 hours—helps the pie set into that firm, sliceable texture everyone loves. Resist the urge to dig in too soon; the wait is absolutely worth it!
How to Serve Old-Fashioned Chocolate Pie Recipe

Garnishes
Nothing beats a cloud of fresh whipped cream or a light meringue crown to top this pie. These additions add a delicate contrast to the deep chocolate flavor. For an extra special touch, sprinkle shaved chocolate, toasted nuts, or a pinch of flaky sea salt on top.
Side Dishes
Serve alongside a scoop of vanilla ice cream or fresh berries to balance the rich chocolate. A cup of strong coffee or a creamy latte pairs wonderfully, making your dessert moment feel like a little celebration every time.
Creative Ways to Present
For dinner parties or special occasions, consider individual mini pies or chocolate tartlets using this same recipe. Layering this pie with crushed cookies or a drizzle of caramel on top can create an exciting twist that your guests won’t forget. Presentation is all about fun and bringing that nostalgic love for old-fashioned desserts into a modern setting.
Make Ahead and Storage
Storing Leftovers
This pie keeps beautifully covered in the fridge for 3 to 4 days. Store it in an airtight container or wrap tightly with plastic wrap to maintain moisture and prevent it from absorbing other flavors.
Freezing
If you want to save some for later, this pie freezes well. Wrap it securely in plastic wrap followed by aluminum foil and freeze for up to one month. Thaw in the fridge overnight before serving to preserve its luscious texture.
Reheating
Because it’s a custard-style pie, reheating is not recommended. Serve chilled for the best taste and texture, and enjoy the creamy consistency that only comes from proper chilling.
FAQs
Can I use a homemade pie crust for this recipe?
Absolutely! A homemade pie crust adds a lovely personal touch and can be tailored to your preference, whether you like it flaky or buttery. Just make sure to bake it beforehand so that it stays crisp under the chocolate filling.
What if I want a more intense chocolate flavor?
You can stir in a handful of semisweet chocolate chips into the warm filling before pouring it into the crust. This melts into the custard, giving your pie an extra rich and decadent chocolate punch.
Is it possible to make this pie dairy-free?
Yes, you can substitute whole milk with a full-fat non-dairy milk such as coconut or oat milk, but be aware the texture and flavor may differ slightly from the classic version.
Can I make this pie ahead of time for a party?
Definitely! This pie actually benefits from some resting time so the flavors develop fully. Prepare it a day ahead and chill it overnight, ensuring it’s perfectly set and ready to impress your guests.
What’s the best way to slice this pie?
Use a sharp knife dipped in hot water and wiped dry between each cut. This helps make clean slices without disturbing the glossy filling or crumbly crust.
Final Thoughts
This Old-Fashioned Chocolate Pie Recipe is a timeless dessert that brings pure joy with every forkful. Whether you’re new to baking or a seasoned veteran, its simple ingredients and straightforward technique make it a reliable, crowd-pleasing favorite. So grab your whisk, gather your ingredients, and start making memories with this wonderful classic pie—you’ll be so glad you did!
Print
Old-Fashioned Chocolate Pie Recipe
- Prep Time: 10 minutes
- Cook Time: 15 minutes
- Total Time: 4 hours 25 minutes
- Yield: 8 slices
- Category: Dessert
- Method: Stovetop
- Cuisine: American
- Diet: Vegetarian
Description
This classic Old-Fashioned Chocolate Pie features a rich, creamy chocolate filling nestled in a flaky baked pie crust. Made with simple pantry ingredients like cocoa powder, cornstarch, and whole milk, this dessert is cooked on the stovetop to create a smooth, glossy pudding-like texture. Perfectly chilled and optionally topped with whipped cream or meringue, it’s a comforting American dessert with deep chocolate flavor that’s easy to prepare and sure to satisfy any sweet tooth.
Ingredients
Pie Crust
- 1 prepared 9-inch pie crust (baked)
Chocolate Filling
- 1 cup granulated sugar
- 1/3 cup unsweetened cocoa powder
- 1/4 cup cornstarch
- 1/4 teaspoon salt
- 2 3/4 cups whole milk
- 4 large egg yolks (lightly beaten)
- 2 tablespoons unsalted butter
- 1 1/2 teaspoons vanilla extract
Topping (Optional)
- Whipped cream or meringue for topping
Instructions
- Mix dry ingredients: In a medium saucepan, whisk together the granulated sugar, unsweetened cocoa powder, cornstarch, and salt until well combined.
- Add milk gradually: Gradually whisk in the whole milk, stirring constantly to create a smooth mixture without lumps.
- Cook until thickened: Place the saucepan over medium heat and cook the mixture, stirring constantly, until it begins to bubble and thickens, about 7 to 10 minutes.
- Temper the eggs: Reduce heat to low. Slowly pour a small amount of the hot chocolate mixture into the lightly beaten egg yolks while whisking quickly to prevent the eggs from curdling.
- Combine egg mixture: Pour the tempered egg yolks back into the saucepan with the chocolate mixture, whisking constantly to combine smoothly.
- Cook further: Continue cooking the mixture for another 2 to 3 minutes over low heat until the filling becomes thick and glossy.
- Add butter and vanilla: Remove the saucepan from heat and stir in the unsalted butter and vanilla extract until fully melted and incorporated.
- Fill the crust: Pour the warm chocolate filling into the baked and cooled 9-inch pie crust, spreading evenly to smooth the top.
- Cool and chill: Allow the pie to cool at room temperature for 30 minutes, then refrigerate for at least 4 hours or until fully set.
- Serve: Before serving, optionally top with whipped cream or meringue for extra indulgence.
Notes
- For a deeper chocolate flavor, add a handful of semisweet chocolate chips to the filling while it’s still warm and stir until melted.
- Use either homemade or store-bought pie crust, but ensure it is pre-baked and cooled to prevent a soggy bottom.
