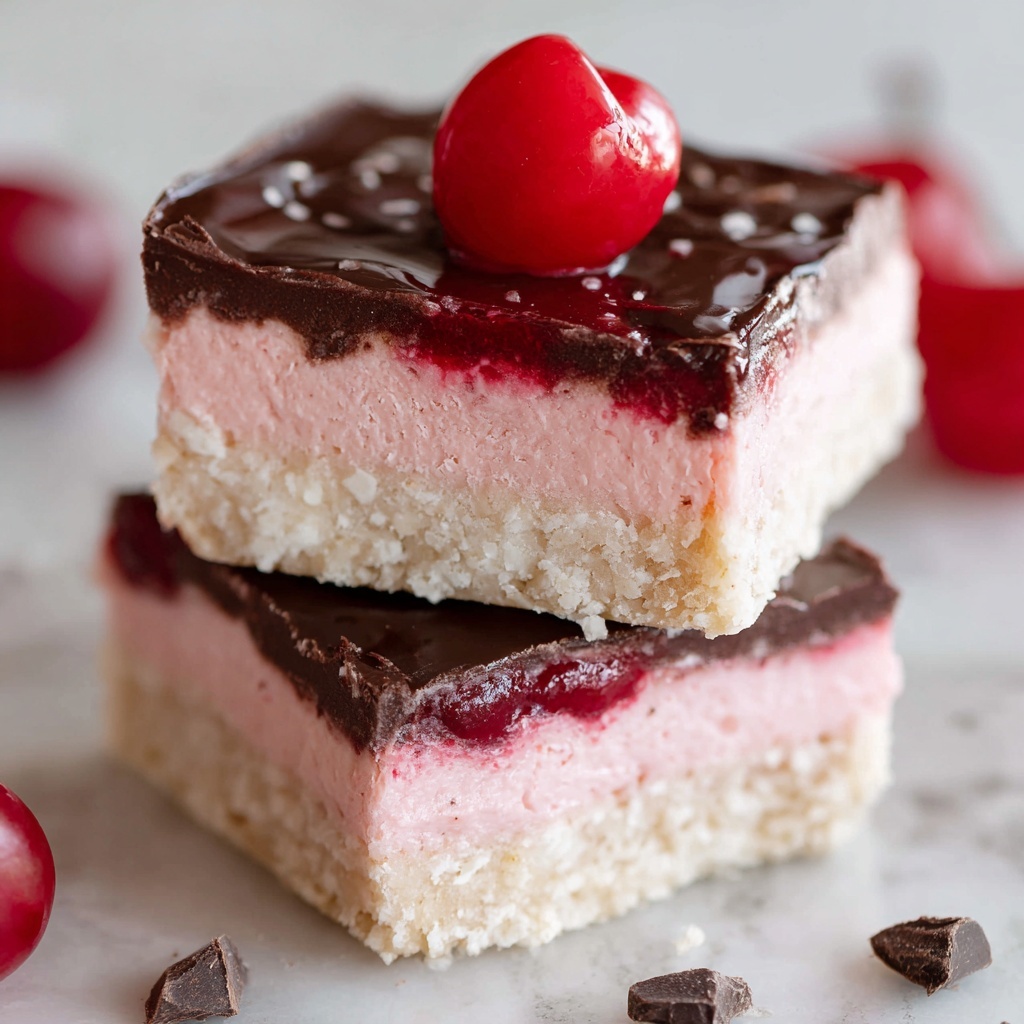
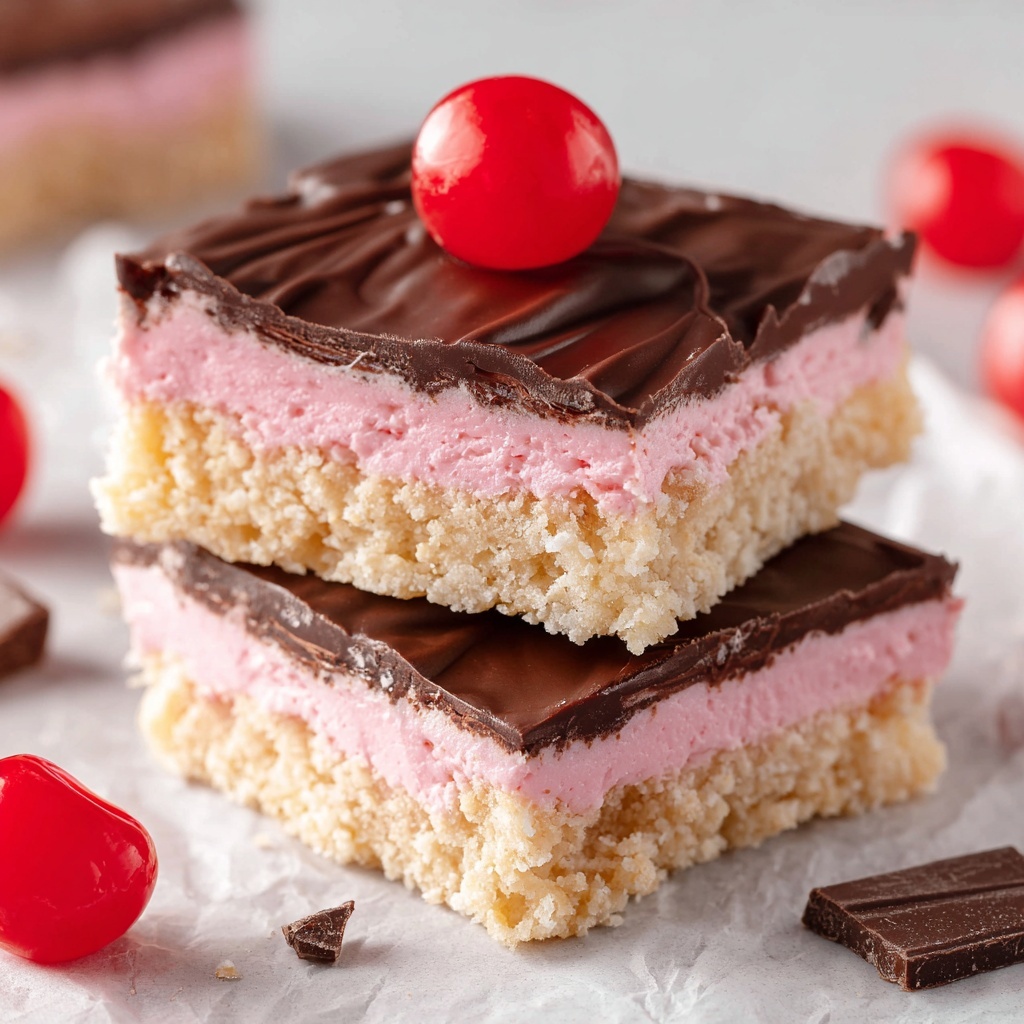
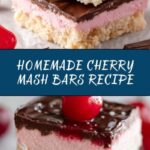
If you have a sweet tooth and a soft spot for nostalgic treats, then you are going to absolutely adore this Homemade Cherry Mash Bars Recipe. Imagine luscious layers of gooey cherry-flavored marshmallow fudge topped with a rich chocolate-peanut butter blend sprinkled with crunchy salted peanuts—each bite is a beautiful harmony of flavors and textures. These bars are easy to whip up but taste like something out of a fancy confectionery, making them the perfect showstopper for gatherings or a delightful homemade indulgence any day of the week.
Ingredients You’ll Need
Gathering the ingredients for this recipe is a joy because each one plays a special role in creating the perfect balance of taste, texture, and color. The list is simple, but together these essentials bring out the magic of this dessert.
- Granulated sugar: Sweetens and helps create a smooth, candy-like base for the cherry layer.
- Evaporated milk: Adds creamy richness that thickens the mixture beautifully.
- Salt: Enhances all the sweet flavors and balances the overall taste.
- Large marshmallows: Key for that characteristic chewy, melt-in-your-mouth texture.
- Unsalted butter: Gives the bars a luscious, velvety finish without extra saltiness.
- Cherry chips (or substitute): Impart the vibrant cherry flavor and lovely pink color that’s signature to this treat.
- Vanilla extract: Adds depth and rounds out the cherry’s tart notes (omit if using cherry extract).
- Semi-sweet chocolate chips: The rich chocolate layer that perfectly complements the fruity cherry base.
- Creamy peanut butter: Blends smoothly with chocolate for that irresistible nutty creaminess.
- Salted peanuts, crushed: Adds crunchy texture and a salty contrast that elevates every bite.
How to Make Homemade Cherry Mash Bars Recipe
Step 1: Prepare the Pan
Start by greasing a 9×13-inch baking dish with butter or non-stick spray. This small step is crucial because it ensures that once your cherry mash bars are set and ready, they will slide right out without any sticky mess or crumbling.
Step 2: Make the Cherry Layer
In a medium saucepan set over medium heat, combine the granulated sugar, evaporated milk, salt, marshmallows, and unsalted butter. Stir this mixture continuously until it starts to gently boil. Keep a close eye and stir often to prevent it from burning, aiming for a perfect smoothness. After boiling for about 5 minutes, remove the pan from heat and immediately stir in your cherry chips (or the alternative mix of white almond bark, cherry extract, and red food coloring) along with the vanilla extract if you’re using it. Mix everything until the cherry chips melt fully into a glossy, pink-hued fudge. Pour this luscious cherry mixture into your prepared pan, spreading it evenly, then set it aside to cool and firm up while you prepare the next layer.
Step 3: Prepare the Chocolate-Peanut Layer
Using a double boiler or a heatproof bowl over simmering water, melt the semi-sweet chocolate chips gently, stirring until silky smooth. Take the melted chocolate off the heat and stir in the creamy peanut butter until perfectly combined. Finally, fold in the crushed salted peanuts, giving the mixture that wonderful crunchy element that contrasts so well with the fudgy textures.
Step 4: Assemble the Bars
After your cherry layer has fully set and looks firm to the touch, pour the chocolate-peanut mixture evenly over the top. Spread it out with a spatula, making sure to cover every inch so you get that perfect layered effect. Then pop the whole dish into the refrigerator and let it chill for at least 2 hours until it is completely firm.
Step 5: Serve
When you’re ready to enjoy, simply remove the bars from the fridge and cut them into generous squares. These bars are best served chilled to keep the layers firm and the textures intact. Store any extras in an airtight container in the refrigerator to keep their freshness and gooey goodness intact.
How to Serve Homemade Cherry Mash Bars Recipe

Garnishes
If you want to add a little flair when serving, consider sprinkling some extra crushed salted peanuts or even a few whole cherries on top right before serving. A light dusting of powdered sugar can also add a pretty snowy effect, making them look just as delightful as they taste.
Side Dishes
These bars are a rich and sweet treat that pairs wonderfully with a scoop of vanilla ice cream or a dollop of whipped cream to cut through the sweetness. A fresh fruit salad with tart berries or citrus slices can also provide a refreshing contrast on the side.
Creative Ways to Present
For parties, arrange your bars on a decorative platter and drizzle with a little melted white chocolate for extra elegance. Wrapping individual bars in parchment paper or cellophane tied with a ribbon makes for adorable homemade gifts that anyone would be thrilled to receive.
Make Ahead and Storage
Storing Leftovers
Leftover Homemade Cherry Mash Bars keep beautifully in an airtight container in the refrigerator for up to a week. This not only preserves their freshness but also maintains the delightful textural contrast between the chewy cherry layer and the crunchy peanut topping.
Freezing
If you want to enjoy these bars over a longer period, they freeze wonderfully. Wrap individual bars tightly in plastic wrap and place them in a freezer-safe container or bag. They keep well for up to 3 months and thaw quickly when you’re ready for a sweet treat.
Reheating
These bars are best enjoyed chilled or at room temperature, but if you want to warm them slightly, give them a few seconds in the microwave—just enough to soften the chocolate slightly without melting everything into a mess.
FAQs
Can I substitute the cherry chips with something else?
Absolutely! If you can’t find cherry chips, you can use white almond bark combined with cherry extract and a touch of red food coloring to mimic the flavor and color effectively.
Is it necessary to use evaporated milk?
Yes, evaporated milk adds a creamy richness and helps achieve the right fudge-like consistency. Using regular milk won’t give the same dense texture for the cherry layer.
Can I make these bars nut-free?
Definitely. Simply omit the peanut butter and salted peanuts, and replace the peanut butter with additional chocolate chips or another nut-free spread like sunflower seed butter.
How long will the bars stay fresh?
Stored properly in the refrigerator, these cherry mash bars will remain fresh and delicious for about a week, allowing you to savor them day after day.
Can I double the recipe?
Yes! Doubling the recipe is straightforward—just use a larger pan or two 9×13-inch pans so the layers don’t get too thick and won’t set properly.
Final Thoughts
I can’t recommend enough giving this Homemade Cherry Mash Bars Recipe a try if you crave something sweet, nostalgic, and utterly satisfying. The way the cherry and chocolate peanut layers come together creates a treat that’s both familiar and wonderfully indulgent. Whether it’s for a family gathering, a special occasion, or just a personal pick-me-up, these bars are sure to bring joy with every bite.
Print
Homemade Cherry Mash Bars Recipe
- Prep Time: 10 minutes
- Cook Time: 10 minutes
- Total Time: 2 hours 20 minutes
- Yield: 24 servings
- Category: Dessert
- Method: No-Cook
- Cuisine: American
Description
These Homemade Cherry Mash Bars are a delightful no-bake treat featuring a rich cherry-flavored base topped with a creamy chocolate and peanut butter layer, finished with crunchy salted peanuts. Perfect for sharing at parties or enjoying as a satisfying sweet snack.
Ingredients
Cherry Layer
- 2 cups granulated sugar
- ⅔ cup evaporated milk
- ¼ teaspoon salt
- 12 large marshmallows
- ½ cup unsalted butter
- 6 ounces cherry chips (or substitute with 6 ounces white almond bark, 1 teaspoon cherry extract, and red food coloring)
- 1 teaspoon vanilla extract (omit if using cherry extract)
Chocolate-Peanut Layer
- 12 ounces semi-sweet chocolate chips
- ¾ cup creamy peanut butter
- 1 cup salted peanuts, crushed
Instructions
- Prepare the Pan: Grease a 9×13-inch baking dish with butter or non-stick spray to ensure the bars can be removed easily once set.
- Make the Cherry Layer: In a medium saucepan over medium heat, combine the granulated sugar, evaporated milk, salt, marshmallows, and unsalted butter. Stir continuously until the mixture reaches a gentle boil.
- Cook Cherry Mixture: Continue cooking the mixture at a gentle boil for 5 minutes, stirring frequently to avoid burning.
- Add Cherry Flavor: Remove the saucepan from heat and stir in the cherry chips (or the almond bark substitute with cherry extract and red food coloring) and vanilla extract until smooth and fully melted.
- Set Cherry Layer: Pour the cherry mixture into the prepared baking dish, spreading it evenly. Allow it to cool and set at room temperature.
- Melt Chocolate: In a double boiler or a heatproof bowl placed over simmering water, melt the semi-sweet chocolate chips, stirring occasionally until smooth.
- Add Peanut Butter: Stir the creamy peanut butter into the melted chocolate until fully combined.
- Incorporate Peanuts: Fold the crushed salted peanuts gently into the chocolate-peanut mixture ensuring even distribution.
- Assemble the Bars: Once the cherry layer has set, pour the chocolate-peanut mixture over it and spread evenly to cover the entire surface.
- Chill: Refrigerate the assembled bars for at least 2 hours or until the chocolate-peanut layer is fully set and firm.
- Serve: Cut the bars into squares and serve chilled. Store leftovers in an airtight container in the refrigerator for freshness.
Notes
- You can substitute cherry chips with white almond bark, cherry extract, and red food coloring if cherry chips are unavailable.
- Use a double boiler method to melt chocolate gently to prevent burning.
- Ensure the cherry layer is completely set before adding the chocolate-peanut layer for best results.
- Store bars in an airtight container in the fridge to maintain texture and flavor.