
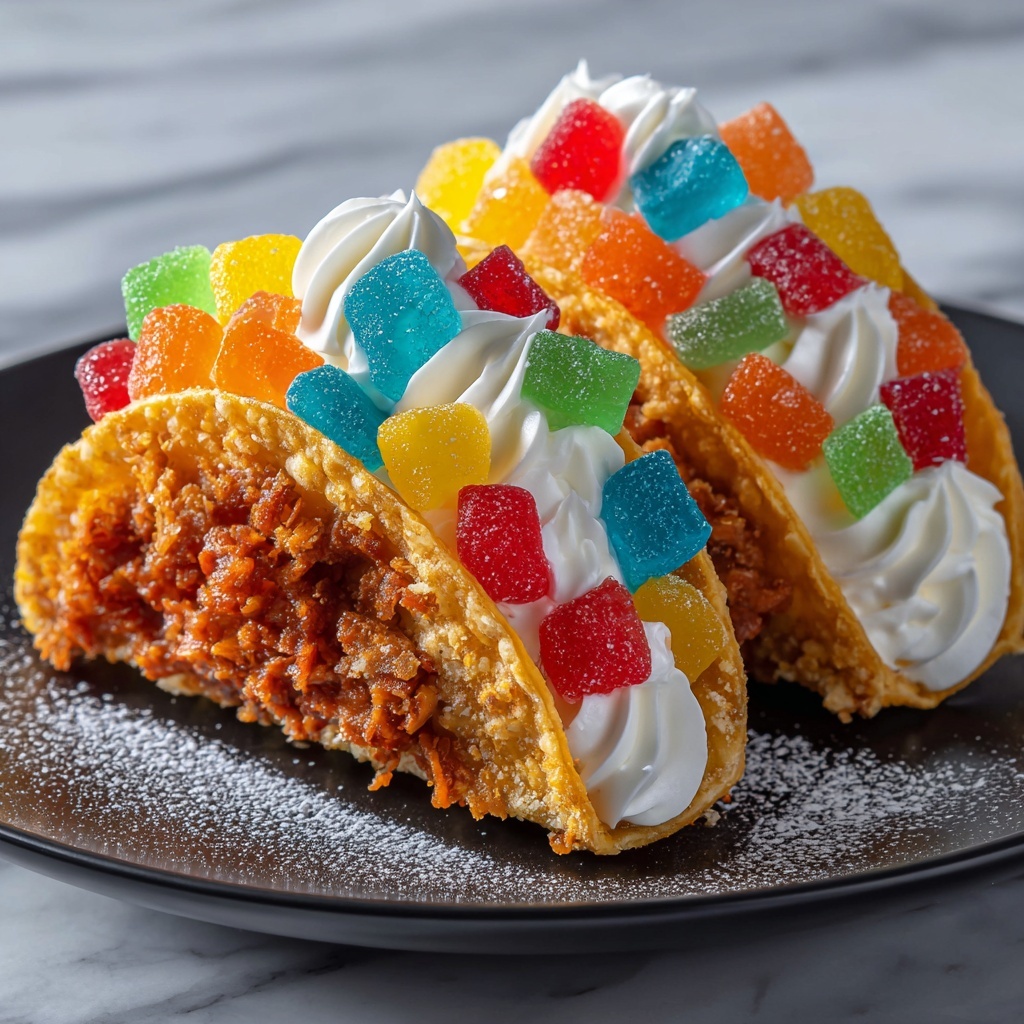
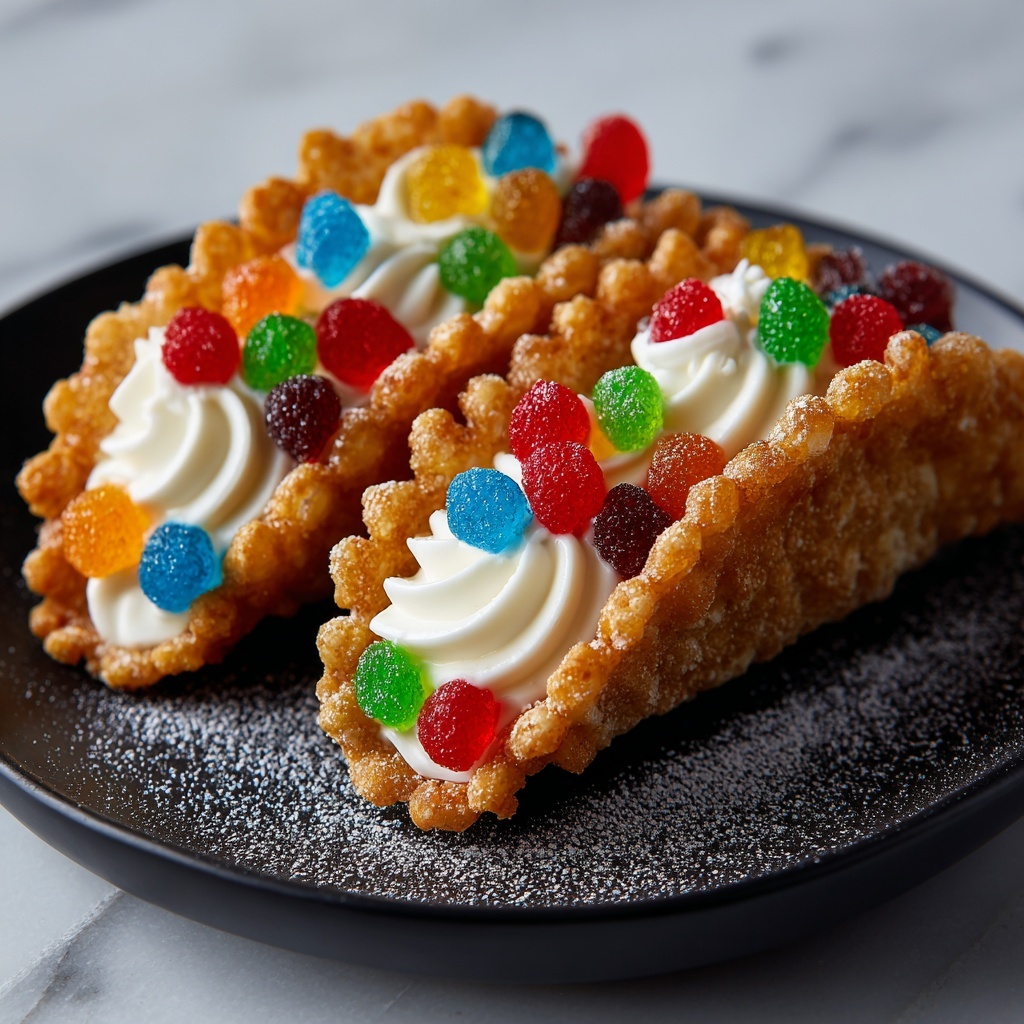
If you’re craving a dessert that’s playful, colorful, and irresistibly creamy, the Fruity Pebbles Cheesecake Tacos Recipe is exactly what you need. Imagine vibrant, crunchy Fruity Pebbles taco shells hugging a silky-smooth cheesecake filling, topped with fresh berries and whipped cream—each bite bursting with nostalgic cereal fun and rich dessert indulgence. It’s a delightful twist on two beloved treats combined into one unforgettable treat that’s sure to brighten any gathering or cozy night in.
Ingredients You’ll Need
Gathering these ingredients is like collecting the perfect combination of taste, texture, and whimsy. Each one plays an important role: from the crunchy Fruity Pebbles shells adding a playful color and crispness, to the creamy cheesecake filling delivering luscious softness that melts in your mouth.
- Fruity Pebbles cereal (2 cups): The star that forms the crispy and colorful taco shells.
- Unsalted butter (2 tablespoons, melted): Helps bind the crushed cereal to create sturdy shells with a golden finish.
- Granulated sugar (1 tablespoon and 1/2 cup): Balances sweetness in both the shell mixture and creamy filling.
- Cream cheese (8 ounces, softened): The rich and smooth base for the cheesecake filling.
- Sour cream (1/4 cup): Adds a slight tang for depth in the cheesecake flavor.
- Vanilla extract (1 teaspoon): Infuses warm aroma and sweetness to tie everything together.
- Heavy cream (1/4 cup): Whipped into the filling to lighten up the texture.
- Additional Fruity Pebbles cereal (1 cup, finely crushed): For dipping the edges of the taco shells to boost crunch and color.
- Whipped cream: For that final fluffy, luscious touch on top.
- Fresh berries: Strawberries, blueberries, or raspberries bring freshness and vibrant color.
- Chocolate shavings: Optional but highly recommended for a touch of decadence.
How to Make Fruity Pebbles Cheesecake Tacos Recipe
Step 1: Prepare the Fruity Pebbles Taco Shells
Start by crushing 2 cups of Fruity Pebbles until they are finely ground—this is key to forming perfect taco shells. You can use a food processor for quick results, or a zip-top bag with a rolling pin for a bit of hands-on fun. Mix the crushed cereal with melted butter and sugar to create a sticky, moldable mixture that’s ready to be shaped.
Step 2: Bake and Shape the Shells
Preheat your oven to 350°F. Press spoonfuls of the mixture into roughly 4-5 inch circles on parchment-lined baking sheets. Bake until the edges are lightly golden and the shells are set but still pliable. While warm, carefully drape each circle over a bar or muffin tin edge to form that classic taco shape. Let them cool fully to harden—the crunch factor is all in this step!
Step 3: Make the Creamy Cheesecake Filling
With the shells cooling, soften your cream cheese completely (this is crucial for smoothness). Beat it well with the half cup of sugar until silky. Add sour cream and vanilla, mixing thoroughly for a luscious tangy hit. Slowly incorporate the heavy cream until the filling becomes fluffy and light—a heavenly texture that’s just waiting to be scooped into those crunchy taco shells.
Step 4: Decorate the Edges
Take the extra Fruity Pebbles cereal and crush it finely for a colorful and crunchy coating. Dip each taco shell rim into the crushed cereal, pressing gently so the pieces stick. This not only amps up the texture but makes these cheesecake tacos absolutely photo-ready.
Step 5: Assemble the Fruity Pebbles Cheesecake Tacos
Pipe or spoon the cheesecake filling generously into each taco shell. Then comes the super fun part: topping! Add whipped cream, fresh berries, and sprinkle chocolate shavings for an extra boost of indulgence. These are best enjoyed right away so you can revel in the contrast of crunchy, creamy, and fruity flavors all at once.
How to Serve Fruity Pebbles Cheesecake Tacos Recipe
Garnishes
Add a pop of fresh berries and a cloud of whipped cream on top to elevate the look and flavor. A few chocolate shavings or drizzle of chocolate sauce also make a decadent addition. These simple garnishes transform your Fruity Pebbles Cheesecake Tacos Recipe from playful to party-perfect.
Side Dishes
While these cheesecake tacos can stand alone as a show-stopping dessert, pairing them with a scoop of vanilla ice cream or a fresh fruit salad complements their fruity and creamy vibe perfectly. A lightly brewed cup of coffee or a sweet, chilled sparkling drink can also balance the richness beautifully.
Creative Ways to Present
Serve your Fruity Pebbles Cheesecake Tacos in a colorful taco holder for easy handling and eye-catching display. Garnish the serving platter with extra fresh berries and scattered Fruity Pebbles to keep the fun party theme alive. For an extra special touch, dust with powdered sugar or drizzle with berry sauce to impress your guests.
Make Ahead and Storage
Storing Leftovers
These cheesecake tacos are best enjoyed fresh, but if you have leftovers, store them in an airtight container in the refrigerator. Keep the taco shells and cheesecake filling separate if possible to preserve the crunch of the shells. Assemble just before serving for the best experience.
Freezing
While the filling can be frozen, the taco shells do not freeze well as they might lose their crispness and become soggy. Freeze the cheesecake filling in a covered container and thaw overnight in the fridge when ready to use. Reassemble the tacos fresh for optimal texture.
Reheating
Since these are delicate dessert tacos, reheating is not recommended as it can compromise the crunch and creaminess. Instead, enjoy them cold or at room temperature straight from the fridge for the best taste and texture.
FAQs
Can I use a different cereal instead of Fruity Pebbles?
Absolutely! While Fruity Pebbles provide that unique colorful crunch and nostalgic flavor, cereals like Cocoa Pebbles or Rice Krispies can work too. Just consider how the flavor and color of the cereal complement the cheesecake filling.
How long does it take to make Fruity Pebbles Cheesecake Tacos Recipe?
From start to finish, you’re looking at about an hour mostly due to baking, cooling, and chilling times. The hands-on prep is quick and fun, making it a perfect dessert project for a weekend afternoon.
Can I prepare the tacos in advance?
Yes, but with a couple of tips: prepare and bake taco shells ahead, store them airtight, and keep cheesecake filling refrigerated. Assemble just before serving to keep shells crisp and the cheesecake vibrant.
Is this dessert kid-friendly?
Definitely! Kids love the bright colorful Fruity Pebbles and creamy filling. It’s an excellent way to get their help in the kitchen too, especially with crushing cereal and decorating the tacos.
What if I don’t have a food processor?
No worries! Place the Fruity Pebbles in a zip-top bag and crush with a rolling pin or meat mallet for a fun and easy alternative. Just be careful to crush evenly for the best shell formation.
Final Thoughts
There is something truly joyful about the Fruity Pebbles Cheesecake Tacos Recipe that combines childhood charm with grown-up decadence. This recipe invites you to get hands-on, have a blast decorating, and share smiles with every bite. Whether you’re serving it at a party or treating yourself after a long day, these tacos prove that dessert can be both playful and elegant. Give it a try—you’ll be amazed how quickly it becomes a cherished favorite.
Print
Fruity Pebbles Cheesecake Tacos Recipe
- Prep Time: 20 minutes
- Cook Time: 10 minutes
- Total Time: 1 hour
- Yield: 8 servings
- Category: Dessert
- Method: Baking
- Cuisine: American
- Diet: Vegetarian
Description
This Fruity Pebbles Cheesecake Tacos recipe combines the playful crunch of Fruity Pebbles cereal with a creamy cheesecake filling, shaped into fun taco shells. Baked to golden perfection and filled with a fluffy, tangy cheesecake mixture, these dessert tacos are topped with whipped cream, fresh berries, and chocolate shavings for a colorful, delightful treat perfect for parties or an enjoyable sweet snack.
Ingredients
Taco Shells
- 2 cups Fruity Pebbles cereal
- 2 tablespoons unsalted butter, melted
- 1 tablespoon granulated sugar
Cheesecake Filling
- 8 ounces cream cheese, softened
- 1/2 cup granulated sugar
- 1/4 cup sour cream
- 1 teaspoon vanilla extract
- 1/4 cup heavy cream
Coating and Garnish
- 1 cup Fruity Pebbles cereal, finely crushed
- Whipped cream, for topping
- Fresh berries (strawberries, blueberries, raspberries), for garnish
- Chocolate shavings, for garnish
- Extra Fruity Pebbles cereal, for topping
Instructions
- Prepare the Cereal Base: In a food processor, pulse 2 cups of Fruity Pebbles cereal until finely ground. Alternatively, crush the cereal by placing it in a zip-top bag and using a rolling pin.
- Mix Taco Shell Ingredients: In a medium bowl, combine the crushed Fruity Pebbles, melted butter, and 1 tablespoon granulated sugar. Mix thoroughly until well combined.
- Shape and Bake Taco Shells: Preheat the oven to 350°F (175°C). Line a baking sheet with parchment paper. Press about 2 tablespoons of the Fruity Pebbles mixture onto the sheet in circles about 4-5 inches in diameter, spacing them approximately 1 inch apart.
- Bake the Shells: Bake for 8-10 minutes or until the edges just start to turn golden brown and the shells set firmly.
- Form Taco Shapes: Remove the baking sheet from the oven and let the shells cool for 1-2 minutes. While still warm and pliable, carefully lift each circle and drape it over an oven rack bar or the edge of a muffin tin to create the taco shell shape.
- Cool and Harden Shells: Allow the shells to cool completely and harden, about 15-20 minutes, before removing them carefully from the rack or muffin tin.
- Soften Cream Cheese: Ensure cream cheese is fully softened at room temperature before starting the filling.
- Make Cheesecake Filling: In a large bowl, beat the softened cream cheese and 1/2 cup granulated sugar with an electric mixer until smooth and creamy.
- Add Sour Cream and Flavoring: Mix in the sour cream and vanilla extract until fully incorporated and smooth.
- Incorporate Heavy Cream: Gradually add the heavy cream to the mixture, beating until the filling becomes light and fluffy.
- Chill Filling: Cover the bowl with plastic wrap and refrigerate the filling for at least 30 minutes to firm it slightly.
- Prepare Crushed Cereal Coating: Crush 1 cup of Fruity Pebbles cereal finely in a zip-top bag using a rolling pin or a meat mallet. Pour crushed cereal into a shallow dish.
- Coat Shell Edges: Dip the edges of each cooled taco shell into the crushed Fruity Pebbles, pressing gently to adhere the cereal coating.
- Fill Taco Shells: Remove the cheesecake filling from the refrigerator and spoon or pipe it generously into each taco shell.
- Decorate: Top the tacos with whipped cream, fresh berries, chocolate shavings, and extra Fruity Pebbles cereal as desired.
- Serve Immediatley: For the best flavor and texture, serve the Fruity Pebbles Cheesecake Tacos immediately after assembling.
Notes
- Make sure the cream cheese is softened thoroughly to avoid lumps in the filling.
- Bake the shells just until lightly golden because overbaking will make them brittle and hard to shape.
- If shells crack when shaping, try warming them in your hands briefly to soften before forming.
- Serve immediately for optimal crunch and freshness.
- These dessert tacos are best enjoyed the same day for the best texture of the shells and filling.


