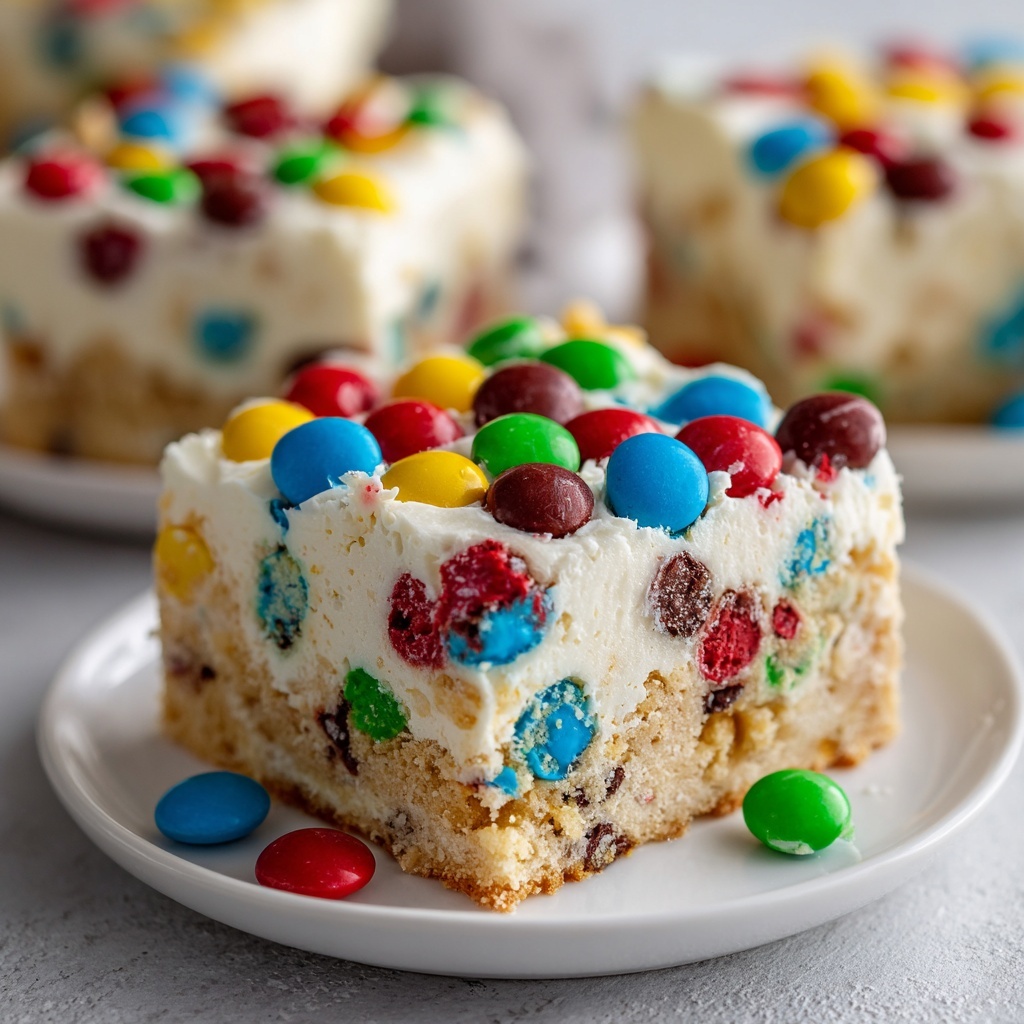
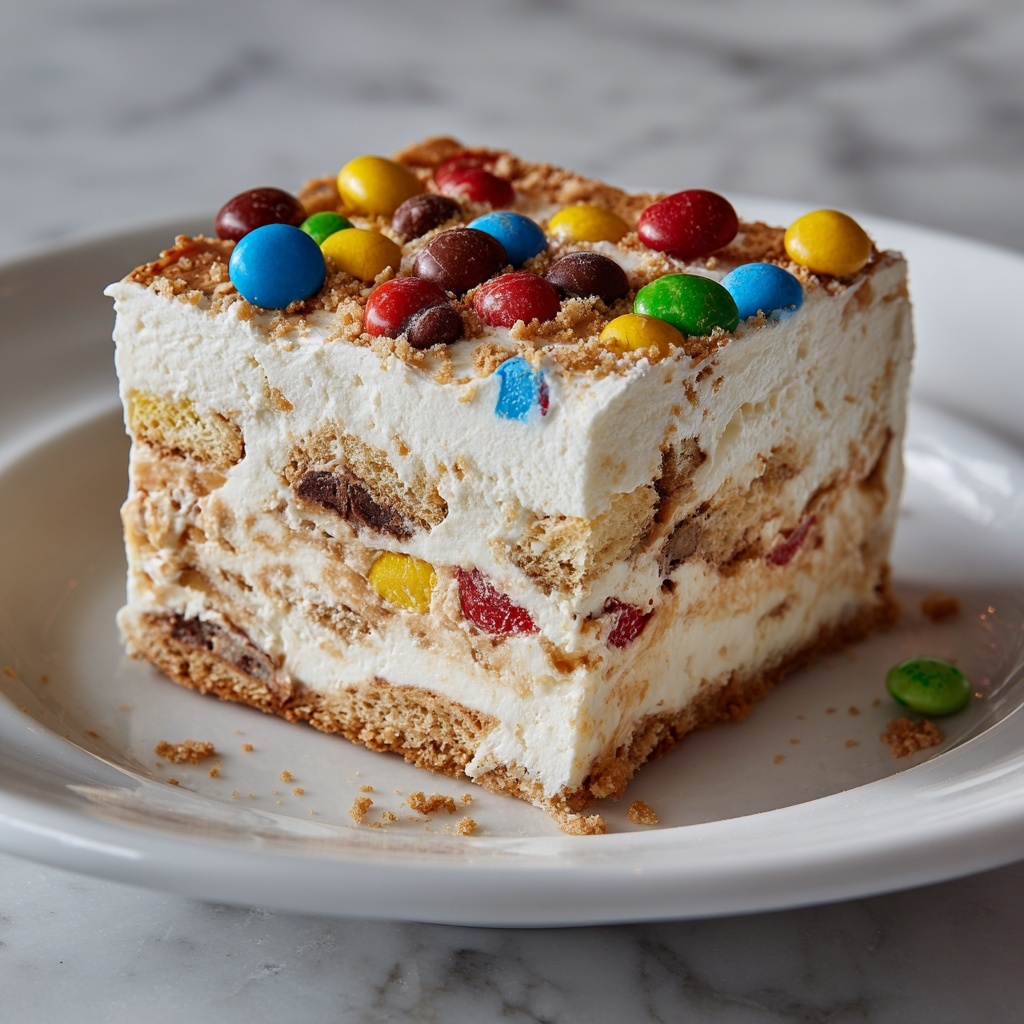
If you have a sweet tooth and love fun, colorful treats, this Easy M&M Ice Cream Sandwich Cake Recipe is about to become your new favorite. Imagine layers of soft, creamy vanilla ice cream tucked between rich ice cream sandwiches, all studded with vibrant M&M candies that bring delightful crunch and bursts of chocolatey goodness. It’s an ice cream cake that’s as simple to assemble as it is irresistible to eat, perfect for impressing friends or just indulging yourself on a sunny day. Trust me, once you try this recipe, you’ll wonder how you ever enjoyed dessert without it!
Ingredients You’ll Need
Gathering the ingredients for this Easy M&M Ice Cream Sandwich Cake Recipe is a breeze because each one plays a vital role in creating the right balance of flavor, texture, and visual appeal. From creamy ice cream to colorful candies, every component comes together effortlessly to bring this dessert to life.
- Ice Cream Sandwiches: About 8 to 10 sandwiches to form the sturdy, delicious base and middle layers.
- Vanilla Ice Cream: 1.5 to 2 quarts, softened to spread easily and add creamy richness between layers.
- M&M Candies: 1 to 1.5 cups for that pop of color and satisfying crunch throughout the cake.
- Whipped Cream: 1 to 2 cups for the smooth, fluffy top layer that balances sweetness.
- Chocolate Syrup (optional): A drizzle to add an extra decorative and chocolaty flourish that makes the cake look as good as it tastes.
How to Make Easy M&M Ice Cream Sandwich Cake Recipe
Step 1: Prepare Your Ingredients
First, make sure your vanilla ice cream is slightly softened by leaving it out at room temperature for a few minutes. This step is crucial because it makes spreading the ice cream over the sandwiches a dream rather than a tug-of-war. Meanwhile, have your ice cream sandwiches laid out and ready to build your layers quickly and smoothly.
Step 2: Arrange The Base Layer
Line up your ice cream sandwiches on a flat serving dish or tray to create the foundation of your cake. This layer provides the perfect combination of chewy, chocolaty crust with the creamy ice cream that’s coming next. Don’t worry about making it too perfect—part of the charm is in the homemade look!
Step 3: Spread The Vanilla Ice Cream
Using a spatula, gently spread a generous layer of your softened vanilla ice cream over the ice cream sandwich base. Try to create an even layer that will help hold the cake together, but a little unevenness adds homemade character and charm.
Step 4: Add The M&M Candies
Now comes the fun part! Sprinkle an even, generous amount of M&M candies all over the ice cream layer. These candies add that playful crunch and amazing bursts of chocolate that make every bite exciting. Plus, their bright colors bring the cake to life visually.
Step 5: Build Additional Layers
Place another layer of ice cream sandwiches over the M&Ms, and then repeat the ice cream spread and candy sprinkle layers. Keep layering until you’ve reached the cake height you desire, finishing off with a top layer of whipped cream to keep it light and fluffy.
Step 6: Top and Decorate
Generously spread whipped cream over the very top layer, smoothing it out with your spatula. Decorate the top with more M&M candies for an inviting, colorful finish, and if you like, drizzle some chocolate syrup over everything for that extra hint of decadence.
Step 7: Chill and Serve
Cover your cake with plastic wrap and pop it in the refrigerator for at least two hours. Chilling helps the layers set properly so when you slice into your Easy M&M Ice Cream Sandwich Cake Recipe, the pieces stay together beautifully. Serve it cold, and enjoy the perfect cool, creamy, colorful treat with every bite!
How to Serve Easy M&M Ice Cream Sandwich Cake Recipe

Garnishes
Decorating your cake is half the fun and really highlights how festive and inviting it is. Think extra M&M candies sprinkled on top, dollops of whipped cream, or even a light dusting of cocoa powder for a subtle hint of chocolate. A drizzle of chocolate syrup or a handful of crushed nuts can also add texture and richness to your serving presentation.
Side Dishes
This ice cream cake shines on its own but pairing it with fresh berries or a fresh fruit salad can balance the sweetness with some bright, juicy freshness. A cup of strong coffee or a light milkshake alongside also perfectly complements the layers of creamy and crunchy textures.
Creative Ways to Present
Want to wow your guests? Serve individual slices in clear dessert glasses layered with extra M&Ms and whipped cream for a parfait-style presentation. Alternatively, cut the cake into bite-sized squares and serve as fun finger food at parties. Wrapping individual slices in parchment paper makes for a charming picnic dessert or gift idea too!
Make Ahead and Storage
Storing Leftovers
If you find yourself with leftovers (although that might be tough), cover the cake tightly with plastic wrap to prevent freezer burn or ice crystals. Store it in the refrigerator if you plan to eat within a day or two.
Freezing
This cake freezes wonderfully, making it perfect for preparing in advance. Wrap it securely in several layers of plastic wrap or foil and place it in an airtight container. When you’re ready to enjoy, just thaw in the refrigerator for 30 to 60 minutes until the ice cream softens enough to cut clean slices.
Reheating
This is a cold dessert, so reheating isn’t recommended. Instead, let it sit at room temperature briefly to soften for easier serving. The key is to enjoy its refreshing, chilled texture and creamy flavors without warming it up.
FAQs
Can I use other flavors of ice cream instead of vanilla?
Absolutely! Vanilla is classic because it pairs well with the chocolate and candy, but feel free to experiment with chocolate, peanut butter, or even mint ice cream for different flavor twists.
How many servings does this cake make?
This Easy M&M Ice Cream Sandwich Cake Recipe typically serves about 8 people, making it perfect for birthdays, parties, or casual family get-togethers.
Can I substitute M&Ms with other candies?
Definitely! You can use any crispy, colorful candy you love like Reese’s Pieces, Skittles, or even chopped nuts for a different texture and flavor profile.
What type of whipped cream works best?
Fresh whipped cream made from heavy cream is ideal for the best texture and flavor, but store-bought whipped topping works well if you’re short on time.
How long does the cake need to chill?
Chilling for at least two hours is essential for the layers to set firmly so the cake slices nicely. If you have more time, chilling overnight is even better.
Final Thoughts
This Easy M&M Ice Cream Sandwich Cake Recipe is an absolute delight that captures the joy of a classic ice cream sandwich turned into an exciting, show-stopping dessert. It’s easy to make, fun to decorate, and loved by kids and adults alike. Give it a try for your next celebration or when you simply need a cool treat that brings a smile with every bite!
Print
Easy M&M Ice Cream Sandwich Cake Recipe
- Prep Time: 15 minutes
- Cook Time: 0 minutes
- Total Time: 2 hours 15 minutes
- Yield: 8 servings
- Category: Dessert
- Method: No-Cook
- Cuisine: American
- Diet: Vegetarian
Description
This Easy M&M Ice Cream Sandwich Cake is a delightful no-bake dessert that combines layers of ice cream sandwiches, creamy vanilla ice cream, colorful M&M candies, and fluffy whipped cream. Perfect for summer parties or anytime you crave a fun, crowd-pleasing treat that comes together quickly with minimal effort.
Ingredients
Base and Layers
- 8–10 Ice Cream Sandwiches (enough to form the base and additional layers)
Ice Cream
- 1.5 to 2 quarts Vanilla Ice Cream, softened
Decorations
- 1 to 1.5 cups M&M Candies (for layering and decorating)
- 1 to 2 cups Whipped Cream (for the top layer)
- Chocolate Syrup (optional, for drizzling on top)
Instructions
- Prepare Your Ingredients: Allow the vanilla ice cream to soften slightly at room temperature so it is easier to spread. Lay out the ice cream sandwiches on a flat surface or serving dish to form the base layer.
- Layer the Ice Cream: Spoon and gently spread a layer of the softened vanilla ice cream uniformly over the base of ice cream sandwiches. This helps bind the cake layers together.
- Add M&M Candies: Evenly sprinkle a generous amount of M&M candies over the ice cream layer to provide a colorful and crunchy texture contrast.
- Repeat Layers: Add another layer of ice cream sandwiches on top of the M&M candies, then repeat layering the softened vanilla ice cream and M&Ms to reach your desired cake height. Finish with a final layer of whipped cream on top.
- Top and Decorate: Spread whipped cream evenly over the final top layer and garnish with additional M&Ms and an optional drizzle of chocolate syrup for an attractive presentation.
- Chill and Serve: Cover the cake securely with plastic wrap and refrigerate it for at least two hours, until firm enough to cut cleanly. Serve chilled for a refreshing and creamy dessert experience.
Notes
- Allow ice cream to soften just enough for easy spreading but not melt completely to maintain structure.
- You can substitute M&Ms with any other colorful candy or chocolate pieces.
- For a firmer cake, freeze the assembled cake for an additional hour before serving.
- This recipe is best served within 1-2 days to retain freshness and texture.
- To make it easier to slice, dip your knife in warm water before cutting.


