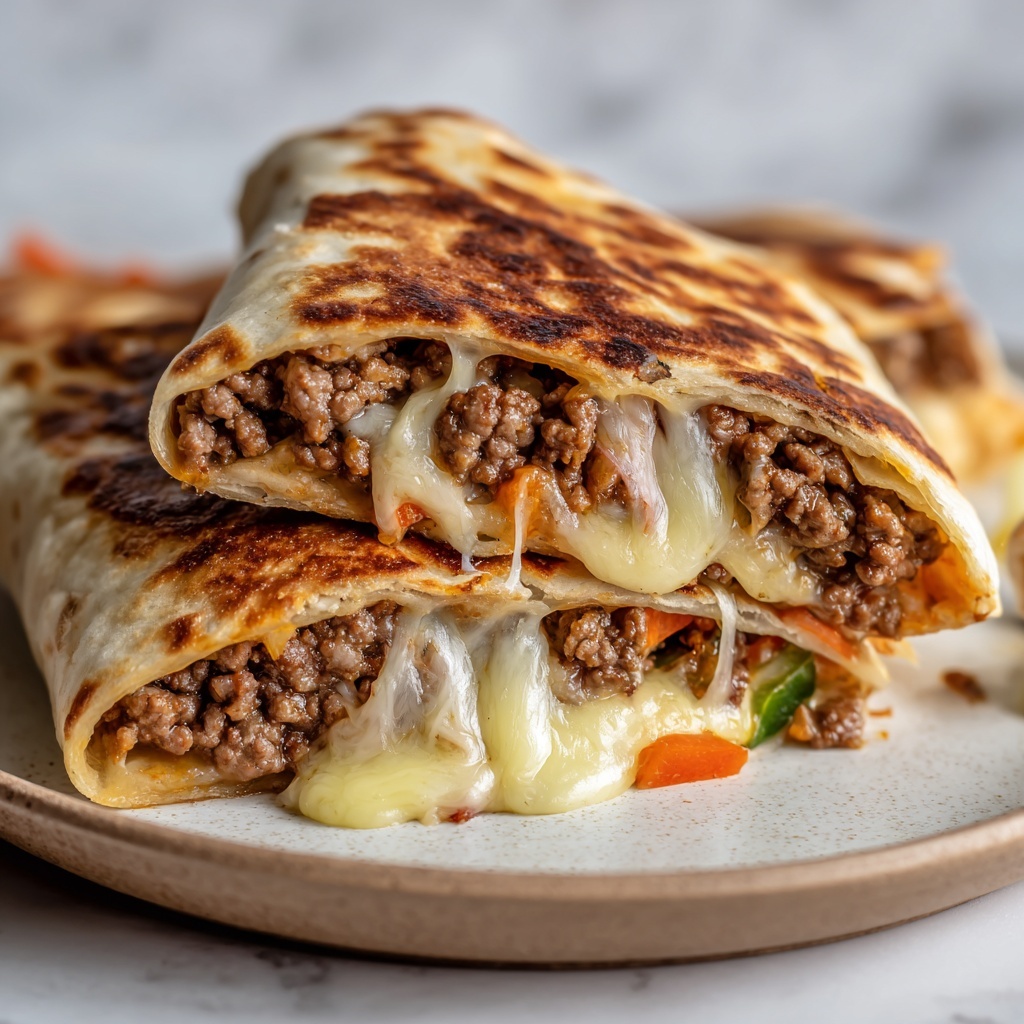
If you’re looking for a vibrant, crowd-pleasing dish that brings together melty cheese, seasoned beef, and a touch of creamy salsa goodness, you’ve found your new favorite. This Loaded Cheesy Pocket Tacos Recipe is a fantastic way to enjoy all the flavors of a classic taco in a fun, handheld form that’s perfect for family dinners or casual gatherings. Crispy on the outside and packed with delicious layers inside, these pocket tacos are sure to become a go-to in your meal rotation.

Ingredients You’ll Need
Everything you need for the Loaded Cheesy Pocket Tacos Recipe is simple yet essential; each ingredient plays a crucial role in building the perfect harmony of taste, texture, and color that makes this dish delightful and memorable.
- 1 lb ground beef: The hearty, savory base that brings rich flavor and satisfying protein to the pockets.
- 1 cup shredded Cheddar cheese: Melts beautifully to add creamy, tangy goodness that binds the filling together.
- 1 packet taco seasoning: Provides the bold, zesty Mexican spices that make the beef irresistibly flavorful.
- ½ cup salsa: Adds moisture, a slight kick, and a burst of fresh tomato and pepper taste to the creamy filling.
- 8 oz cream cheese, softened: Gives a smooth, rich texture that balances the bold taco flavors while keeping the pockets moist.
- 12 6-inch tortillas: The perfect size to hold all the delicious fillings and fold into a neat pocket.
- 2 tbsp melted butter: Brushed on top to create that irresistible golden, crispy finish when baked.
How to Make Loaded Cheesy Pocket Tacos Recipe
Step 1: Cook the Beef
Start by heating your skillet to medium, then add the ground beef, breaking it up as it cooks. Cooking it until fully browned ensures a rich, savory base. Don’t forget to drain any excess fat — this keeps the filling from getting greasy while concentrating those meaty flavors.
Step 2: Season the Beef
Next, stir in the taco seasoning according to the packet’s directions. This step is where your beef gets that classic taco character with a warm blend of spices. Make sure it’s evenly mixed so every bite is packed with flavor.
Step 3: Prepare the Cream Cheese Mixture
In a separate bowl, beat the cream cheese until it’s delightfully smooth. Then fold in the salsa—this mixture brings a creamy, slightly tangy contrast to the beef and cheese, enhancing the overall texture and taste.
Step 4: Assemble the Pocket Tacos
Lay a tortilla flat and spread a generous line of the cream cheese mixture down the center. This creamy base acts as a delicious glue for the rest of the filling.
Step 5: Add Beef and Cheese
Top the cream cheese layer with a hearty scoop of the seasoned beef, then sprinkle shredded Cheddar cheese over the top. This combination ensures ooey-gooey deliciousness inside every pocket.
Step 6: Fold the Tortilla into a Pocket
Carefully fold the tortilla over the filling, tucking it in burrito-style so it forms a neat, self-contained pocket. Repeat the process with the remaining tortillas and filling.
Step 7: Bake to Perfection
Preheat your oven to 350°F (175°C) and lightly grease a baking sheet. Arrange your filled tortilla pockets on the sheet, then brush the tops with melted butter — this little step creates that irresistible golden crust that will have everyone reaching for seconds.
Step 8: Bake Until Crispy
Bake the pocket tacos for about 15 minutes, or until the tortillas are crisp and beautifully golden brown. The warm, crispy shell paired with the melty filling inside makes this Loaded Cheesy Pocket Tacos Recipe stand out.
Step 9: Serve and Enjoy
Serve these tasty pockets hot right from the oven. They’re fantastic on their own or paired with your favorite taco toppings. Simple, satisfying, and absolutely delicious!
How to Serve Loaded Cheesy Pocket Tacos Recipe

Garnishes
To elevate your Loaded Cheesy Pocket Tacos Recipe, consider fresh garnishes like chopped cilantro, diced tomatoes, sliced jalapeños, or a dollop of sour cream. These add brightness and contrast that lift each bite to a whole new level of yum.
Side Dishes
Pair these pocket tacos with classic sides like Mexican rice, refried beans, or a crisp green salad with a citrus vinaigrette. The combination of creamy, cheesy pockets with fresh or hearty sides keeps your meal balanced and exciting.
Creative Ways to Present
For a fun twist, slice the pocket tacos in half diagonally and arrange them on a platter with small bowls of guacamole, salsa verde, or chipotle mayo for dipping. This makes the meal feel festive and interactive, perfect for serve-yourself gatherings or family dinners.
Make Ahead and Storage
Storing Leftovers
If you have any leftover Loaded Cheesy Pocket Tacos Recipe servings, store them in an airtight container in the refrigerator for up to three days. Keeping them sealed helps maintain moisture and prevents the tortillas from drying out.
Freezing
You can freeze these pocket tacos by placing them on a baking sheet to flash freeze individually before transferring to a freezer bag. They’ll keep well for up to two months, making them a convenient ready-to-bake meal for busy days.
Reheating
To reheat, bake frozen or refrigerated pockets in a preheated oven at 350°F until warmed through and the shells regain their crispness, about 10 to 15 minutes. Avoid microwaving if possible, as the tortillas may turn soggy.
FAQs
Can I use ground turkey instead of ground beef?
Absolutely! Ground turkey works well if you prefer a leaner option; just be sure to season it generously with the taco mixture so the flavor stays vibrant and satisfying.
What type of cheese works best for these pocket tacos?
While Cheddar cheese is classic and melts perfectly, you can experiment with Monterey Jack or a Mexican cheese blend for a slightly different flavor profile that’s equally delicious.
Can I make these spicy?
Yes, definitely! Add chopped jalapeños to the cream cheese mixture or use a spicier salsa to kick up the heat. For an extra zing, sprinkle crushed red pepper flakes on top before baking.
Are these pocket tacos kid-friendly?
They really are! The mild flavors and cheesy filling make them a hit with kids, but you can always adjust the spice level or add fun toppings to suit younger tastes.
Is it possible to prepare these ahead of time for a party?
Yes, you can assemble the pocket tacos and keep them refrigerated for a few hours before baking, or prepare them completely and reheat right before serving. They’re perfect for entertaining when you want convenient, crowd-pleasing food.
Final Thoughts
There’s something so comforting and downright fun about this Loaded Cheesy Pocket Tacos Recipe that makes it a must-try for anyone craving a delicious, easy-to-make meal. Whether you’re feeding a hungry family or impressing friends at your next get-together, these tacos deliver bold flavors, cheesy goodness, and a crispy finish that keeps everyone coming back for more. Give them a whirl and watch them quickly become one of your kitchen’s staples!
Print
Loaded Cheesy Pocket Tacos Recipe
- Prep Time: 10 minutes
- Cook Time: 20 minutes
- Total Time: 30 minutes
- Yield: 12 pocket tacos
- Category: Main Dish
- Method: Baking
- Cuisine: Mexican
Description
These Loaded Cheesy Pocket Tacos combine seasoned ground beef, creamy salsa-infused cream cheese, and melted Cheddar cheese all wrapped inside crispy baked tortillas. Perfect for a family meal, they are quick to make and packed with delicious flavors and textures.
Ingredients
Meat and Cheese
- 1 lb ground beef
- 1 cup shredded Cheddar cheese
- 8 oz cream cheese, softened
Seasoning and Sauce
- 1 packet taco seasoning
- ½ cup salsa
Wrapping and Finishing
- 12 6-inch tortillas
- 2 tbsp melted butter
Instructions
- Cook the Beef: Heat a skillet over medium heat. Add the ground beef and cook until fully browned, breaking it up as it cooks. Drain any excess liquid to prevent sogginess.
- Season the Beef: Stir in the taco seasoning as directed on the packet, making sure the beef is evenly and well-seasoned for full flavor.
- Prepare the Cream Cheese Mixture: In a separate bowl, beat the softened cream cheese until smooth. Then mix in the salsa until completely combined, creating a creamy and tangy filling base.
- Assemble the Pocket Tacos: Lay a tortilla flat on a clean surface. Spread a portion of the cream cheese mixture down the center of the tortilla.
- Add Beef and Cheese: Top the cream cheese layer with a generous amount of the seasoned ground beef, then sprinkle shredded Cheddar cheese over the beef.
- Form the Pocket: Fold the tortilla around the filling like a burrito, making sure the filling is enclosed to form a pocket. Repeat this process with all tortillas.
- Preheat the Oven: Set your oven to 350°F (175°C) and lightly grease a baking sheet to prevent sticking.
- Brush with Butter: Place the filled tortillas seam-side down on the baking sheet and brush the tops with melted butter to promote golden color and crispiness.
- Bake the Tacos: Bake for about 15 minutes or until the tortillas are crisp and golden, ensuring the filling is warmed through and the cheese is melted.
- Serve Hot: Serve the loaded cheesy pocket tacos immediately, either plain or accompanied by additional taco toppings or dipping sauces of your choice.
Notes
- You can substitute ground turkey or chicken for a leaner option.
- For extra heat, add diced jalapeños or hot sauce in the cream cheese mixture.
- Use flour tortillas for best folding and crisping results.
- Make ahead by assembling the tacos and refrigerating them unbaked, then bake before serving.
- Try serving with guacamole, sour cream, or pico de gallo for added flavor.


