
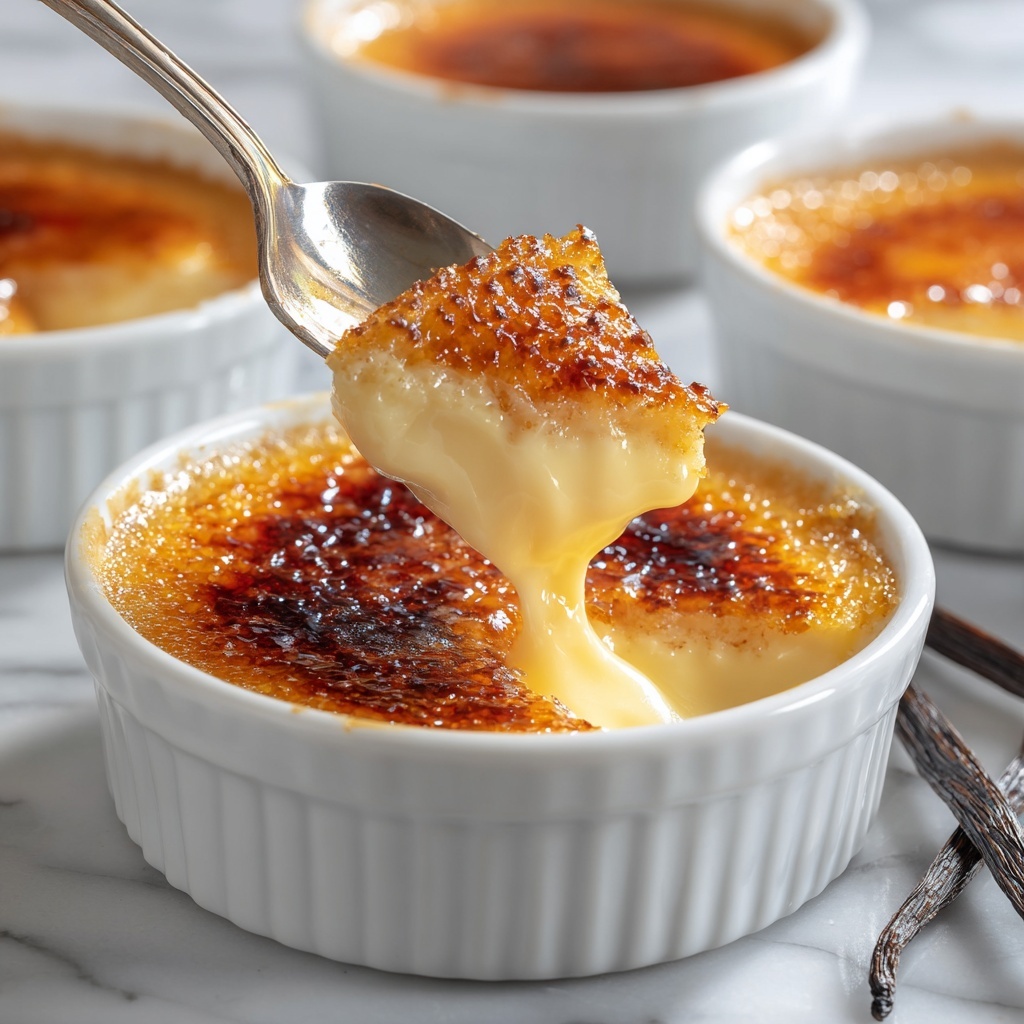
If you have been searching for a dessert that captures the rich, creamy indulgence of classic crème brûlée without firing up an ice cream maker or using any dairy, you are going to adore this Vegan No-Churn Creme Brulee Ice Cream Recipe. It combines silken soy custard, luscious vegan cream, and the unmistakable caramelized sugar crust to bring you a smooth, dreamy treat that’s easy to make and irresistibly satisfying. Perfect for warm nights or anytime you crave a special cool-down, this recipe celebrates the essence of crème brûlée in a fresh, plant-based style that anyone can enjoy.
Ingredients You’ll Need
This recipe relies on a handful of simple, thoughtful ingredients that each play a crucial role in texture and flavor. From the creamy vegan condensed milk to the fragrant vanilla seeds, every component adds depth and richness without complexity.
- Soy milk (420 ml): Provides a smooth, neutral base that’s perfect for custard without overpowering other flavors.
- Cornstarch (30 g): Acts as a natural thickener to create that creamy, custard-like body we all crave.
- Vegan condensed milk (240 g): Adds sweetness and richness, replicating the luscious texture of traditional condensed milk.
- Vanilla pod: Fresh vanilla seeds infuse an authentic warm aroma and delicate flavor that’s the heart of any crème brûlée.
- Sea salt (¼ teaspoon): Enhances all the sweet notes and balances the ice cream perfectly.
- Vegan whipping cream (400 ml, chilled): Whipped to clouds of fluffy perfection, this vegan cream delivers the luscious, airy texture essential to no-churn ice cream.
- Granulated sugar (60 g): Used at the end to create that signature caramelized brûlée topping which adds irresistible crunch and flavor contrast.
How to Make Vegan No-Churn Creme Brulee Ice Cream Recipe
Step 1: Prepare Your Custard Base
Begin by combining soy milk, cornstarch, and vegan condensed milk in a saucepan. Whisk thoroughly to remove any lumps and ensure a silky smooth texture. Split the vanilla pod lengthwise and scrape out the fragrant seeds, then add both seeds and pod to the mixture. Place the saucepan over medium heat and gently simmer, stirring often. This process helps the custard thicken evenly and develop its signature flavor.
Step 2: Thicken the Mixture
Simmer the custard on low-medium heat for about 5 minutes while constantly whisking. Watch closely as it thickens until it coats the back of a spoon, signaling that it’s reached the perfect consistency for ice cream base. This step is where the creamy texture starts to take shape.
Step 3: Strain and Chill
Remove the vanilla pod and any remaining bits by passing the custard mixture through a fine-mesh sieve into a bowl. This leaves you with a luxuriously smooth liquid. Cover the surface with plastic wrap to prevent skin from forming and chill it in the refrigerator for one hour, allowing the mixture to cool completely and thicken further.
Step 4: Whip the Vegan Cream
While your custard chills, whip the vegan whipping cream until light and fluffy using an electric or stand mixer. This whipped cream brings airiness and volume that transform your custard into creamy, dreamy ice cream without the need for churning.
Step 5: Fold and Combine
Carefully fold the cooled custard into the whipped cream with a rubber spatula, mixing gently until the two are blended evenly. The folding technique is crucial to maintain the airy texture while incorporating the rich custard flavor.
Step 6: Freeze in Ramekins
Divide the mixture between 4 to 8 ramekins or your preferred small containers. Cover them tightly and freeze for at least 4 hours, allowing time for the ice cream to set fully into a satisfyingly scoopable consistency.
Step 7: Caramelize the Sugar Topping
Before serving, let the ice cream thaw at room temperature for 10 to 15 minutes. Then gently sprinkle an even layer of granulated sugar on top of each ramekin. Using a kitchen blowtorch, caramelize the sugar to a beautiful golden brown crust that cracks delightfully with each spoonful, recreating the iconic brûlée top.
How to Serve Vegan No-Churn Creme Brulee Ice Cream Recipe

Garnishes
To elevate your serving, consider delicate, edible garnishes such as fresh berries, a sprig of mint, or a dusting of cinnamon. These simple touches complement the vanilla and caramel notes beautifully while adding a pop of color and freshness to each bite.
Side Dishes
This ice cream pairs wonderfully with crisp biscotti, shortbread cookies, or even a warm fruit compote. The contrast between hot and cold, crunchy and creamy, makes each spoonful an exciting mix of textures and temperatures that will keep everyone coming back for more.
Creative Ways to Present
For a stunning presentation, serve the ice cream in vintage tea cups or mini glass jars, topped with the caramelized crust right before guests arrive. You could also spoon it over a warm vegan chocolate tart or drizzle with a homemade caramel sauce for an extra indulgent twist.
Make Ahead and Storage
Storing Leftovers
Leftover Vegan No-Churn Creme Brulee Ice Cream Recipe is best stored tightly covered in the freezer to prevent ice crystals and flavor loss. If possible, cover the surface of the ice cream directly with plastic wrap before sealing the container to keep it as fresh as possible.
Freezing
The no-churn nature makes this recipe very freezer-friendly. Simply freeze for at least 4 hours or overnight for the best texture. When frozen solid, it holds its creamy consistency beautifully, so it’s perfect for making ahead for parties or family dinners.
Reheating
There’s no need to reheat this dessert; in fact, gently allowing it to sit at room temperature for 10 to 15 minutes before serving is ideal. This softens the ice cream enough to scoop easily and lets the flavors shine, especially the wonderful caramelized sugar crust.
FAQs
Can I use a different plant milk instead of soy milk?
Yes, you can experiment with almond, oat, or cashew milk, but soy milk has the perfect balance of creaminess and protein to help the custard set well. Other plant milks might result in a slightly different texture or flavor.
Is it necessary to use a vanilla pod?
While vanilla pods provide the most authentic and intense flavor, you can substitute with high-quality vanilla extract if needed. Use about 1 to 2 teaspoons of pure vanilla extract added during cooking to capture that classic crème brûlée essence.
Can I make this ice cream without a blowtorch?
Absolutely! If you don’t have a blowtorch, you can carefully caramelize the sugar under a broiler for 1 to 3 minutes, watching closely to avoid burning. The broiler method works well but requires more attention for the perfect crust.
How long does this ice cream keep in the freezer?
This ice cream maintains its best quality for up to two weeks in the freezer. Beyond that, it might develop ice crystals or lose some of its creamy texture, so enjoying it sooner is recommended for the best experience.
Is this recipe suitable for those with nut allergies?
Yes! This recipe uses soy milk and vegan cream without any nuts, making it a safe and delicious choice for those avoiding nuts. Just make sure your vegan condensed milk and cream are nut-free to keep it allergy-friendly.
Final Thoughts
Making the Vegan No-Churn Creme Brulee Ice Cream Recipe at home is a delightful way to impress friends or treat yourself with a classic dessert reimagined for a plant-based lifestyle. Its simple yet special ingredients combine to create a luxurious, creamy dessert with that unforgettable caramelized sugar topping. Once you master this recipe, you’ll find it’s a wonderful staple to have on hand for celebrations or comforting weekends. Give it a try—you might just find a new favorite that’s as comforting as it is elegant.
Print
Vegan No-Churn Creme Brulee Ice Cream Recipe
- Prep Time: 20 minutes
- Cook Time: 5 minutes
- Total Time: 4 hours 25 minutes
- Yield: 4 servings
- Category: Dessert
- Method: No-Cook
- Cuisine: French-inspired Vegan
- Diet: Vegan
Description
This Vegan Crème Brûlée Ice Cream is a luscious, no-churn dessert that combines the creamy texture of classic crème brûlée with the cool refreshment of vegan ice cream. Made with soy milk, vegan condensed milk, and vegan whipping cream, it’s a dairy-free indulgence perfect for warm days. The crowning glory is a caramelized sugar topping, just like the traditional French dessert, achieved with a simple kitchen blowtorch for an elegant finish.
Ingredients
Custard Base
- 420 ml soy milk
- 30 g cornstarch
- 240 g vegan condensed milk
- 1 vanilla pod
- ¼ teaspoon sea salt
Whipped Cream
- 400 ml vegan whipping cream (chilled overnight)
- 60 g granulated sugar (for caramelizing topping)
Instructions
- Prepare the custard base: Add the soy milk, cornstarch, and vegan condensed milk to a saucepan. Whisk well to remove any lumps and cut the vanilla pod lengthwise to scrape out the seeds. Add both seeds and pod to the mixture and place the pan over medium heat.
- Simmer and thicken: Gently simmer on low-medium heat for about 5 minutes, whisking continuously until the mixture thickens enough to coat the back of a spoon.
- Strain the custard: Pass the thickened mixture through a fine-mesh sieve into a medium bowl to remove the vanilla pod and any residual lumps, ensuring a smooth custard.
- Chill the custard: Cover the surface of the custard with plastic wrap directly touching it to prevent skin formation, then refrigerate for one hour until chilled.
- Whip the vegan cream: Using an electric mixer or stand mixer, whip the chilled vegan whipping cream until it becomes light and fluffy, forming soft peaks.
- Combine custard and cream: Gently whisk the chilled custard and pour it into the bowl with the whipped cream. Fold carefully using a rubber spatula until the mixture is evenly combined, taking care not to deflate the whipped cream.
- Freeze the mixture: Spoon the ice cream mixture into 4 to 8 ramekins, cover them with lids or plastic wrap, and freeze for at least 4 hours until firm.
- Serve with caramelized topping: Allow the ice cream to sit at room temperature for 10-15 minutes before serving for easier scooping. Sprinkle an even layer of granulated sugar over each portion and use a kitchen blowtorch to caramelize and brown the sugar, creating the signature crunchy brûlée crust.
Notes
- Use soy milk for the best creamy texture and protein content in this recipe.
- Chill the vegan whipping cream overnight for optimal whipping results.
- If a vanilla pod is unavailable, use 1 teaspoon of vanilla extract, added after cooking and cooling slightly.
- When caramelizing sugar, keep the blowtorch moving to avoid burning the sugar unevenly.
- This recipe is dairy-free, egg-free, and suitable for vegans.

