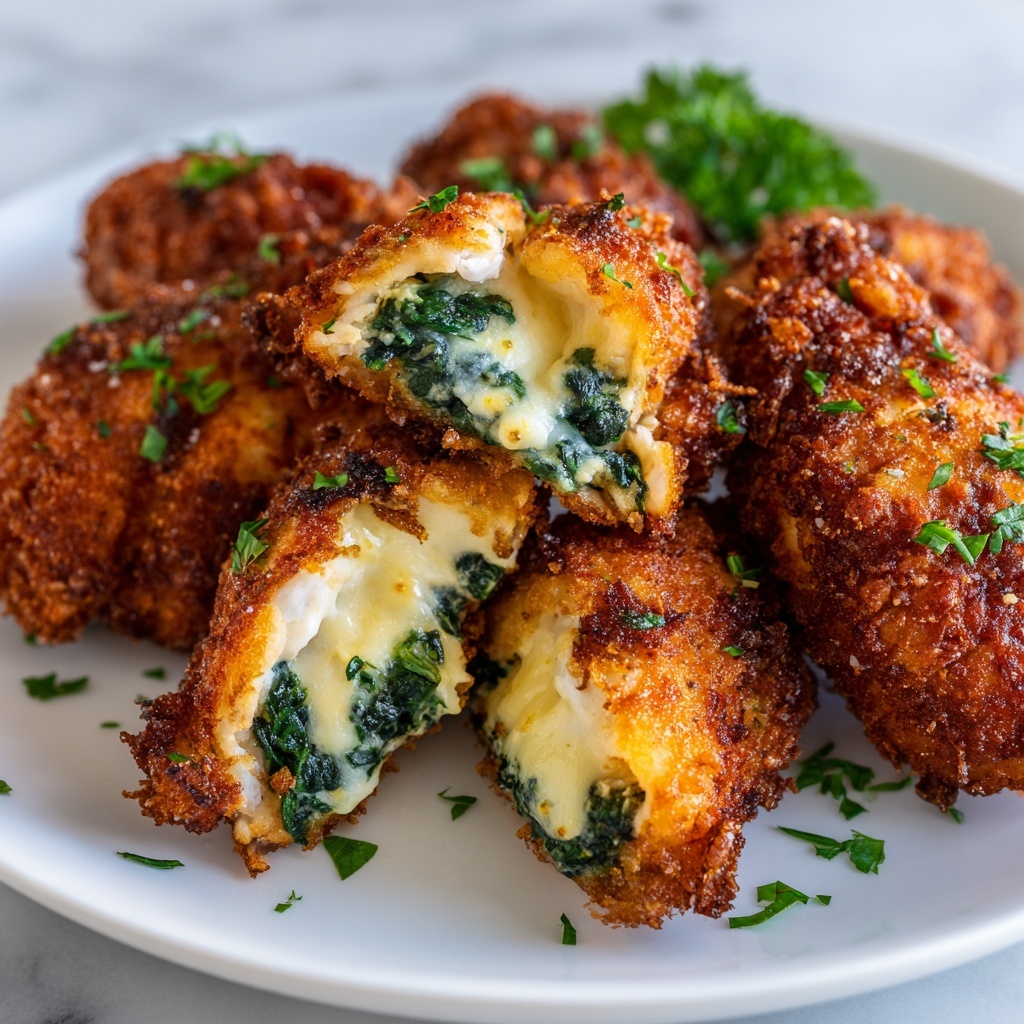
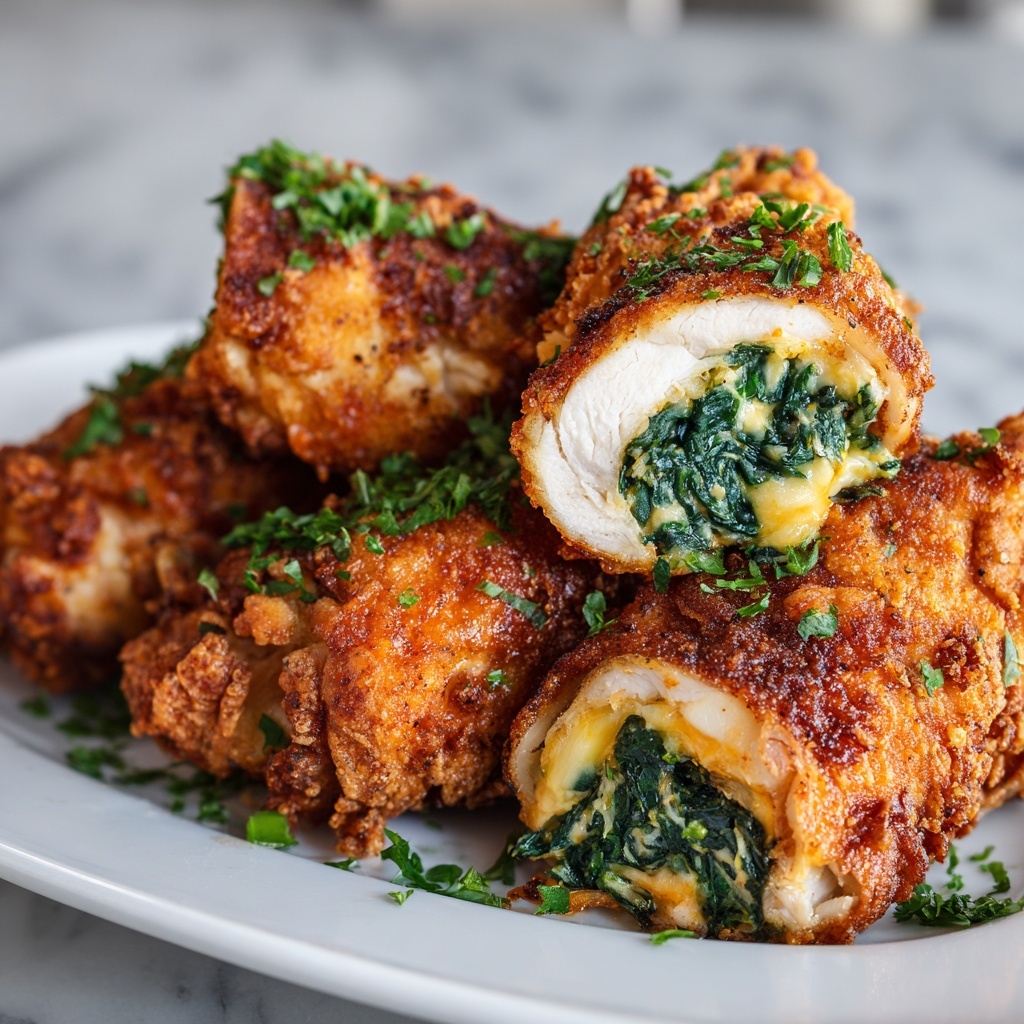
If you have ever dreamed of a dish where crispy, golden chicken encases a luscious, melting center of garlicky butter, then this Chicken Kiev with Garlic Butter Recipe is the one you need to try in your kitchen. This classic Ukrainian-inspired delight combines tender chicken breasts wrapped around a fragrant garlic butter core, creating a spectacular explosion of flavor in every bite. The crunchy crust paired with that silky, herb-infused butter makes for an unforgettable meal that’s both elegant and deeply comforting. Whether you’re cooking for a special occasion or just want to wow your taste buds, this recipe is guaranteed to become a favorite.
Ingredients You’ll Need
These ingredients are beautifully simple yet essential, each one bringing its own magic to the final dish. From the creamy richness of the softened butter to the light, crispy texture of the panko breadcrumbs, every component plays a starring role.
- Unsalted butter (90g): The foundation of the luscious garlic butter filling that oozes out when you cut into the chicken.
- Fresh parsley (2 teaspoons finely chopped): Adds a fresh, herbal note that balances the richness wonderfully.
- Garlic (2 cloves, finely minced): Infuses the butter with unmistakable aromatic flavor that elevates the entire dish.
- Salt (¼ teaspoon): Seasoning for the butter to bring out all the flavors—omit if your butter is already salted.
- Chicken breasts (2, skinless and boneless): The tender vessel for the garlic butter, carefully pounded to the perfect thickness for rolling.
- Salt and black pepper: Essential for seasoning the chicken to perfection.
- Egg (1 large, lightly whisked): Helps the coating stick to the chicken for that irresistible crunch.
- All-purpose flour (¼ cup): The first step in the breading process, ensuring the coating adheres beautifully.
- Panko breadcrumbs (1 cup): Provides that signature crispy, airy crust that makes Chicken Kiev so iconic.
- Canola or vegetable oil (about 1 liter): Perfect for frying to a golden, crisp exterior without overpowering the flavors.
- Fresh parsley (for garnish): Adds that final pop of color and fresh flavor when serving.
How to Make Chicken Kiev with Garlic Butter Recipe
Step 1: Prepare the Garlic Butter Filling
Start by mixing your softened butter with finely chopped parsley, minced garlic, and salt in a bowl until it’s fully combined and fragrant. Once mixed, shape this butter mixture into a neat rectangle on a piece of baking paper—about 10 by 6 centimeters—and pop it in the fridge to firm up. After chilling, slice it into two equal batons. This butter is the heart of your Chicken Kiev and will melt beautifully inside the chicken, so don’t skip this step!
Step 2: Flatten and Season the Chicken Breasts
Lay each chicken breast between two sheets of parchment paper and gently pound them with a meat mallet until they are uniformly thin, around half a centimeter thick. This ensures even cooking and makes rolling easier. Season both sides generously with salt and freshly ground black pepper to enhance the natural flavor of the chicken.
Step 3: Stuff and Roll the Chicken
Place one buttery baton in the center of each flattened chicken breast. Carefully fold the sides over the butter and roll the breast tightly, making sure the seam is tucked underneath to prevent leaks during cooking. Wrap each roll snugly in cling film and twist the ends to form a firm log shape, then chill in the freezer for half an hour. This quick chill firms up the butter and chicken, making breading a breeze.
Step 4: Bread the Chicken Rolls
Set out three shallow bowls—one with flour, one with the whisked egg, and one with panko breadcrumbs. Remove the chicken from the cling film and coat each roll first in flour, shaking off any excess. Next, dip into the egg, letting the extra drip away, then carefully roll in panko breadcrumbs, pressing gently so the crumbs stick well. Pop the breaded rolls back into the freezer for another 30 minutes to set the coating firmly.
Step 5: Fry and Bake to Perfection
Preheat your oven to 180 degrees Celsius (350 degrees Fahrenheit) and heat about a liter of oil in a heavy-based pot until it reaches 190 degrees Celsius (375 degrees Fahrenheit). Fry each chicken roll carefully for about 2 to 3 minutes per side until gorgeous and golden brown. Once fried, transfer them to a rack over a baking sheet and bake in the oven for 15 minutes, or until the internal temperature hits 65 degrees Celsius (150 degrees Fahrenheit). Let the chicken rest for a couple of minutes before serving—this keeps the juices locked inside!
How to Serve Chicken Kiev with Garlic Butter Recipe

Garnishes
Sprinkle with freshly chopped parsley right before serving. The parsley not only adds a vibrant green pop of color but also a refreshing contrast to the buttery richness inside. It’s a simple touch that brings elegance and brightness to the plate.
Side Dishes
This dish deserves side companions that complement its rich flavors without overpowering them. Consider classic mashed potatoes or creamy mashed cauliflower for a silky base to soak up the garlic butter. A crisp green salad or steamed veggies like asparagus or green beans add a refreshing bite and a lovely balance.
Creative Ways to Present
For a show-stopping presentation, slice the Chicken Kiev on a slight diagonal to reveal the oozing garlic butter center. Serve on a warm, inviting platter with a sprinkle of chopped herbs and a wedge of lemon for a hint of brightness. For dinner parties, pair it with roasted baby potatoes scattered around to soak up every last bit of butter.
Make Ahead and Storage
Storing Leftovers
Once cooled, wrap leftover Chicken Kiev tightly in foil or place in an airtight container. It will keep safely in the refrigerator for up to 2 days. Because the garlic butter is inside the chicken, storing it well preserves that buttery richness for reheating.
Freezing
You can freeze uncooked, breaded chicken rolls by wrapping them tightly in cling film and placing them in a freezer-safe bag or container. Freeze for up to 1 month. When you’re ready, cook them directly from frozen, adding a few extra minutes to the frying and baking time to ensure they’re heated through properly.
Reheating
To reheat leftover cooked Chicken Kiev, it’s best to do so in an oven preheated to 160 degrees Celsius (320 degrees Fahrenheit) for about 15 minutes. This method keeps the crust crisp and warms the butter inside evenly. Avoid microwaving, as it can make the breading soggy and the butter separate.
FAQs
Can I make the garlic butter filling ahead of time?
Absolutely! The garlic butter mixture can be prepared and shaped up to a day before making the Chicken Kiev. Just keep it refrigerated until you’re ready to assemble your chicken.
What type of oil is best for frying Chicken Kiev?
Neutral oils with high smoke points like canola or vegetable oil work best. They fry the chicken evenly without imparting any unwanted flavors and withstand the high heat needed for a crispy crust.
How do I prevent the butter from leaking out during cooking?
The keys are to pound the chicken evenly thin, roll it tightly with the seam underneath, and chill the rolls before breading and frying. Freezing the rolls helps the butter stay contained and melt slowly inside.
Is there a healthier alternative to frying?
While frying gives that signature crunchy texture, you can bake the breaded rolls in a hot oven to reduce oil use. Brush the rolls lightly with oil for better browning, then bake at 200 degrees Celsius (400 degrees Fahrenheit) until golden and cooked through.
Can this recipe be doubled for more servings?
Yes! Simply multiply the ingredients and adjust cooking times accordingly, keeping the individual chicken rolls the same size for even cooking. You may need to fry and bake in batches.
Final Thoughts
There’s something truly special about making Chicken Kiev with Garlic Butter Recipe at home—it’s a dish that feels luxurious yet surprisingly achievable. The satisfying crunch, the rich, garlicky butter melting inside, and the vibrant herb notes come together to create a crowd-pleaser that will have you going back for seconds (and thirds!). I hope you give this recipe a try and enjoy every delicious bite as much as I do. Happy cooking!
Print
Chicken Kiev with Garlic Butter Recipe
- Prep Time: 20 minutes
- Cook Time: 30 minutes
- Total Time: 1 hour
- Yield: 2 servings
- Category: Main Course
- Method: Frying
- Cuisine: European
Description
Chicken Kiev with Garlic Butter is a classic dish featuring tender chicken breasts stuffed with a flavorful garlic and parsley butter, breaded, fried to golden perfection, and then baked to ensure juicy, well-cooked meat. This recipe combines the richness of garlic butter with crunchy panko coating, making it an impressive yet approachable meal.
Ingredients
For the Garlic Butter Filling:
- 90g unsalted butter, softened
- 2 teaspoons finely chopped fresh parsley
- 2 cloves garlic, finely minced (approximately 2 teaspoons)
- ¼ teaspoon salt (omit if using salted butter)
For the Chicken:
- 2 chicken breasts (220-250g each), skinless and boneless
- ½ teaspoon salt
- ¼ teaspoon freshly ground black pepper
- 1 large egg, lightly whisked
- ¼ cup all-purpose flour
- 1 cup panko breadcrumbs
- Canola or vegetable oil for frying (approximately 1 liter)
For Serving:
- Finely chopped parsley for garnish
Instructions
- Prepare the Garlic Butter Filling: In a bowl, combine softened butter, chopped parsley, minced garlic, and salt until well mixed to create the flavorful filling.
- Shape the Butter: Place the butter mixture onto a sheet of baking paper and shape it into a rectangle approximately 10×6 cm. Refrigerate until firm, then cut into two equal batons lengthwise for stuffing.
- Prepare the Chicken: Lay the chicken breasts smooth side down between two sheets of parchment paper. Use a meat mallet to gently pound each breast to an even thickness of about 0.5 cm. Season both sides with salt and freshly ground black pepper.
- Stuff and Roll the Chicken: Place one butter baton in the center of each flattened chicken breast. Fold the sides over the butter, then roll tightly ensuring the seam is on the underside. Wrap each roll tightly in cling film, twisting the ends to form firm logs.
- Freeze the Rolls: Freeze the wrapped chicken rolls for 30 minutes until firm but not fully frozen to help maintain shape during cooking.
- Bread the Chicken: Set up three bowls with flour, whisked egg, and panko breadcrumbs. Remove the chicken from cling film. Coat rolls first in flour, shaking off excess, then dip in egg, allowing excess to drip, and finally coat with panko breadcrumbs, pressing gently to adhere.
- Freeze Again to Firm: Return the breaded chicken rolls to the freezer for another 30 minutes to ensure they hold shape while frying.
- Fry the Chicken: Preheat the oven to 180°C (350°F). Heat canola or vegetable oil in a heavy-based pot to 190°C (375°F). Carefully fry the chicken rolls, cooking each side for 2-3 minutes until golden brown and crisp.
- Bake to Finish Cooking: Transfer the fried chicken to a rack set over a baking sheet and bake in the preheated oven for 15 minutes or until the internal temperature reaches 65°C (150°F).
- Rest and Serve: Allow the chicken to rest for 2 minutes after baking. Garnish with finely chopped parsley and serve hot for an indulgent main course.
Notes
- Ensure the garlic butter is well chilled before stuffing to prevent it from leaking during cooking.
- Pounding the chicken breasts to an even thickness helps in cooking them evenly and makes rolling easier.
- Freezing in stages helps maintain the shape and prevents the butter from melting out during frying.
- Using panko breadcrumbs gives a crispier coating compared to regular breadcrumbs.
- Check internal temperature with a meat thermometer to ensure safe cooking.
- Serve with a side of steamed vegetables or mashed potatoes for a complete meal.


