
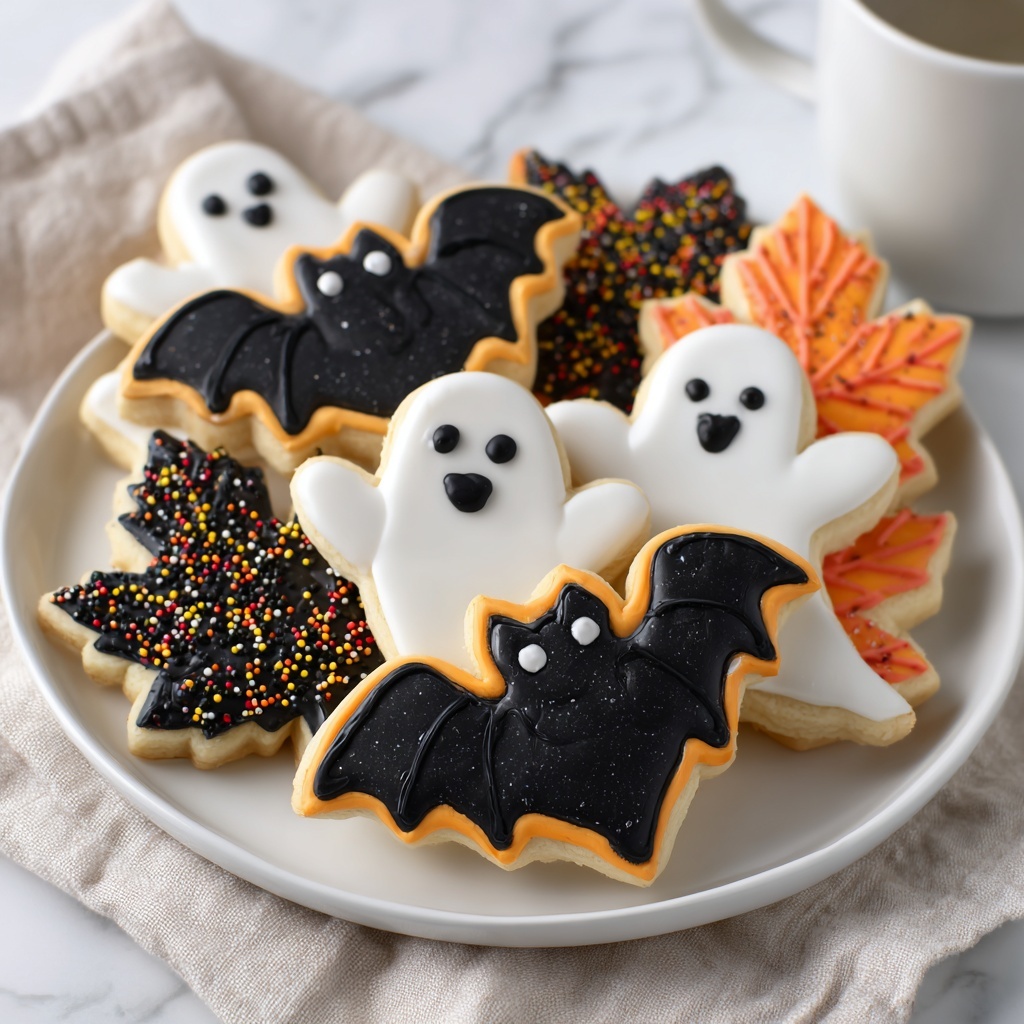
There is something truly magical about the way festive treats can bring joy to any gathering, and this Halloween Royal Icing Cookies Recipe is no exception. Imagine soft, buttery cookies baked to perfection and then transformed into spooky masterpieces with vibrant orange and black royal icing. Each cookie is a little canvas that you can decorate with candy skulls or sprinkles, making this recipe a showstopper for Halloween parties or cozy nights at home. It’s not just a cookie; it’s a fun, creative experience guaranteed to make your Halloween extra special.
Ingredients You’ll Need
These ingredients are simple pantry staples yet essential for creating the perfect balance of flavor, texture, and festive color in your Halloween Royal Icing Cookies Recipe. Each item plays its own role, from the silky butter that gives richness to the fluffy royal icing that turns ordinary cookies into edible art.
- 1 cup (226 g) unsalted butter (chilled): Provides a tender, buttery base for the cookies.
- 1 cup (200 g) granulated sugar: Adds sweetness and helps create a light, fluffy dough.
- 1 whole egg: Binds ingredients together and contributes to cookie structure.
- 1 egg yolk: Adds richness and enhances texture for chewy goodness.
- 2 tsp vanilla extract: Infuses comforting flavor that complements all other ingredients.
- 1 tsp salt: Balances sweetness and intensifies flavors.
- 3 cups + 2 tbsp (375 g) all-purpose flour: The foundation of the cookie that ensures the right crumb.
- 4 egg whites: Key for whipping up glossy, stiff royal icing.
- 2 lbs powdered sugar: Gives the royal icing its signature bright, smooth sweetness.
- ½ tsp butter emulsion (or butter flavoring): Adds depth to the icing’s flavor.
- ¼ tsp almond emulsion (or almond extract): A subtle surprise flavor in the royal icing.
- Water (as needed): Adjusts icing consistency perfectly for piping and flooding.
- Gel food coloring (orange and black): Adds vibrant Halloween colors without runny icing.
- Halloween candy skulls (for coffin cookies): Fun edible decorations to bring spooky charm.
- Sprinkles (for cauldron cookies): Adds texture and festive flair.
How to Make Halloween Royal Icing Cookies Recipe
Step 1: Make the Cookie Dough
Start by creaming the chilled butter and granulated sugar together until your mixer bowl is filled with light, fluffy goodness—this is where that perfect cookie texture begins. Then, beat in the egg, egg yolk, vanilla extract, and salt. Gradually mix in the flour to form a dough that’s soft but not sticky, ready to roll out and shape.
Step 2: Chill the Dough
This next step is a must for perfect cookies that hold their shape. Refrigerating the dough for at least one hour helps it firm up and prevents spreading during baking, so your Halloween shapes look sharp and festive.
Step 3: Cut and Bake
Roll out the chilled dough to an even thickness and get ready to have fun with Halloween-themed cookie cutters—think coffins and cauldrons! Bake at 350°F (175°C) for about 11 minutes, just until the edges set but don’t brown. This way you get soft, tender cookies that are perfect for decorating.
Step 4: Cool the Cookies
Patience is key. Cool your cookies completely on a wire rack before getting creative with royal icing. If you decorate warm cookies, icing can melt and lose its crisp look, so this step ensures your designs stay flawless.
Step 5: Prepare the Royal Icing
Beat fresh egg whites until frothy, then slowly whisk in powdered sugar until silky smooth. Add vanilla extract, butter emulsion, and almond emulsion to give your royal icing a dreamy flavor that’s anything but boring. Adjust with small amounts of water to get the consistency just right for piping crisp outlines and flooding each cookie with color.
Step 6: Color the Icing
Divide your icing into separate bowls and tint them with gel food coloring in your signature Halloween palette: bright orange, deep black, and some classic white for contrast. These bold colors mean your cookies will be both festive and eye-catching.
Step 7: Decorate the Cookies
Using piping bags fitted with tiny round tips (#1 or #2), outline each cookie shape and then flood the centers with your colored icing. Add candy skulls on coffin cookies and sprinkles on cauldrons for that extra spooky charm. Precision and a bit of creativity here will make your cookies stand out.
Step 8: Dry the Icing
Let your decorated cookies dry completely in front of a fan or a small heater. This helps the royal icing set with a smooth, shiny finish, so your Halloween creations are both delicious and impressively polished.
How to Serve Halloween Royal Icing Cookies Recipe

Garnishes
Sprinkle additional tiny edible glitter or candy eyes on top for some playful spooky accents that add dimension and surprise. These little touches make your Halloween Royal Icing Cookies Recipe festive and fun.
Side Dishes
Serve these cookies alongside hot apple cider or pumpkin-spiced lattes to keep the seasonal vibe going. The warm drinks perfectly balance the sweetness and enhance the whole snack experience.
Creative Ways to Present
Display your decorated cookies on a tiered cake stand with faux cobwebs and mini pumpkins for a hauntingly beautiful centerpiece. You might even gift them in clear bags tied with orange and black ribbons—every bite is a treat and the presentation is a delight.
Make Ahead and Storage
Storing Leftovers
Keep your decorated cookies fresh by storing them in an airtight container at room temperature. Layer them with parchment paper to prevent sticking and enjoy them within a week for the best texture.
Freezing
If you want to prepare in advance, freeze undecorated cookies tightly wrapped in plastic wrap and placed in a freezer bag. When ready, thaw completely before decorating to maintain that perfect texture.
Reheating
These cookies are best enjoyed at room temperature. If you prefer them a little warm, pop them in a low oven (about 250°F) for a few minutes, but be cautious not to melt the royal icing.
FAQs
Can I use meringue powder instead of fresh egg whites for the royal icing?
Absolutely! Meringue powder is a great substitute for fresh egg whites and is often used to make royal icing because it’s safe and shelf-stable. Adjust water accordingly to get the right consistency.
What if I don’t have Halloween-themed cookie cutters?
No worries! Any spooky shapes you like—like stars, pumpkins, or bats—will work perfectly. You can even hand-cut shapes with a knife if you’re feeling creative.
How long does royal icing take to dry completely?
Under ideal conditions, it usually takes about 4 to 6 hours to dry hard to the touch, but overnight drying is best to ensure the icing is fully set and won’t smudge.
Can I make these cookies gluten-free?
Yes! Substitute the all-purpose flour with a gluten-free blend that can be used cup-for-cup. Keep in mind texture may vary slightly but flavor stays fantastic.
What can I do if the black royal icing looks gray?
To get a true black, add a tiny bit of black gel color gradually. A combination of black with a touch of purple or cocoa powder can also deepen the shade for a richer, darker finish.
Final Thoughts
Making these Halloween Royal Icing Cookies Recipe is such a joyful way to celebrate the season, whether you’re baking with family or entertaining friends. The combination of tender cookies and gorgeous royal icing lets you express your spooky creativity while treating everyone to delicious homemade goodies. Give this recipe a try—you’re bound to create some sweet memories along with those perfect Halloween cookies!
Print
Halloween Royal Icing Cookies Recipe
- Prep Time: 20 minutes
- Cook Time: 11 minutes
- Total Time: 1 hour 31 minutes
- Yield: 24 servings
- Category: Dessert
- Method: Baking
- Cuisine: American
Description
Celebrate Halloween with these festive Royal Icing Cookies featuring soft, buttery cookie bases decorated with vibrant orange, black, and white royal icing. Perfect for party treats, the cookies are adorned with themed candy skulls and sprinkles, making them a spooky and delicious addition to your holiday celebrations.
Ingredients
For the Cookies
- 1 cup (226 g) unsalted butter, chilled
- 1 cup (200 g) granulated sugar
- 1 whole egg
- 1 egg yolk
- 2 tsp vanilla extract
- 1 tsp salt
- 3 cups + 2 tbsp (375 g) all-purpose flour
For the Royal Icing
- 4 egg whites
- 2 lbs powdered sugar
- 1 tsp vanilla extract
- ½ tsp butter emulsion (or butter flavoring)
- ¼ tsp almond emulsion (or almond extract)
- Water, as needed
- Gel food coloring (orange and black)
Decorations
- Halloween candy skulls (for coffin cookies)
- Sprinkles (for cauldron cookies)
Instructions
- Make the Cookie Dough: In a mixing bowl, cream the chilled butter and granulated sugar together until the mixture is light and fluffy. Beat in the whole egg, egg yolk, vanilla extract, and salt until fully incorporated. Gradually add the all-purpose flour and mix until the dough forms and ingredients are well combined.
- Chill the Dough: Wrap the dough in plastic wrap and refrigerate for at least 60 minutes. This helps the cookies maintain their shape during baking and makes the dough easier to roll out.
- Cut and Bake: Preheat the oven to 350°F (175°C). Roll out the chilled dough on a lightly floured surface to your desired thickness. Use Halloween-themed cookie cutters to shape the cookies. Place the cutouts on a baking sheet lined with parchment paper and bake for approximately 11 minutes, or until the edges are just set but not browned to ensure softer cookies.
- Cool the Cookies: Transfer the baked cookies to a wire rack and let them cool completely before decorating to prevent the icing from melting.
- Prepare the Royal Icing: In a clean bowl, beat the egg whites until frothy. Gradually add powdered sugar while continuing to mix until the icing is smooth. Add vanilla extract, butter emulsion, and almond emulsion, mixing well. Adjust the consistency by adding small amounts of water as needed to reach a pipeable texture.
- Color the Icing: Divide the royal icing into separate bowls. Tint one portion orange, one portion black, and leave one portion white using gel food coloring, mixing each until evenly colored.
- Decorate the Cookies: Fill piping bags fitted with #1 or #2 tips with the different colored icings. Outline and flood the cookies with the royal icing. While the icing is still wet, embellish coffin-shaped cookies with candy skulls and cauldron cookies with sprinkles to enhance the Halloween theme.
- Dry the Icing: Allow the decorated cookies to dry completely in front of a fan or a small heater to help keep the icing shiny and firm.
Notes
- Chilling the dough is essential to prevent spreading during baking and to maintain cookie shape.
- Do not overbake cookies to keep them soft; avoid browning edges.
- Use gel food coloring for vibrant colors without altering icing consistency.
- Adjust water quantity gradually in royal icing to avoid too thin or too thick icing.
- Ensure cookies are thoroughly cooled before decorating to prevent melting of icing.
- Allow decorated cookies to dry completely for best texture and appearance.

