
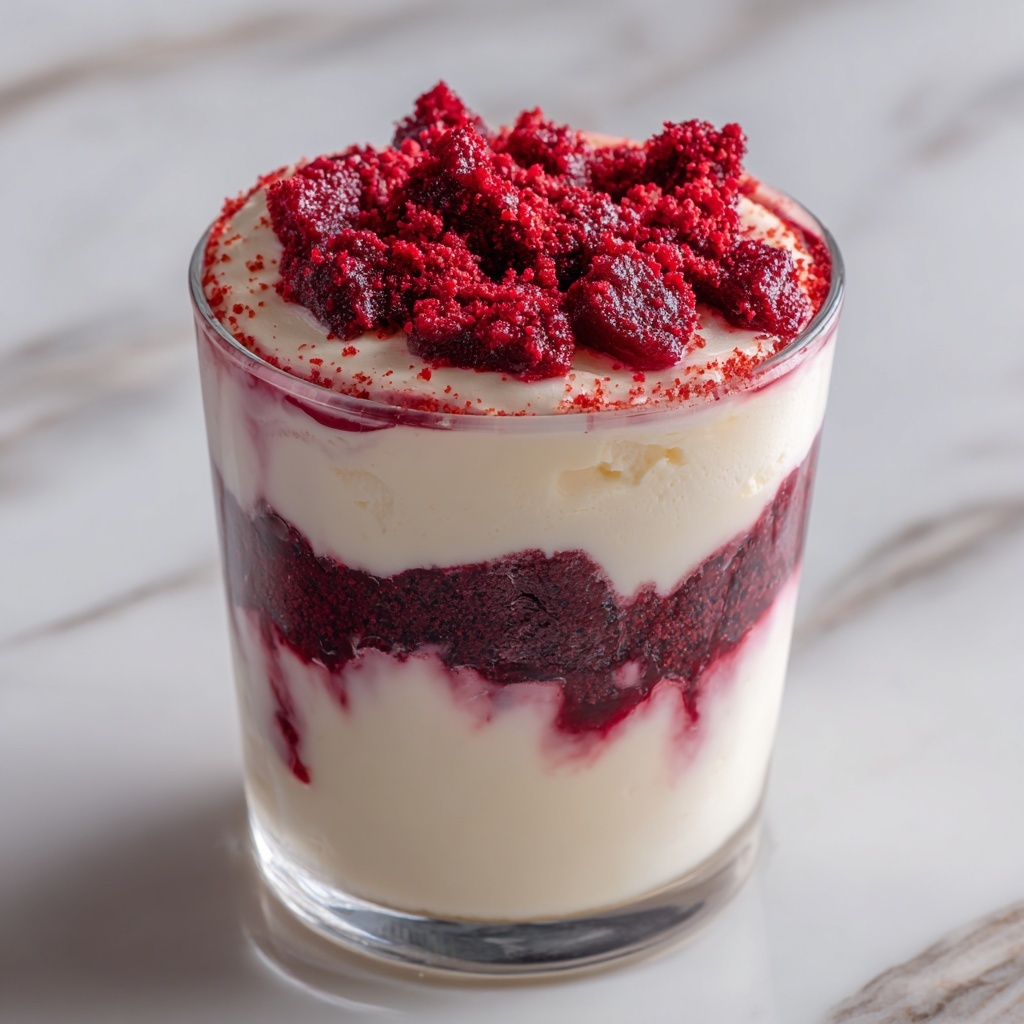
If you have a sweet tooth and love desserts that combine rich flavors with a stunning presentation, you are going to adore the Red Velvet Cheesecake Trifle Recipe. This delightful dish layers moist, vibrant red velvet cake cubes with a luscious, creamy cheesecake mixture and fluffy whipped cream, creating a harmonious blend of textures and tastes in every spoonful. It’s perfect for celebrations or simply impressing your loved ones with a show-stopping treat that makes dessert feel extra special.
Ingredients You’ll Need
Gathering the right ingredients for this trifle is simpler than you might think, but each one plays a vital role in building the beautiful layers and delicious flavor profile. From the iconic red velvet cake to the creamy cheesecake filling, everything works together to craft a dessert that’s as visually appealing as it is tasty.
- Red velvet cake mix: Provides the base with its signature deep red color and tender crumb.
- Cream cheese (8 oz, softened): Adds tangy richness to the cheesecake layer for that classic flavor.
- Powdered sugar (1 cup): Sweetens the cream cheese gently while helping the mixture stay smooth.
- Vanilla extract (1 tsp): Enhances all the flavors with its warm, floral notes.
- Heavy cream (1 ½ cups): Whipped to stiff peaks for a light, airy texture that lifts the cheesecake layer.
- Whipped cream (2 cups, store-bought or homemade): Adds a creamy, cloud-like layer that beautifully contrasts the vibrant cake.
- Mini chocolate chips (½ cup, optional): Provide bursts of chocolatey goodness and a little crunch.
- Fresh raspberries or strawberries (optional): Offer a fresh, fruity garnish that complements the rich layers.
How to Make Red Velvet Cheesecake Trifle Recipe
Step 1: Bake the Red Velvet Cake
Start by preparing the red velvet cake according to the package instructions. It’s crucial to let the cake cool completely after baking, so the layers hold their shape and the trifle doesn’t become too soggy. The rich red color and tender crumb set the stage for this dessert’s stunning look and delicious taste.
Step 2: Prepare the Cheesecake Mixture
In a medium bowl, beat together the softened cream cheese, powdered sugar, and vanilla extract until smooth and creamy. This mixture should be silky without lumps because it forms the creamy heart of the trifle. It brings that perfect balance of creaminess and sweetness that you expect in cheesecake.
Step 3: Whip the Heavy Cream
In a separate bowl, whip the heavy cream until stiff peaks form. This is the secret to lightening up the dense cream cheese mixture. Gently folding the whipped cream into the cheesecake mixture creates a fluffy, airy texture that beautifully contrasts with the moist cake layers.
Step 4: Cube the Cooled Cake
Once your red velvet cake is cooled, cut it into small, even cubes. These cubes will be the layered foundation in your trifle dish, helping build structure while adding bursts of cake in each bite.
Step 5: Assemble the Trifle Layers
In a large, clear trifle dish, start layering by adding a generous scoop of red velvet cake cubes. Next, spread a layer of the cheesecake mixture over the cake, followed by a layer of whipped cream. Repeat these layers until all the ingredients are used up, ensuring you finish with a lush layer of whipped cream on top.
Step 6: Add Garnishes and Chill
Sprinkle mini chocolate chips over the top layer for a touch of texture and chocolate bursts. If you like, add fresh raspberries or strawberries for a pop of color and fruity freshness. Finally, refrigerate your trifle for at least 2 hours to let the flavors meld together and the layers set up beautifully.
How to Serve Red Velvet Cheesecake Trifle Recipe

Garnishes
Elevate your presentation by adding fresh berries like raspberries or strawberries on top of the trifle, which not only look pretty but provide a lovely tart contrast to the sweet layers. Mini chocolate chips scattered last-minute add a hint of chocolate delight and a little crunch.
Side Dishes
This trifle shines as a dessert star, so pairing it with light, complementary sides such as a simple green salad or a glass of sparkling wine can balance the richness. Serving it after a rich meal is a perfect way to end with a splash of celebratory flavor.
Creative Ways to Present
Instead of using one large trifle bowl, try layering individual servings in clear parfait glasses or mason jars. This makes each portion feel personal and perfect for parties. You can also add decorative edible flowers or dust the top with a light sprinkle of cocoa powder for an elegant touch.
Make Ahead and Storage
Storing Leftovers
The Red Velvet Cheesecake Trifle Recipe is fantastic for making ahead. Keep leftovers covered tightly in the refrigerator for up to 3 days. Its layers stay moist and delicious, although the whipped cream top is best eaten fresh for optimal texture.
Freezing
While freezing is possible, it is not recommended for this trifle because the texture of the cream cheese and whipped cream layers may change upon thawing. To keep the best flavor and consistency, enjoy it fresh or within a few days.
Reheating
This dessert is best served chilled and shouldn’t be reheated. Warming it would melt the creamy layers and compromise the textures that make this recipe so special. Simply remove from the fridge a few minutes before serving to take the chill off if desired.
FAQs
Can I use homemade red velvet cake instead of mix?
Absolutely! Using a homemade red velvet cake adds a personal touch. Just be sure it’s fully cooled before cutting into cubes and layering, so your trifle holds together nicely.
Is it necessary to whip the heavy cream separately?
Yes, whipping the heavy cream until stiff peaks is essential to create that airy, fluffy texture when folded into the cheesecake mixture. It lightens the richness and gives the trifle its beautiful consistency.
Can I make this trifle vegan or dairy-free?
With some ingredient swaps, like using dairy-free cream cheese and whipped toppings, you can make a vegan version, but it may affect the texture and flavor slightly. Experimenting with plant-based alternatives can still produce a delicious layered dessert.
How long should I chill the trifle before serving?
Chill your trifle for at least 2 hours so the flavors meld and the layers set perfectly. For an even better taste, you can refrigerate it overnight.
Can I add other fruits besides berries for garnish?
Definitely! Sliced peaches, kiwi, or pomegranate seeds can add color and a fresh twist. Choose fruits that complement the creamy, rich flavors without overpowering them.
Final Thoughts
There is something truly magical about the Red Velvet Cheesecake Trifle Recipe that brings parties and family gatherings to life. It’s an effortless showstopper packed with beautiful color, creamy textures, and classic flavors that everyone will love. Give it a try and watch how your dessert table instantly becomes the star of the celebration.
Print
Red Velvet Cheesecake Trifle Recipe
- Prep Time: 20 minutes
- Cook Time: 25 minutes
- Total Time: 45 minutes plus 2 hours chilling
- Yield: 8 servings
- Category: Dessert
- Method: No-Cook
- Cuisine: American
Description
This Red Velvet Cheesecake Trifle is a decadent layered dessert combining moist red velvet cake cubes, creamy cheesecake filling, and luscious whipped cream. Perfectly balanced with a touch of vanilla and garnished with chocolate chips and fresh berries, this no-bake trifle is a crowd-pleaser that requires minimal effort and no baking beyond the cake base itself.
Ingredients
Cake
- 1 box red velvet cake mix (plus ingredients to make the cake as directed)
Cheesecake Layer
- 8 oz cream cheese, softened
- 1 cup powdered sugar
- 1 tsp vanilla extract
Whipped Cream
- 1 ½ cups heavy cream
- 2 cups whipped cream (store-bought or homemade)
Optional Garnishes
- ½ cup mini chocolate chips
- Fresh raspberries or strawberries
Instructions
- Prepare the Cake: Prepare the red velvet cake according to the box instructions, bake it, and let it cool completely. Cooling is essential to avoid melting the cheesecake and whipped cream layers.
- Make Cheesecake Filling: In a medium bowl, beat together the softened cream cheese, powdered sugar, and vanilla extract until the mixture is smooth and creamy with no lumps.
- Whip Heavy Cream: In a separate bowl, whip the heavy cream until stiff peaks form. Gently fold the whipped cream into the cream cheese mixture until combined, creating a fluffy cheesecake layer.
- Cube the Cake: Cut the cooled red velvet cake into small, bite-sized cubes for easy layering.
- Layer the Trifle: In a large trifle dish, start by adding a layer of red velvet cake cubes, then spread a layer of the cheesecake mixture on top, followed by a layer of the whipped cream. Repeat these layers until all ingredients are used, finishing with a final layer of whipped cream on top.
- Garnish: Sprinkle mini chocolate chips and arrange fresh raspberries or strawberries on top for a beautiful and flavorful garnish.
- Chill: Refrigerate the assembled trifle for at least 2 hours before serving. This allows the flavors to meld and the layers to set properly.
Notes
- You can use homemade whipped cream or store-bought, depending on convenience and preference.
- For extra flavor, consider adding a splash of vanilla extract to the whipped cream as well.
- The dessert should be served chilled and enjoyed within 2-3 days for optimal freshness.
- If you want a deeper cheesecake flavor, you can add a tablespoon of sour cream to the cheesecake mixture.
- To make it nut-free, ensure that the cake mix and garnishes do not contain nuts or traces of nuts.


