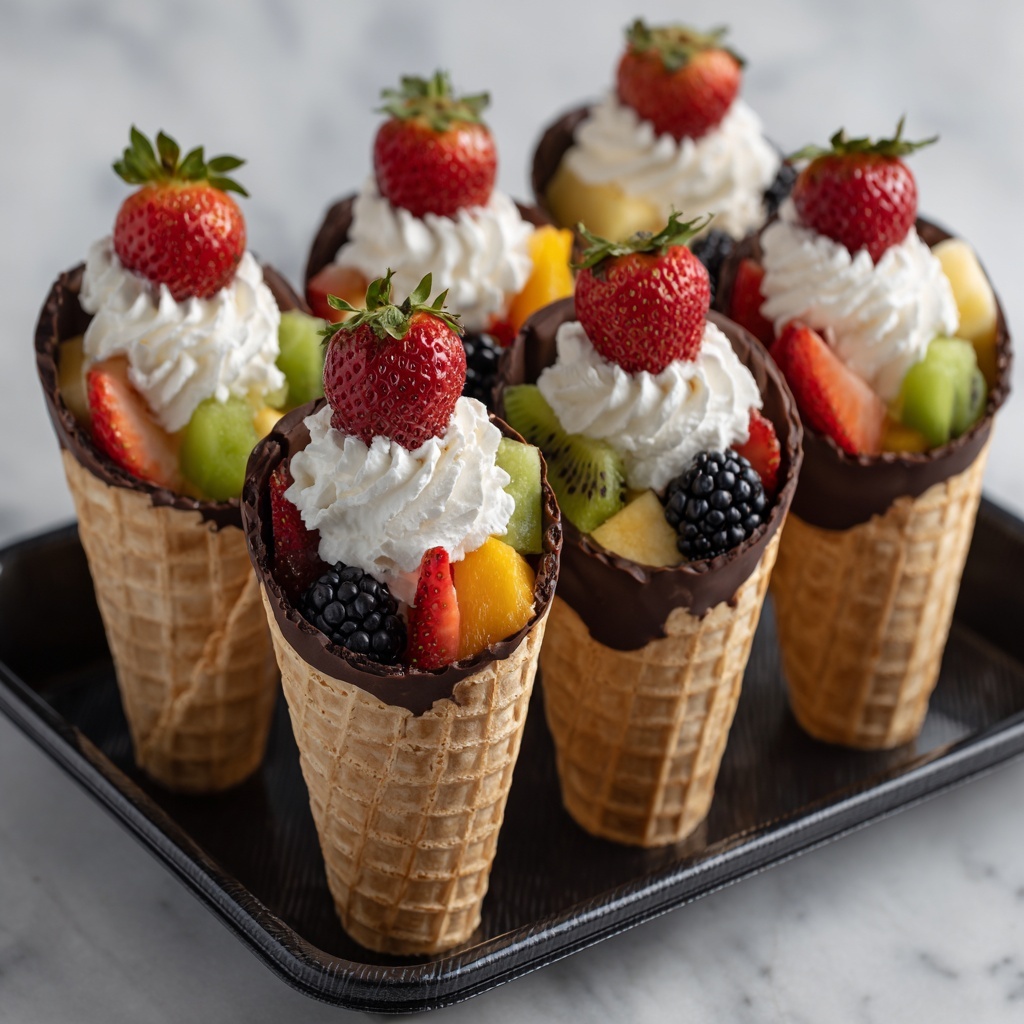
If you’re looking for a dessert that feels as fun to eat as it is delicious, the Chocolate Dipped Fruit Filled Cones Recipe is an absolute winner. Combining crunchy sugar cones rimmed with smooth semisweet chocolate and bursting with fresh, vibrant fruit, this treat offers the perfect blend of textures and flavors. It’s a refreshing snack that’s simple to prepare yet impressively delightful—a perfect pick-me-up for summer afternoons, an inviting party appetizer, or a kid-friendly dessert that brings smiles all around.

Ingredients You’ll Need
Gathering your ingredients is the first step toward creating this delightful treat, and you’ll find they are simple, fresh, and each plays a unique role in making the cones irresistible.
- 6 sugar cones: The sturdy yet crisp vessel for your fruit and chocolate, they add that signature crunch.
- 1 cup semisweet chocolate chips: Melts beautifully to create a smooth, rich coating that pairs so well with fresh fruit.
- 1 teaspoon coconut oil (optional): Helps achieve a shinier, creamier chocolate dip if you prefer extra smoothness.
- 2 cups mixed fresh fruit (strawberries, blueberries, kiwi, mango, grapes): Provides vibrant colors, juicy bursts of flavor, and a healthy freshness.
- 1/2 cup whipped cream or vanilla yogurt (optional): Adds a creamy base that enhances the fruit filling and balances the chocolate’s sweetness.
- 1 tablespoon sprinkles or shredded coconut (optional): Perfect for adding a festive touch or a hint of extra texture on top.
How to Make Chocolate Dipped Fruit Filled Cones Recipe
Step 1: Melt the Chocolate
Start by melting your semisweet chocolate chips in a microwave-safe bowl. Heat in 30-second bursts, stirring well after each interval. If you’re using coconut oil, add it now to create a silkier dip that sets with a lovely shine. This simple step ensures your chocolate is perfectly smooth and ready to coat the cones.
Step 2: Dip the Cone Rims
Next, dip the rims of your sugar cones into the melted chocolate, letting any excess drip off naturally. This chocolate border not only tastes amazing but also strengthens the cone’s edge and adds a beautiful touch of decadence. Stand the cones upright in a cup or specialized cone holder so the chocolate can set without smudging.
Step 3: Let the Chocolate Set
Allow your dipped cones to rest at room temperature or pop them in the fridge for about 10 to 15 minutes. This gives the chocolate enough time to harden nicely, forming a firm but delicate shell ready to hold all your fresh goodness.
Step 4: Prepare the Fruit Filling
While the chocolate sets, wash and chop your mixed fruit into bite-sized pieces. Choose fruits that complement each other not only in color but in sweetness and texture—for example, juicy strawberries with slightly tart kiwi adds a lovely balance. The freshness of the fruit is what makes this snack so refreshing and delightful.
Step 5: Assemble the Cones
Once the chocolate has firmed up, spoon a small amount of whipped cream or vanilla yogurt into the bottom of each cone if you’re using it. This layer acts as a subtle cream cushion preventing fruit juices from soaking into the cone too quickly. Then, pile on your vibrant fruit until each cone is overflowing with deliciousness.
Step 6: Add Final Touches
Top off each filled cone with a dollop of whipped cream, an extra drizzle of melted chocolate, or a sprinkle of colorful toppings like shredded coconut or festive sprinkles. These finishing touches not only elevate the visual appeal but add extra layers of taste and texture that take these cones from simple to spectacular.
How to Serve Chocolate Dipped Fruit Filled Cones Recipe

Garnishes
Garnishes are your chance to get creative and add personality to each cone. Fresh mint leaves, delicate edible flowers, or a dusting of powdered sugar bring fresh notes and visual wow-factor. A quick sprinkle of toasted coconut flakes or chopped nuts adds delightful crunch and nutty flavor. These small touches make eating your chocolate dipped fruit filled cones feel like a mini celebration.
Side Dishes
This treat pairs wonderfully with light, complementary sides. A refreshing glass of sparkling water with lemon, a chilled herbal iced tea, or a creamy vanilla bean smoothie all amplify the fresh, fruity flavors without overwhelming the palate. For a little extra indulgence, serve alongside a scoop of vanilla ice cream or a small bowl of dark chocolate ganache.
Creative Ways to Present
Presentation is part of the fun! Arrange your cones upright on a decorated tray lined with parchment paper. For parties, consider creating a colorful “cone bar” where guests can fill and decorate their own cones. Another charming idea is to serve them in flower pots with a layer of colored sugar or edible “soil” at the base to mimic a garden scene—such whimsy delights both kids and adults alike.
Make Ahead and Storage
Storing Leftovers
If you have any cones leftover, remove the fruit filling first since it can make the cone soggy over time. Store the cones and fruit separately in airtight containers in the refrigerator. This keeps the cones crisp and the fruit fresh when you’re ready to enjoy them later.
Freezing
Freezing is not ideal for these cones because the fresh fruit and chocolate texture can change significantly, and the cones may become soggy upon thawing. For best results, prepare the fruit filling fresh and assemble just before serving.
Reheating
Since this is a no-bake, cold dessert, reheating is generally unnecessary and not recommended. Instead, allow any refrigerated cones to come to room temperature before serving to maximize flavor and texture.
FAQs
Can I use different types of chocolate for dipping?
Absolutely! Feel free to experiment with dark, milk, or even white chocolate. Just ensure the chocolate melts smoothly so it coats the cones nicely and sets well.
Is there a way to make this dessert vegan?
Yes! Use dairy-free chocolate chips and replace whipped cream or yogurt with coconut whipped cream or a plant-based yogurt alternative for a completely vegan-friendly treat.
What fruits work best for filling the cones?
Choose fresh, firm fruits that won’t release too much juice quickly, like strawberries, blueberries, kiwi, mango, and grapes. Mixing colors and textures makes each bite exciting and refreshing.
How long can I prepare these cones ahead of time?
Prep the fruit up to a day in advance and store it refrigerated. Dip the cones in chocolate and let them set on the day you plan to serve. Fill the cones with fruit just before serving to keep them crisp and fresh.
Can I use these cones for other fillings?
Definitely! These cones are super versatile and work wonderfully with creamy dessert fillings, like mousse or ice cream, or even savory options for party appetizers.
Final Thoughts
The Chocolate Dipped Fruit Filled Cones Recipe is such a joyful way to combine simple ingredients into a snack that feels like a little celebration. Whether you’re whipping them up for a sunny picnic, a casual gathering, or a fun family treat, these cones never fail to brighten the table and your mood. I wholeheartedly encourage you to give this recipe a try—you might just find your new favorite go-to dessert that’s as healthy as it is heavenly.
Print
Chocolate Dipped Fruit Filled Cones Recipe
- Prep Time: 15 minutes
- Cook Time: 5 minutes
- Total Time: 20 minutes
- Yield: 6 cones
- Category: Snack
- Method: No-Cook
- Cuisine: American
- Diet: Vegetarian
Description
Delightful and easy-to-make chocolate dipped fruit-filled cones that combine crisp sugar cones with fresh mixed fruits and a rich chocolate coating. Perfect as a refreshing, kid-friendly snack or a festive treat for parties and summer gatherings.
Ingredients
Cones and Chocolate
- 6 sugar cones
- 1 cup semisweet chocolate chips
- 1 teaspoon coconut oil (optional, for smoother dipping)
Fruit Filling
- 2 cups mixed fresh fruit (such as strawberries, blueberries, kiwi, mango, grapes)
Optional Toppings
- 1/2 cup whipped cream or vanilla yogurt (optional)
- 1 tablespoon sprinkles or shredded coconut (optional, for garnish)
Instructions
- Melt Chocolate: Melt the chocolate chips with the coconut oil (if using) in a microwave-safe bowl in 30-second intervals, stirring in between each interval until the mixture is smooth and fully melted.
- Dip Cones: Dip the rims of the sugar cones into the melted chocolate, allowing excess chocolate to drip off. Place the cones upright in a cup or cone stand and let the chocolate set at room temperature or refrigerate for 10–15 minutes until firm.
- Prepare Fruit: While the chocolate sets, wash and chop the mixed fresh fruits into bite-sized pieces, ready for filling.
- Fill Cones: Once the chocolate has set, spoon a little whipped cream or vanilla yogurt into the bottom of each cone, if using, then fill the cones generously with the prepared mixed fruit.
- Garnish and Serve: Garnish the tops with an extra dollop of whipped cream, a drizzle of melted chocolate, or a sprinkle of shredded coconut or sprinkles if desired. Serve the cones immediately for the best texture and freshness.
Notes
- For a dairy-free version, use coconut whipped cream or omit whipped cream entirely.
- These cones are perfect for parties, picnics, or kid-friendly snacks.
- You can prep and chop the fruit ahead of time, but fill the cones just before serving to prevent sogginess.

