
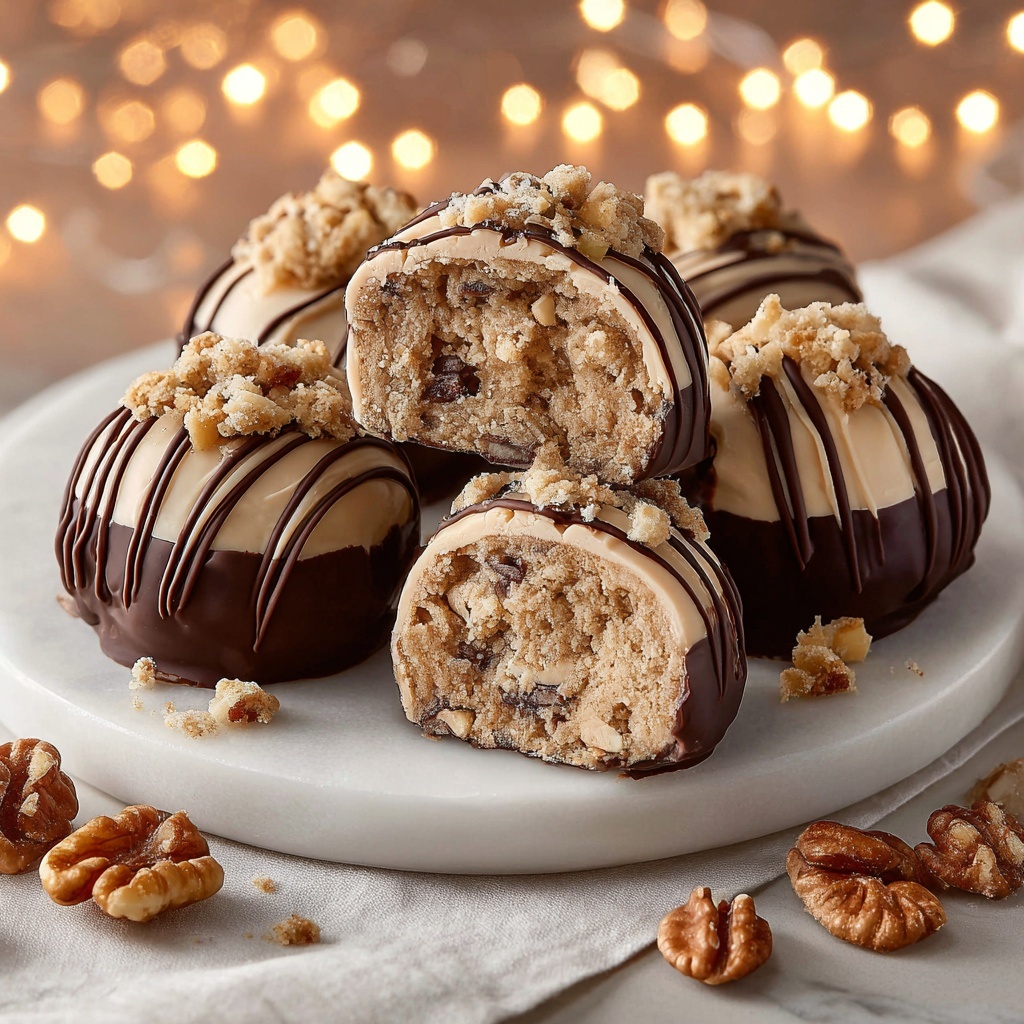
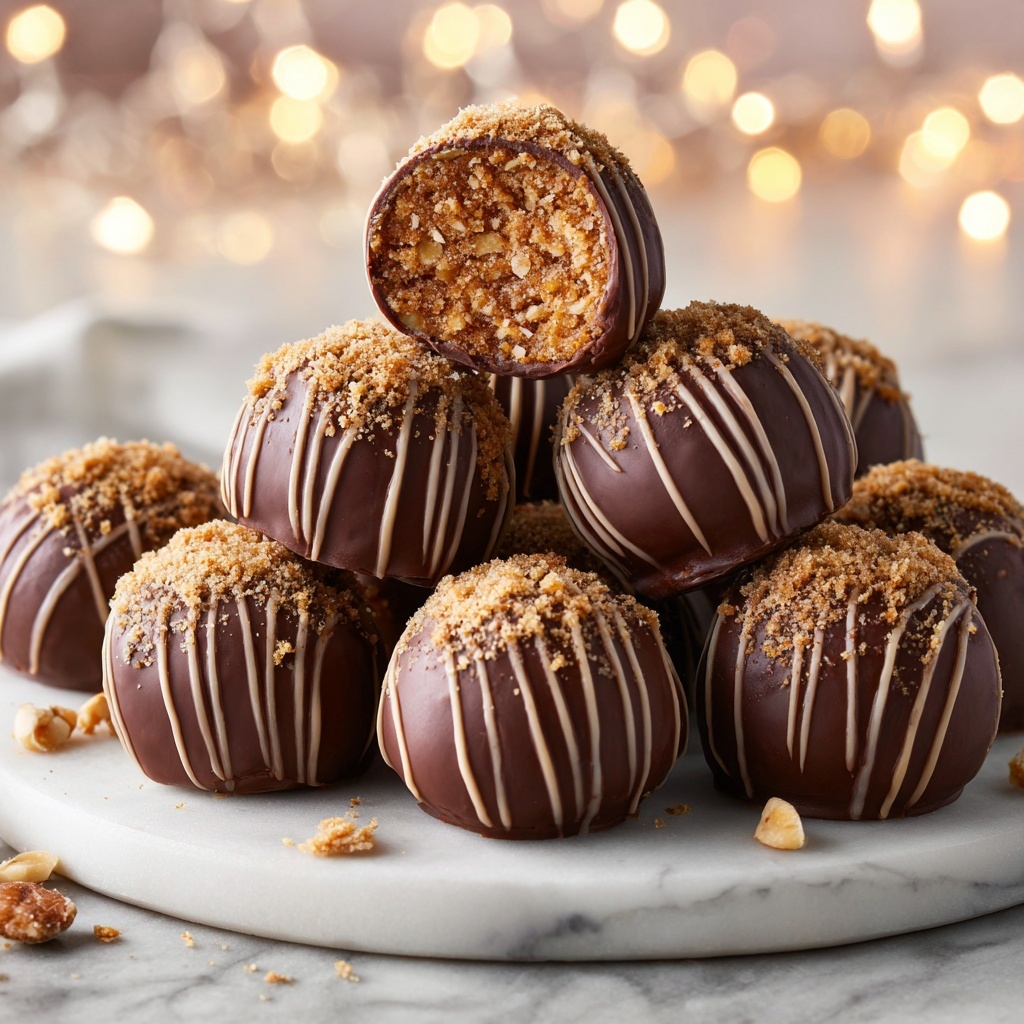
If you are looking for a sweet treat that’s both indulgent and playful, the Festive Butterfinger Balls Recipe is a guaranteed showstopper. These no-bake delights combine creamy peanut butter, buttery richness, and the unmistakable crunch of crushed Butterfinger candy bars all wrapped in a smooth chocolate coating. They’re perfect for brightening up your holiday gatherings or simply savoring a fun, nostalgic flavor that everyone will adore. Soft yet crunchy, chocolaty but nutty, this recipe brings a perfect balance of textures and flavors to your dessert table.
Ingredients You’ll Need
Simple does it with this Festive Butterfinger Balls Recipe. Each ingredient plays a crucial role—from texture to taste—making the magic happen with minimal fuss. Gather these essentials to create your festive treats.
- Creamy peanut butter: The base flavor that adds richness and smoothness.
- Unsalted butter (softened): Brings a velvety texture and balances the peanut butter.
- Powdered sugar: Sweetens and thickens the mixture for easy rolling.
- Crushed Butterfinger candy bars: Adds a signature crunchy and crisp caramelized flavor.
- Semi-sweet or milk chocolate chips: Coats the balls with luscious chocolate.
- Coconut oil or shortening: Helps melt the chocolate smoothly and creates a shiny finish.
- Festive sprinkles or colored candy melts (optional): Adds color and sparkle to celebrate the season.
How to Make Festive Butterfinger Balls Recipe
Step 1: Prepare the peanut butter dough
Start by mixing the creamy peanut butter and softened unsalted butter in a large bowl until you have a smooth, creamy blend. This creates the perfect base for your butterfinger balls, giving them richness and a buttery undertone to complement the candy crunch.
Step 2: Incorporate the powdered sugar
Slowly add powdered sugar into the mixture, stirring constantly until it thickens into a dough that is firm enough to shape but still soft. This sweetens the blend and ensures your balls hold together without being dry or crumbly.
Step 3: Fold in the crushed Butterfinger pieces
Gently fold in the crushed Butterfinger candy bars, making sure every bite will deliver delightful crunch and toasty caramel flavors. Even distribution is key for that satisfying texture surprise!
Step 4: Shape into balls
Scoop out tablespoon-sized portions of the dough and roll them between your palms until you have smooth, round balls. Place them carefully on a parchment-lined baking sheet to keep them from sticking.
Step 5: Chill the dough balls
Pop the baking sheet into the freezer for about 20 to 30 minutes or until the balls become firm and easier to dip into chocolate. This chilling step is essential for a neat coating later.
Step 6: Melt the chocolate coating
In a microwave-safe bowl, melt the chocolate chips along with the coconut oil in short 30-second bursts, stirring in between until silky and smooth. The coconut oil adds gloss and helps the chocolate set with a lovely shine.
Step 7: Dip and decorate
Using a toothpick or fork, dip each chilled ball into the melted chocolate, letting the excess drip off for an elegant finish. Place them back on the parchment paper, and while the chocolate is still wet, decorate with festive sprinkles or drizzle with colorful candy melts for that holiday sparkle.
Step 8: Final chill to set
Return the chocolate-coated balls to the fridge to chill until the coating is completely hardened. Then they’re ready to delight your taste buds or impress your guests at any festive occasion.
How to Serve Festive Butterfinger Balls Recipe
Garnishes
Sprinkles in red, green, gold, or even edible glitter create a cheerful look that instantly elevates these butterfinger balls from delicious to festive. If you want a fun twist, try drizzling contrasting colors of melted candy melts for an artistic touch.
Side Dishes
Serve these decadent bites alongside a cup of hot cocoa, spiced coffee, or even a creamy eggnog. The warmth of the drinks pairs beautifully with the cool, chocolaty crunch, making for a cozy holiday pairing everyone will love.
Creative Ways to Present
Arrange the butterfinger balls on a festive platter with holly leaves or pine sprigs for a seasonal vibe. Place them in mini cupcake liners for easy serving or stack them in a clear jar tied with a beautiful ribbon to gift friends and family.
Make Ahead and Storage
Storing Leftovers
You can keep leftover Festive Butterfinger Balls in an airtight container in the refrigerator for up to a week. This keeps them fresh while maintaining the perfect balance of creamy inside and crunchy chocolate outside.
Freezing
Freeze these treats to extend their life by wrapping them individually in plastic wrap and placing them in a freezer-safe container. They’ll keep well for several months and can be thawed in the fridge before serving.
Reheating
Since these are no-bake treats, reheating is not necessary, but if you prefer a softer center, allow them to come to room temperature for about 15 minutes before enjoying. Avoid microwaving to prevent melting the chocolate coating unevenly.
FAQs
Can I substitute peanut butter with another nut butter?
Absolutely! Almond or cashew butter can be used, though it may slightly alter the flavor and texture. Make sure the nut butter is creamy for the best dough consistency.
What if I don’t have coconut oil for melting chocolate?
If you don’t have coconut oil or shortening, you can melt chocolate chips on their own, but the chocolate might be thicker and less glossy. A small splash of vegetable oil can be a decent alternative.
How do I crush Butterfinger bars without making a mess?
Place the candy bars inside a sealed plastic bag and gently crush them with a rolling pin or the back of a spoon. This keeps the crumbs contained and makes folding them into the mixture easier.
Can these balls be made gluten-free?
Yes! All ingredients in this Festive Butterfinger Balls Recipe are naturally gluten-free, but be sure to check that the candy bars and chocolate chips are labeled gluten-free to avoid cross-contamination.
Is there a way to make these nut-free?
This recipe relies heavily on peanut butter, so for nut-free versions, you might try a sunflower seed butter, but expect a different flavor. Always check ingredient labels to ensure safety for nut allergies.
Final Thoughts
There’s nothing quite like biting into a Festive Butterfinger Balls Recipe to bring a smile during the holidays or any special occasion. The perfect fusion of creamy, crunchy, and chocolaty that’s both easy to make and irresistibly good. I encourage you to gather your ingredients, get a little messy, and create these delightful treats. Your friends and family will thank you for bringing such sweetness and joy to the table!
Print
Festive Butterfinger Balls Recipe
- Prep Time: 30 minutes
- Cook Time: 0 minutes
- Total Time: 30 minutes plus chilling time
- Yield: 24 balls
- Category: Dessert
- Method: No-Cook
- Cuisine: American
- Diet: Vegetarian
Description
These Festive Butterfinger Balls are a delightful no-bake holiday treat combining creamy peanut butter, crushed Butterfinger candy bars, and a decadent chocolate coating. Perfectly bite-sized and easy to make, they offer a crunchy, sweet, and creamy flavor that’s sure to impress at any festive occasion.
Ingredients
Main Ingredients
- 1 1/2 cups creamy peanut butter
- 1/2 cup unsalted butter, softened
- 3 cups powdered sugar
- 2 cups crushed Butterfinger candy bars (about 10 fun-size bars)
Chocolate Coating
- 2 cups semi-sweet or milk chocolate chips
- 1 tablespoon coconut oil or shortening
Optional Decoration
- Festive sprinkles or colored candy melts
Instructions
- Mix Peanut Butter and Butter: In a large bowl, combine the creamy peanut butter and softened unsalted butter, mixing until the mixture is smooth and creamy, ensuring no lumps remain for a consistent dough texture.
- Add Powdered Sugar: Gradually incorporate the powdered sugar into the peanut butter mixture, stirring continuously until a thick, pliable dough forms that can be easily rolled.
- Fold in Crushed Butterfinger: Gently fold the crushed Butterfinger candy bars into the dough, distributing the pieces evenly without breaking them down further, to preserve the crunchy texture.
- Form the Balls: Scoop tablespoon-sized portions of the mixture and roll each into a ball shape using your hands. Lay the balls on a parchment-lined baking sheet for easy handling.
- Chill the Balls: Place the baking sheet in the freezer for 20 to 30 minutes, allowing the peanut butter balls to firm up, which makes dipping easier.
- Melt Chocolate Coating: In a microwave-safe bowl, melt the chocolate chips with the coconut oil in 30-second intervals, stirring well after each until completely smooth and glossy.
- Dip the Peanut Butter Balls: Using a fork or toothpick, dip each chilled ball into the melted chocolate, allowing any excess chocolate to drip off. Return each coated ball to the parchment-lined baking sheet.
- Decorate: While the chocolate is still wet, decorate with festive sprinkles or drizzle with colored candy melts for a colorful finish.
- Final Chill: Refrigerate or freeze the coated balls again until the chocolate sets completely, securing the coating on the balls.
Notes
- These Butterfinger balls can be made ahead and stored in the refrigerator for up to one week or frozen for longer storage.
- To simplify dipping, use a toothpick or fork to handle the balls, avoiding getting your hands messy.
- For a different flavor, you can substitute peanut butter with almond or cashew butter if preferred.
- Ensure the chocolate is fully melted and smooth for a shiny coating that sets well.

