
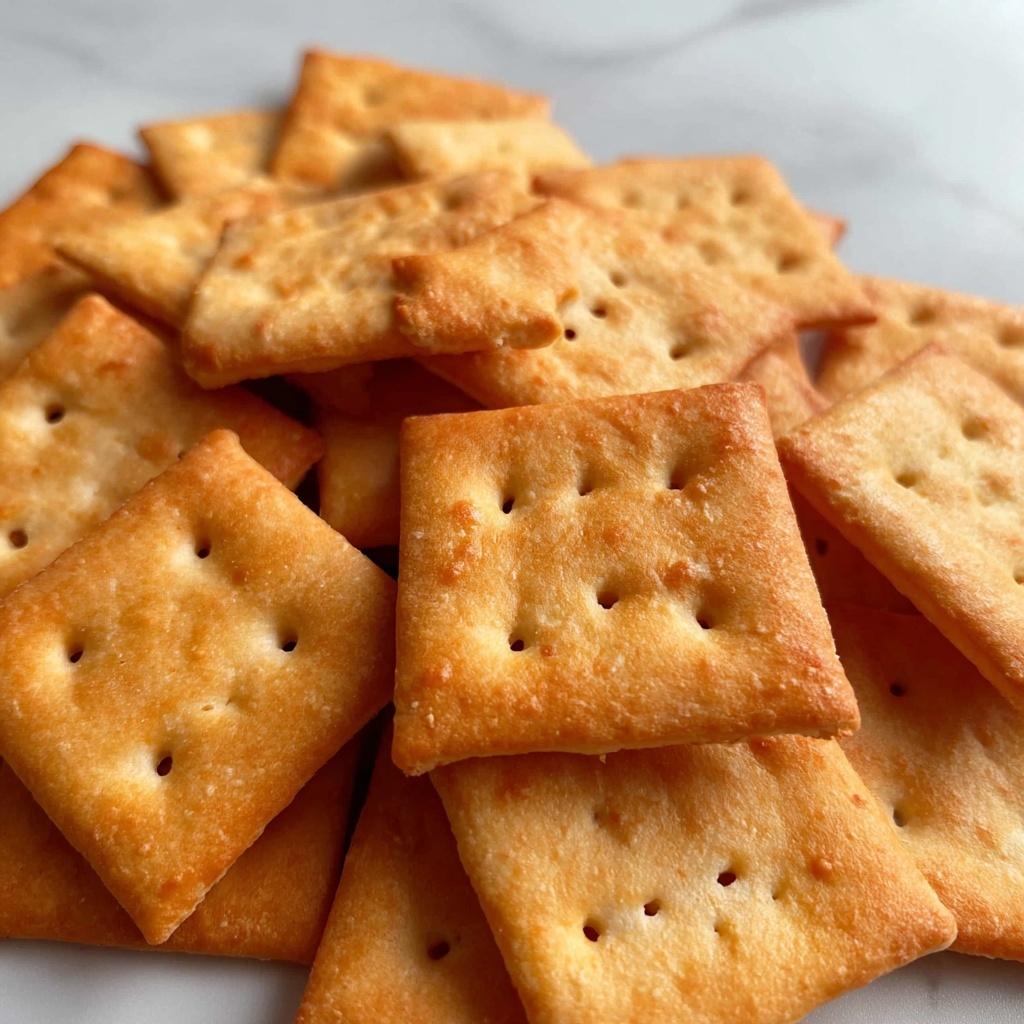
If you’ve ever found yourself reminiscing about that perfect, savory crunch of your favorite cheesy snack, you’re in for a real treat with this Homemade Cheez-Its Recipe. It’s a delightful twist on the classic store-bought cracker, bursting with sharp cheddar flavor and a hint of garlic and paprika that will have your taste buds dancing. Making these crackers from scratch is surprisingly simple, and the results are so rewarding—crispy, cheesy bites that are perfect for snacking, sharing, or even impressing guests. Once you try this recipe, reaching for a bag of store-bought Cheez-Its just won’t feel the same.
Ingredients You’ll Need
All the magic starts with just a few simple ingredients that are easy to find and each play an essential role in creating the perfect texture and flavor for your homemade crackers. Each component brings its own unique touch to this tasty snack, making it a breeze to whip up in no time.
- 2 cups all-purpose flour: This forms the sturdy base of your crackers, giving them structure and that perfect crunch.
- 1 1/2 cups sharp cheddar cheese, grated: The star of the show, providing a rich, bold flavor that Cheez-Its are famous for.
- 1/4 cup unsalted butter, cold and cubed: Adds flakiness and depth of buttery goodness while helping bind the dough.
- 1/4 teaspoon salt: Enhances all the flavors without overpowering the cheese.
- 1/4 teaspoon paprika: A subtle smoky note that brings warmth and color to the crackers.
- 1/4 teaspoon garlic powder: Infuses a gentle savory kick that perfectly complements the cheese.
- 2-3 tablespoons cold water: Needed just enough to bring the dough together without making it sticky.
How to Make Homemade Cheez-Its Recipe
Step 1: Preheat and Prepare Your Baking Sheet
Start by heating your oven to 375°F (190°C) so it’s ready for your crackers. Line a baking sheet with parchment paper which will prevent sticking and make cleanup quick and easy. This simple start sets a strong foundation for perfectly baked homemade Cheez-Its.
Step 2: Combine the Dry Ingredients and Cheese
In a food processor, toss together the flour, sharp cheddar, cold cubed butter, salt, paprika, and garlic powder. Pulse everything until it forms coarse crumbs. This quick step ensures the butter is well distributed, creating a flaky, tender texture that you’ll love in your crackers.
Step 3: Form the Dough
Gradually add cold water, one tablespoon at a time, pulsing after each addition until a rough dough ball forms. Be careful not to add too much water, as the dough should just come together without being sticky. This step is critical for achieving the dough’s ideal consistency.
Step 4: Roll Out the Dough
Lightly flour a clean surface to avoid sticking, then roll out your dough to about 1/8 inch in thickness. The thinness of the dough is key—it ensures your homemade Cheez-Its will bake up crisp and not cakey, just like the classic crackers you remember.
Step 5: Cut into Squares
Use a cookie cutter or a knife to slice the dough into small squares. Traditional Cheez-Its have tiny perforations, so don’t hesitate to poke a few small holes in each square if you want to mimic that authentic look and texture. This step adds a fun, hands-on element to the process.
Step 6: Bake Until Golden and Crispy
Arrange your squares neatly on the parchment-lined baking sheet and pop them into the oven. Bake for 12 to 15 minutes until they turn a lovely golden color and you can smell the irresistible cheese aroma. Keep an eye on them so they don’t over-bake—these crackers can quickly go from perfect to burnt!
Step 7: Cool and Enjoy
Once baked, transfer the crackers to a wire rack and allow them to cool completely. Cooling is important because it lets the crackers firm up for that satisfying crunch your taste buds will adore. Then, dig in and enjoy the rewarding results of your efforts.
How to Serve Homemade Cheez-Its Recipe

Garnishes
While these crackers shine all on their own, you can sprinkle a touch of extra smoked paprika or a pinch of flaky sea salt on top just before baking for a subtle flavor boost and an attractive finish. Fresh herbs like finely chopped chives or thyme can also be mixed into the dough for a fun twist that brightens these cheesy bites.
Side Dishes
Homemade Cheez-Its are fantastic all by themselves but pairing them with dips like creamy hummus, spicy salsa, or a cool ranch dressing can turn your snack into a mini appetizer extravaganza. They also go wonderfully alongside a glass of chilled white wine or a craft beer for a casual yet sophisticated treat.
Creative Ways to Present
For parties, try serving your homemade Cheez-Its recipe in a rustic wooden bowl alongside fresh veggies and cured meats. Stacking them neatly on a platter or using them as a crunchy element in a cheese board adds not just flavor but also delightful texture contrast, making your spreads even more inviting.
Make Ahead and Storage
Storing Leftovers
If you have any leftover crackers, keep them fresh by storing in an airtight container at room temperature. They’ll stay crisp and tasty for up to a week, perfect for snacking throughout the week or sharing with friends who didn’t get a taste the first time around.
Freezing
You can freeze your homemade Cheez-Its by laying them flat in a single layer on a baking sheet and placing it in the freezer until firm. Then transfer them to a sealed freezer bag or container. When stored this way, they’ll keep for up to 2 months without losing their crunch or flavor.
Reheating
If your crackers lose some crispness after storage, simply warm them in a preheated 325°F oven for 5 minutes. This little trick refreshes their texture, giving you that fresh-baked crunch every time you want to enjoy your homemade Cheez-Its recipe.
FAQs
Can I use a different type of cheese in this recipe?
Absolutely! While sharp cheddar is classic for its bold cheesy flavor, you can experiment with gouda, parmesan, or even a spicy pepper jack to match your taste preferences. Just be sure to use a cheese that melts well for the best texture.
Is it possible to make this recipe gluten-free?
Yes, you can substitute the all-purpose flour for a gluten-free blend designed for baking. Keep in mind that the texture might change slightly, but with the right blend, your homemade Cheez-Its will still come out deliciously crisp and cheesy.
How thin should I roll the dough for the best results?
Rolling the dough to about 1/8 inch thick is ideal. This thickness ensures your crackers bake up with a wonderful crunch instead of becoming too soft or doughy. Thin dough means perfectly crisp homemade Cheez-Its every time.
Can I add spices or herbs to customize the flavor?
Definitely! The basic recipe is a fantastic canvas for your creativity. Try adding cayenne for heat, rosemary for an herbal note, or a pinch of chili powder for smoky depth. These additions can take your homemade Cheez-Its recipe to the next level.
How long do homemade Cheez-Its stay fresh?
Stored properly in an airtight container at room temperature, they stay fresh and crunchy for up to a week. For longer storage, freezing is a great option that can extend their shelf life for a couple of months without compromising on that delicious crunch.
Final Thoughts
Making this Homemade Cheez-Its Recipe is like bringing a little piece of snack heaven right into your kitchen. It’s simple, fun, and yields a delicious result you can feel proud of sharing. Once you taste how fresh and flavorful your own crackers can be, you’ll never want to grab those store-bought boxes again. So gather your ingredients, roll up your sleeves, and get ready to enjoy cheesy, crunchy bliss straight from your oven!
Print
Homemade Cheez-Its Recipe
- Prep Time: 10 minutes
- Cook Time: 15 minutes
- Total Time: 25 minutes
- Yield: 4 servings (about 32 crackers)
- Category: Snack
- Method: Baking
- Cuisine: American
Description
Homemade Cheez-Its are a crunchy, cheesy snack made with sharp cheddar cheese and a blend of spices, baked to golden perfection. These savory crackers are easy to prepare from scratch, delivering the perfect balance of cheesy flavor and a satisfying crispness in just 30 minutes.
Ingredients
Cheese Crackers
- 2 cups all-purpose flour
- 1 1/2 cups sharp cheddar cheese, grated
- 1/4 cup unsalted butter, cold and cubed
- 1/4 teaspoon salt
- 1/4 teaspoon paprika
- 1/4 teaspoon garlic powder
- 2–3 tablespoons cold water
Instructions
- Preheat Oven: Preheat your oven to 375°F (190°C) and line a baking sheet with parchment paper to prevent sticking and ensure even baking.
- Mix Dry Ingredients: In a food processor, combine the all-purpose flour, grated sharp cheddar cheese, cold cubed unsalted butter, salt, paprika, and garlic powder. Pulse these ingredients together until the mixture resembles coarse crumbs.
- Form Dough: Gradually add the cold water, one tablespoon at a time, to the food processor mixture while pulsing until the dough begins to come together and forms a ball that is not too sticky.
- Roll Out Dough: Transfer the dough onto a floured surface and roll it out evenly to about 1/8-inch thickness, ensuring the crackers will bake into thin, crisp bites.
- Cut Crackers: Using a cookie cutter or a knife, cut the dough into small squares or your preferred shape to resemble classic Cheez-Its.
- Bake: Arrange the cut squares on the prepared baking sheet, leaving a little space between each. Bake in the preheated oven for 12-15 minutes, or until the crackers turn golden and crispy.
- Cool and Serve: Remove the baking sheet from the oven and allow the crackers to cool completely on the sheet before serving to maximize their crispiness.
Notes
- For extra crispiness, prick each cracker with a fork before baking to prevent puffing.
- You can store homemade Cheez-Its in an airtight container at room temperature for up to one week.
- Experiment with different cheeses like Parmesan or a smoked cheddar for varied flavors.
- Adjust the paprika and garlic powder according to your taste preference.
