
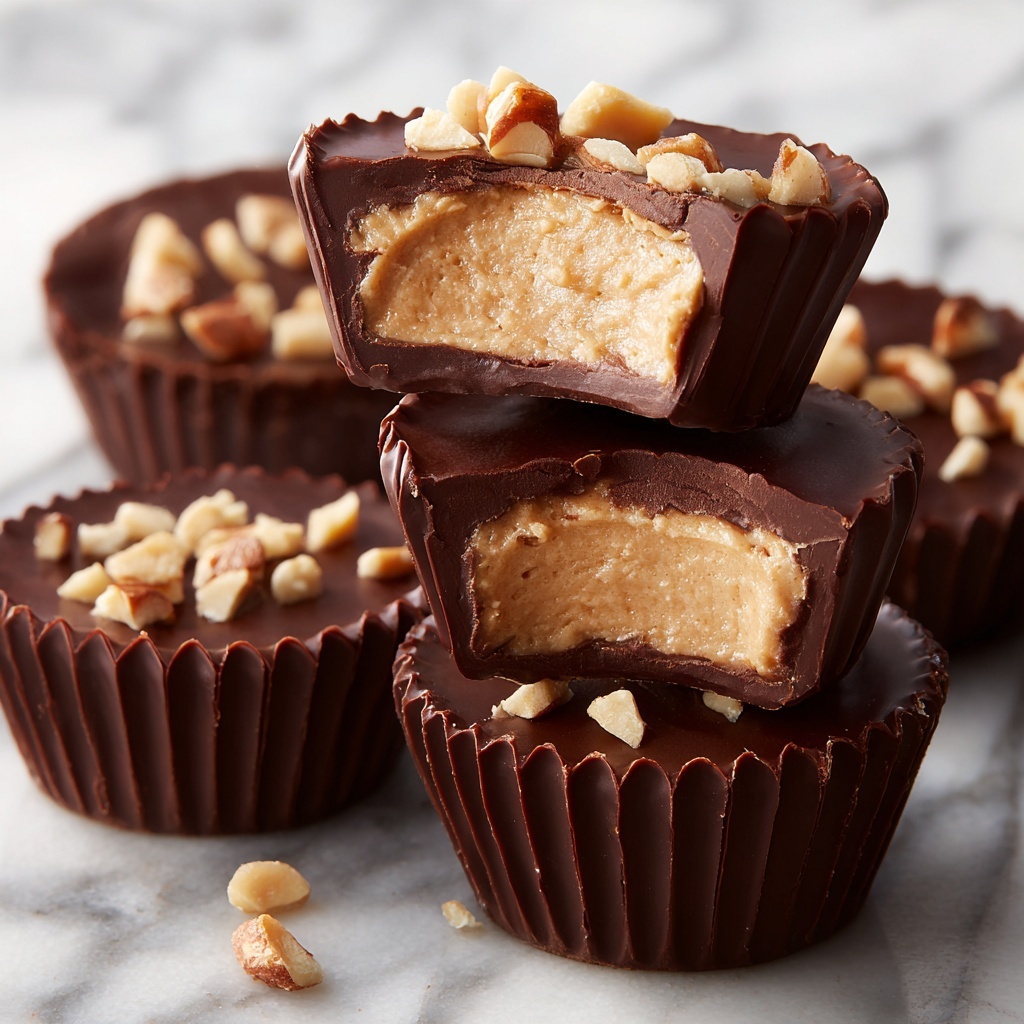
If you’ve ever found yourself daydreaming about that perfect balance of creamy peanut butter hugged by rich chocolate, then this Homemade Reese’s Peanut Butter Cups Recipe is about to become your new obsession. These treats capture all the nostalgia and flavor of your favorite candy cups but with the fresh satisfaction of making them yourself. With just a handful of simple ingredients, you can whip up this irresistible delight that melts in your mouth and delights your sweet tooth like no other. Get ready to fall in love all over again with this timeless classic, made easy and absolutely unforgettable.
Ingredients You’ll Need
Every ingredient in this Homemade Reese’s Peanut Butter Cups Recipe plays a vital role in creating that smooth, luscious texture and perfectly balanced flavor that makes these cups so special. From the creamy peanut butter to the rich chocolate, each element complements the others, ensuring each bite is as magical as the last.
- Creamy peanut butter: Provides the silky, nutty center essential for that authentic Reese’s experience.
- Powdered sugar: Sweetens and thickens the peanut butter filling for a luscious texture without graininess.
- Vanilla extract: Adds a subtle warmth and depth that elevates the peanut butter blend.
- Chocolate chips: The star component that creates the smooth, glossy chocolate shell, whether milk or semi-sweet.
- Optional chopped peanuts: Offer a delightful crunch and extra peanut flavor when sprinkled on top.
How to Make Homemade Reese’s Peanut Butter Cups Recipe
Step 1: Mix the Peanut Butter Filling
Start by combining creamy peanut butter, powdered sugar, and vanilla extract in a mixing bowl. Stir until the mixture is smooth and thick without any lumps. This filling promises that rich, velvety texture that melts beautifully inside the chocolate shell.
Step 2: Melt the Chocolate
Next, melt your chocolate chips gently using a microwave or double boiler method. Heat until they’re fully melted and shiny, which ensures an even coating. Be careful not to burn them—gentle warmth is the key to a glossy, indulgent finish.
Step 3: Prepare the Molds
Line a muffin tin with cupcake liners or use silicone molds. These will hold the peanut butter cups perfectly and make removal after refrigeration so easy and mess-free. The molds also define the classic shape we all love.
Step 4: Create the Chocolate Base
Pour a spoonful of melted chocolate into each liner to cover the bottom. This layer forms the crunchy, chocolatey foundation for your peanut butter filling. A smooth, even chocolate base will keep the final cups sturdy and satisfying.
Step 5: Add the Peanut Butter Layer
Carefully spoon the peanut butter mixture on top of the chocolate layer, spreading it evenly but gently. This is where all that creamy goodness is nestled. Aim for a nice, balanced thickness so each bite is perfectly satisfying.
Step 6: Seal with More Chocolate
Cover the peanut butter layer completely with the remaining melted chocolate, sealing the filling inside. This step creates that classic Reese’s cup look and gives the perfect chocolate-to-peanut butter ratio we crave.
Step 7: Add Optional Toppings
If you want to add a little extra texture and flair, sprinkle chopped peanuts on top before chilling. It adds a lovely crunch and a hint of sophistication without overwhelming the classic flavors.
Step 8: Chill Until Firm
Place the tray in the refrigerator for about 30 minutes or until the cups have fully set and are firm to the touch. This chilling step is crucial for getting that perfect snap and holding their shape beautifully.
How to Serve Homemade Reese’s Peanut Butter Cups Recipe

Garnishes
Serving these lovely peanut butter cups with a delicate sprinkle of sea salt or crushed peanuts on top can elevate their flavor even further. The salt contrast enhances the sweetness and highlights the chocolate and peanut flavors brilliantly, creating a truly gourmet snack.
Side Dishes
Pair your Homemade Reese’s Peanut Butter Cups Recipe with a cold glass of milk or a rich cup of coffee for an indulgent treat. They also go wonderfully alongside fresh fruit, such as sliced strawberries or bananas, which provide a refreshing counterpoint to the rich sweetness.
Creative Ways to Present
For parties or gifts, arrange your peanut butter cups in a decorative box lined with parchment paper or place them in mini cupcake wrappers for a charming presentation. You can even drizzle leftover melted chocolate over them for a professional touch or wrap them individually with festive ribbons for a personal gift idea.
Make Ahead and Storage
Storing Leftovers
Keep any leftover Homemade Reese’s Peanut Butter Cups Recipe stored in an airtight container in the refrigerator. They will last for about a week while maintaining their taste and texture. This makes them perfect for making ahead and enjoying throughout the week or sharing with friends and family.
Freezing
These peanut butter cups freeze beautifully. Place them in a single layer on a baking sheet to freeze individually before transferring to a sealed container or freezer bag. Frozen, they stay fresh for up to two months, offering a handy and delicious treat whenever you need one.
Reheating
When you’re ready to indulge, simply let frozen cups thaw in the refrigerator for a couple of hours. Avoid microwaving as it can cause the chocolate to melt unevenly. Enjoy their rich flavor and satisfyingly firm texture as if just made.
FAQs
Can I use crunchy peanut butter instead of creamy?
Absolutely! Crunchy peanut butter adds a nice texture variation, giving your peanut butter cups a little extra bite. Just keep in mind this will alter the smoothness of the filling slightly, which some might love for that added crunch.
What type of chocolate works best for this recipe?
Milk chocolate chips are the traditional choice to replicate classic Reese’s cups, but semi-sweet or even dark chocolate can be used if you prefer a richer or less sweet flavor. Just choose a good-quality chocolate for the best results.
Can I make these gluten-free?
Yes! The ingredients in this Homemade Reese’s Peanut Butter Cups Recipe are naturally gluten-free, but always double-check your chocolate chips and peanut butter labels to ensure there is no cross-contamination if gluten sensitivity is a concern.
How long does it take for the cups to set properly?
Refrigerating the peanut butter cups for about 30 minutes is usually enough for them to firm up. If your refrigerator is very cold, you might want to leave them for up to an hour to ensure they hold their shape well.
Can I add other flavors or fillings?
Definitely! You can experiment with adding a pinch of cinnamon, a drizzle of caramel, or even a touch of sea salt to the peanut butter mixture for a unique twist. Just keep in mind to balance the flavors so the peanut butter and chocolate remain the stars.
Final Thoughts
Making this Homemade Reese’s Peanut Butter Cups Recipe is not only fun but also incredibly rewarding. There’s something special about biting into a treat that’s been lovingly crafted in your own kitchen—you get all the flavor you crave with none of the mystery additives. So, grab your ingredients, gather your loved ones, and dive into this deliciously easy recipe that promises smiles with every bite. Trust me, once you try these, your snack game will never be the same!
Print
Homemade Reese’s Peanut Butter Cups Recipe
- Prep Time: 10 minutes
- Cook Time: 0 minutes
- Total Time: 40 minutes
- Yield: 12 servings
- Category: Dessert
- Method: No-Cook
- Cuisine: American
- Diet: Vegetarian
Description
These Homemade Reese’s Peanut Butter Cups are a delightful treat combining creamy peanut butter and rich chocolate in a perfect balance. Easy to make with simple ingredients, they are ideal for satisfying your sweet tooth while enjoying a classic candy flavor right at home.
Ingredients
Peanut Butter Mixture
- 1 cup creamy peanut butter
- 1/4 cup powdered sugar
- 1/2 teaspoon vanilla extract
Chocolate Coating
- 1 1/2 cups chocolate chips
Optional Topping
- 1/4 cup chopped peanuts
Instructions
- Prepare Peanut Butter Mixture: In a mixing bowl, thoroughly combine the creamy peanut butter, powdered sugar, and vanilla extract until the mixture is smooth and homogenous.
- Melt Chocolate: Melt the chocolate chips in a microwave-safe bowl using 20-30 second intervals, stirring in between, or use a double boiler until the chocolate is fully melted and smooth.
- Line Muffin Tin: Place cupcake liners or silicone molds in a muffin tin to hold the peanut butter cups during setting.
- First Chocolate Layer: Pour a small amount of melted chocolate into each liner to cover the bottom evenly, ensuring a solid chocolate base.
- Add Peanut Butter Layer: Spoon a layer of the prepared peanut butter mixture on top of the set chocolate, spreading it evenly without touching the edges to allow sealing with chocolate.
- Seal with Chocolate: Cover the peanut butter layer with additional melted chocolate, spreading to the edges to completely seal the peanut butter inside.
- Add Topping: Optionally, sprinkle chopped peanuts on top of the final chocolate layer for added crunch and decoration.
- Refrigerate: Place the muffin tin in the refrigerator for about 30 minutes or until the peanut butter cups are firm and fully set before removing from the liners and serving.
Notes
- Use silicone molds or sturdy liners to make removal easier and prevent sticking.
- Adjust powdered sugar for more or less sweetness in the peanut butter layer according to taste.
- Store finished peanut butter cups in the refrigerator to keep them firm.
- For a richer flavor, use natural or homemade peanut butter without added salt or sugar.
- This recipe can be doubled easily for larger batches.

