
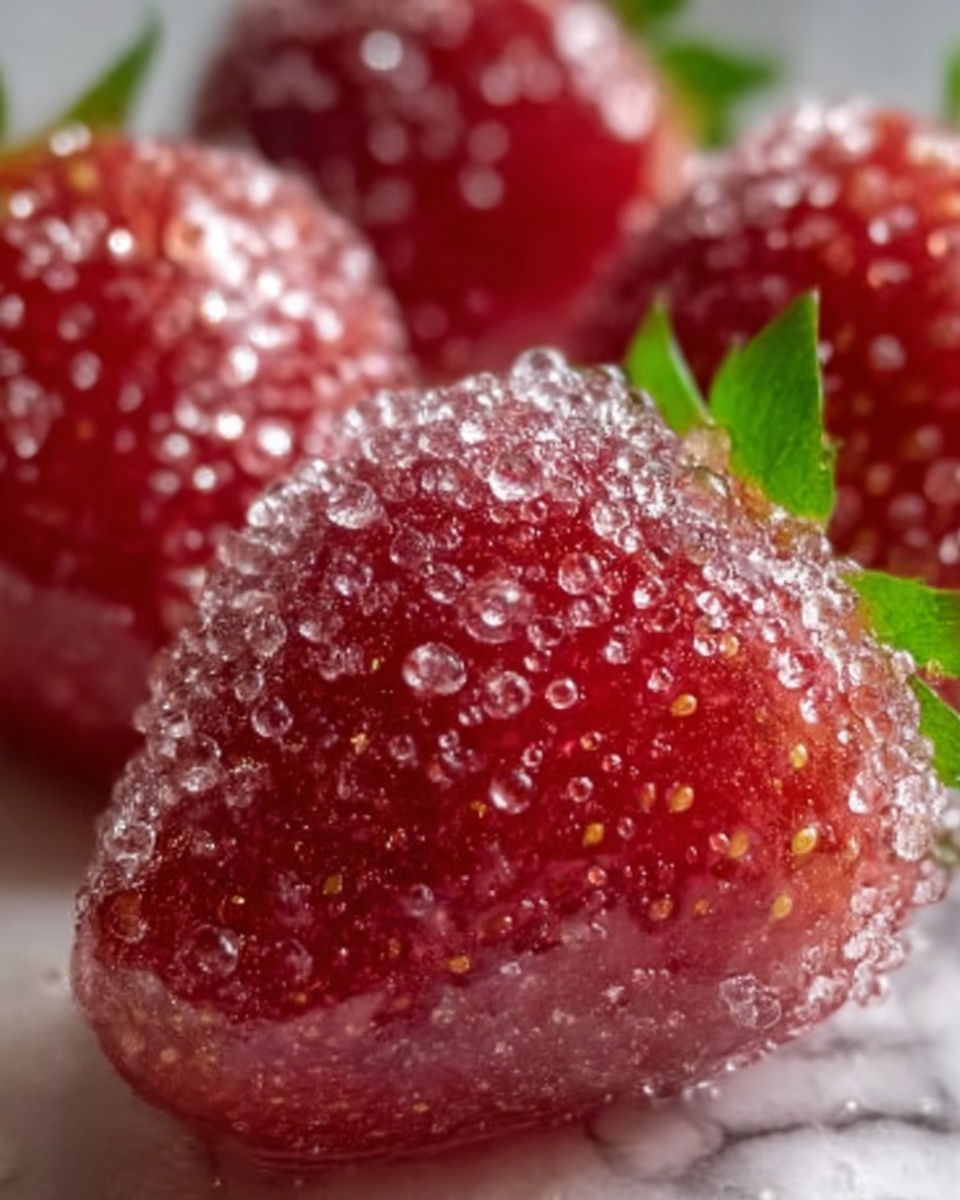
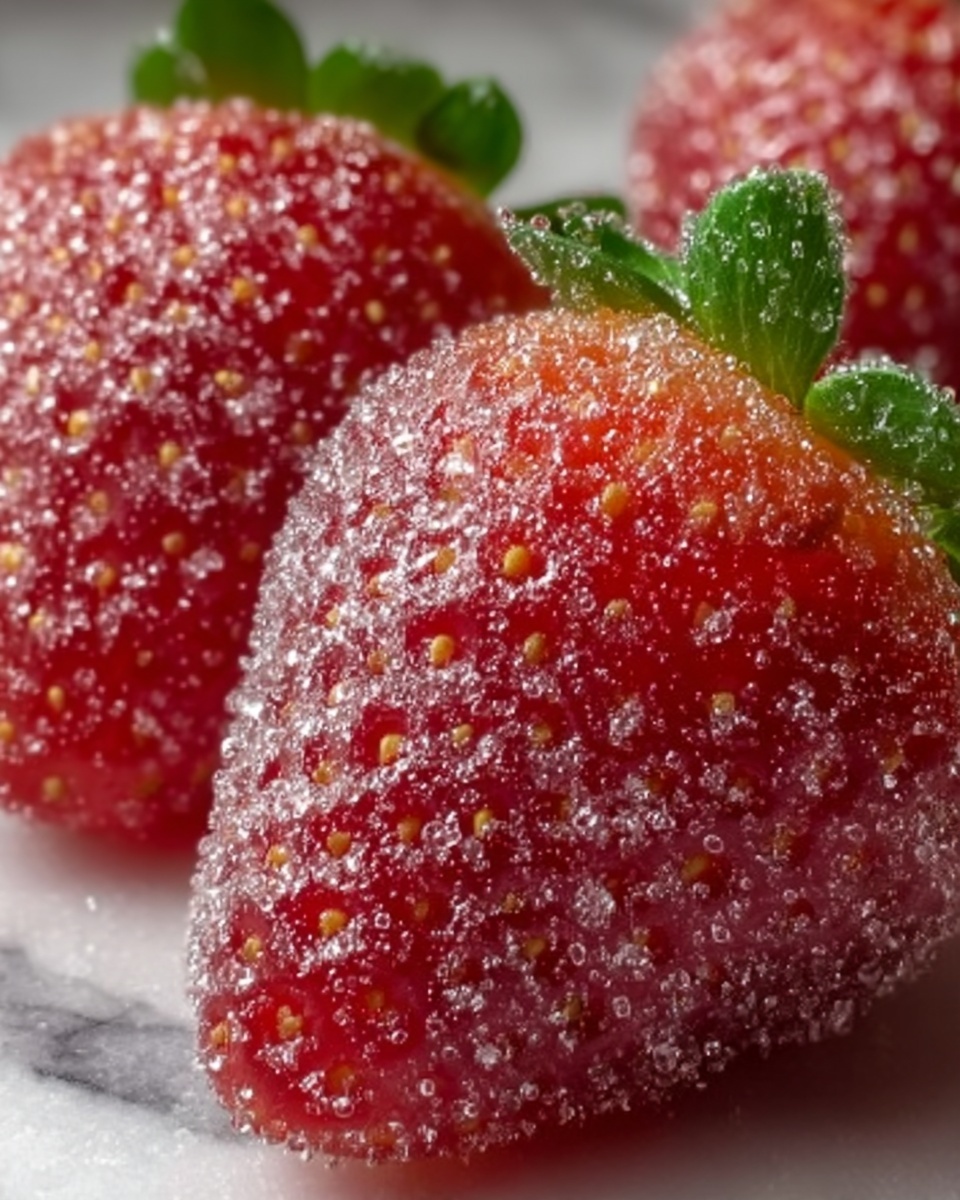
If you’re looking for a whimsical and delightfully sweet treat to brighten up any gathering or just to enjoy as a personal indulgence, the Rock Candy Sugar-Coated Strawberries Recipe is an absolute must-try. This recipe transforms fresh, juicy strawberries into sparkling gems coated with crunchy, colorful rock candy, combining natural fruitiness with a captivating crunch. It’s simple, fun, and a guaranteed crowd-pleaser that brings joy to every bite.
Ingredients You’ll Need
This recipe calls for a handful of simple but essential ingredients, each playing a vital role in creating the perfect balance of sweetness, texture, and eye-catching color that makes these strawberries so irresistible.
- Fresh strawberries: Choose firm, ripe strawberries with their green stems intact to make dipping and serving easier while ensuring freshness and sweetness.
- Granulated sugar: A base coating that blends beautifully with the rock candy to help everything stick and adds that classic sugary burst.
- Rock candy: Crushed or in small pieces, this colorful candy provides the signature crystalline crunch and bright pops of color.
- Water: Just a touch helps the sugar and rock candy mixture adhere evenly to the strawberry surface.
- Vanilla extract (optional): Adds a subtle layer of flavor that complements the fruitiness without overpowering it.
- Wooden skewers or toothpicks (optional): Perfect for dipping and handling the strawberries without making a sticky mess.
How to Make Rock Candy Sugar-Coated Strawberries Recipe
Step 1: Prepare the Strawberries
Start by washing your strawberries thoroughly and drying them completely, since any moisture left on the surface can prevent the sugar coating from sticking. Keeping the green stems intact is key, not only for aesthetics but also to make dipping and eating easier and more fun.
Step 2: Crush the Rock Candy
If your rock candy pieces are large, gently crush them into smaller, bite-sized bits. This can be done by placing them in a resealable bag and pounding carefully with a rolling pin or by using a food processor for a faster method. The goal is to have crunchy bits that stick well without turning into powder, which ensures an appealing texture on your strawberries.
Step 3: Prepare the Sugar Coating
In a shallow bowl, mix together the granulated sugar and the crushed rock candy. Feel free to get creative here by mixing the colors for a multicolored sparkle effect or keeping them separate to dip strawberries into different vibrant layers. This combination provides both sweetness and a dazzling crunch texture that’s hard to resist.
Step 4: Coat the Strawberries
For easier handling, insert a wooden skewer or toothpick into the stem of each strawberry. Lightly dip each strawberry into water—this is the secret to helping the sugary coating stick beautifully without becoming soggy. Then, roll the strawberry in the sugar and rock candy mixture, pressing gently to ensure the coating adheres well over every inch.
Step 5: Set the Strawberries
Place your beautifully coated strawberries onto a parchment-lined tray or plate. Let them sit undisturbed for 10 to 15 minutes so the sugary coating can firm up and provide that satisfying crunch you’re aiming for. This short patience period makes all the difference in the final texture and presentation.
Step 6: Serve and Enjoy
Once the coating has set, your Rock Candy Sugar-Coated Strawberries Recipe is ready to dazzle. Serve them fresh at parties, dessert tables, or enjoy them as a sweet pick-me-up anytime you crave a little sparkle in your snack.
How to Serve Rock Candy Sugar-Coated Strawberries Recipe
Garnishes
To take these strawberries up a notch, sprinkle a light dusting of edible glitter or finely chopped fresh mint leaves around your serving plate. A small bowl of whipped cream or a drizzle of melted white chocolate complements the sweetness while adding a luxurious touch.
Side Dishes
Pair these dazzling strawberries with fluffy pancakes for brunch, a scoop of vanilla ice cream for dessert, or a crisp cheese platter for contrasting flavors and textures. Their sweet crunch works beautifully alongside creamy or savory items.
Creative Ways to Present
Imagine arranging your sugar-coated strawberries on a tiered dessert stand for a vibrant display or serving them in clear glasses layered with whipped cream for an elegant parfait effect. You can even skewer them with other fruits like grapes or pineapple chunks to create colorful fruit kabobs that everyone will love.
Make Ahead and Storage
Storing Leftovers
If you have any leftovers (though that’s unlikely!), store the strawberries in a single layer on a plate lined with parchment paper and loosely cover with plastic wrap. Keep them refrigerated and consume within a day to maintain freshness and the crunch of the sugar coating.
Freezing
Freezing is not recommended for this Rock Candy Sugar-Coated Strawberries Recipe, as the rock candy coating may become soggy and lose its delightful crunch when thawed. Fresh is definitely best!
Reheating
These strawberries are best enjoyed cold or at room temperature. Reheating is not necessary and will likely cause the sugar coating to melt or become sticky, detracting from the intended texture and appearance.
FAQs
Can I use frozen strawberries for this recipe?
It’s best to use fresh strawberries because frozen ones contain excess moisture that can prevent the sugar coating from sticking properly and may make the candy coating soggy.
What if I can’t find rock candy in stores?
Try looking in specialty candy shops or online—rock candy is often available in various colors and sizes. If unavailable, coarse sugar crystals can be a substitute, but the signature crunch and colors might not be as vibrant.
Can I make this recipe without using water?
Water is key to helping the sugar and rock candy stick to the strawberries. Without a light water dip, the coating may fall off more easily once dry.
How long will these sugar-coated strawberries stay fresh?
For optimal flavor and texture, enjoy them within a day of making. The candy coating loses its crunch and the strawberries may soften if stored longer.
Are there flavor variations I can try?
Absolutely! Adding a few drops of almond or lemon extract instead of vanilla can give an interesting twist. You can also experiment with different colored rock candies to match seasonal themes or parties.
Final Thoughts
There’s something truly magical about biting into a strawberry encrusted with sparkling, crunchy rock candy, and this Rock Candy Sugar-Coated Strawberries Recipe puts that magic right at your fingertips. Whether you’re crafting a special treat for friends or a playful snack to brighten your day, this recipe invites you to create a feast for both the eyes and the taste buds. So go ahead, pick up some fresh strawberries and colorful rock candy, and let your sweet adventure begin!
Print
Rock Candy Sugar-Coated Strawberries Recipe
- Prep Time: 15 minutes
- Cook Time: 0 minutes
- Total Time: 40 minutes
- Yield: 12 servings
- Category: Dessert
- Method: No-Cook
- Cuisine: American
- Diet: Vegetarian
Description
Rock Candy Sugar-Coated Strawberries are a delightful and colorful treat perfect for parties, snacks, or dessert tables. Fresh strawberries are lightly coated with water and rolled in a vibrant mixture of granulated sugar and crushed multi-colored rock candy, creating a crunchy sugary shell that adds a burst of sweetness and texture to every bite.
Ingredients
Strawberries
- 1 pint fresh strawberries (about 12–16 strawberries)
Sugar Coating
- 1/2 cup granulated sugar
- 1/2 cup rock candy (in various colors, crushed or in small pieces)
- 1 tablespoon water
- 1/2 teaspoon vanilla extract (optional, for added flavor)
Extras
- Wooden skewers or toothpicks (optional)
Instructions
- Prepare the Strawberries: Wash and dry the strawberries thoroughly to remove any dirt or moisture. Make sure they are completely dry to ensure the sugar coating adheres properly. Leave the green stems intact, which will make handling easier in the next steps.
- Crush the Rock Candy: If your rock candy pieces are large, crush them into small bits by placing them in a resealable plastic bag and gently pounding with a rolling pin or using a food processor. The pieces should be small enough to coat the strawberries evenly but not powdered.
- Prepare the Sugar Coating: In a shallow bowl, combine the granulated sugar with the crushed rock candy. Stir well to mix the colors evenly, or keep them separate if you prefer to layer colors on the strawberries for a vibrant, multi-colored effect.
- Coat the Strawberries: For easier dipping, optionally insert a wooden skewer or toothpick into each strawberry’s stem. Lightly dip each strawberry into the tablespoon of water, just enough to moisten the surface and help the sugar mixture stick. Then roll the strawberry thoroughly in the rock candy sugar mixture, pressing gently so the candy adheres well and forms a full coating.
- Set the Strawberries: Place the coated strawberries on a parchment paper-lined tray or plate. Allow them to set for 10 to 15 minutes at room temperature so the candy coating can firm up and harden slightly.
- Serve and Enjoy: Once set, the Rock Candy Sugar-Coated Strawberries are ready to serve. Enjoy them as a sweet snack, a colorful party treat, or as a fun addition to any dessert spread.
Notes
- Ensure strawberries are completely dry before dipping to help the sugar coating stick better.
- Use various colored rock candy for a more visually appealing result.
- Vanilla extract is optional but adds a nice subtle flavor to the coating.
- Wooden skewers or toothpicks make dipping easier and create cute presentation options for serving.
- This recipe is best enjoyed fresh to maintain the crisp candy coating.


